
You have a busy sales rep looking at an Opportunity record, trying to remember when the next meeting is, what demo dates are booked, and when the contract is expected to close.
They click into Activities, open separate tabs, and jump to the Calendar app all just to see a simple date schedule for this one deal. It’s slow, confusing, and you lose context every time you switch pages.
A better way is to show a calendar directly on the record page, tied to that specific Opportunity, Account, or Case. When the rep opens the record, they instantly see all related events, follow-ups, tasks, and key milestones in one view.
No more hunting through different screens. This is what a calendar on a Lightning record page can do for your CRM.
Imagine a B2B sales team managing 500 long-running opportunities, each with multiple meetings, demos, and internal review calls.
If each opportunity record had its own embedded calendar showing events from Events, Tasks, or custom scheduling objects, reps would spend more time selling and less time clicking.
In this article, I’ll show you 3 ways to add a calendar to the Record Page in Salesforce.
Method 1 – Use an AppExchange Calendar Component (No-Code)
Use this method if you want a quick, no-code solution and don’t want to build custom code yourself. This fits best when you need a visual calendar for standard objects like Opportunity, Account, or Contact that your whole team can use.
Here I’ll use an example like AnyCalendar (a typical AppExchange calendar component) on the Opportunity record page.
The scenario: a sales team tracks all meetings and demos for each Opportunity and wants them visible on the record page calendar.
Step 1: Install a Calendar App from AppExchange
- Go to Salesforce AppExchange from the gear icon → Setup → type AppExchange Marketplace in Quick Find, then click it.
- In AppExchange, search for Anything Calendar or AnyCalendar.
- Open the app listing and follow the install steps for Production or Sandbox.
- During install, pick the correct profiles or permission sets that should access the app.

Step 2: Verify the Calendar Component in Lightning App Builder
- In Salesforce, click the gear icon → Setup.
- Go to Setup → User Interface → Lightning App Builder or just type Lightning App Builder in Quick Find.
- Open any existing Record Page (for example, Opportunity Record Page) and click Edit to confirm that the new calendar component appears under Custom or Custom – Managed.

Step 3: Add the Calendar to the Opportunity Record Page
- From the App Launcher (9-dot icon) → click View All → open the Sales app.
- Click the Opportunities tab and open an Opportunity, for example United Oil Office Portable Generators.
- On the record page, click the gear icon → Edit Page.
This opens the Lightning App Builder for that record page. - In the left panel under Components → Custom or Custom – Managed, locate the AnyCalendar (or similar) component.
- Drag and drop the AnyCalendar component into the page layout region where you want the calendar to appear, for example below the Activity or Details tab.

Step 4: Configure the Calendar Component
Most AppExchange calendar components have some configuration options:
- With the calendar component selected, look at the right-side properties panel.
- Choose the object to show events from (for example Event, Task, or a custom Meeting__c object).
- Set filters or list views so that only records related to the current Opportunity appear. Common options include:
- Filter by WhatId or WhoId (for Events and Tasks)
- Filter by a custom lookup field like Opportunity__c on a custom object
- Adjust view options like Month, Week, Day, and color coding.

Sample result
When a user opens United Oil Office Portable Generators Opportunity in the Sales app, they see a calendar showing all upcoming demos, internal review meetings, and customer calls connected to that Opportunity. They can click a date to open or create events, depending on the app features.How does this work?
The AppExchange component uses Lightning runtime and your org’s data to render a calendar that filters records based on the current record’s ID and the configuration you set in the properties. Because it’s installed as a managed package, you don’t need to write Apex or LWC; the app handles querying records, applying filters, and building the calendar UI.Pro Tip: When you use AppExchange calendar apps, always review license limits, profile access, and data sharing rules. For large orgs, test performance and sharing settings in a sandbox before going live on the production record page.
Method 2 – Build a Custom LWC Calendar Component
Use this method if you want full control over the calendar and are comfortable with Lightning Web Components (LWC) and Apex. This is ideal for complex scenarios, like a B2B team tracking custom Project_Schedule__c records per Opportunity.
In our scenario, each Opportunity has related Event records. We’ll build a simple LWC calendar that shows those events on the Opportunity record page.
Step 1: Create an Apex Class to Fetch Events
Navigate to Setup → Apex Classes or open Developer Console. Create a new Apex class named OpportunityCalendarController:
public with sharing class OpportunityCalendarController {
    @AuraEnabled(cacheable=true)
    public static List<CalendarEventWrapper> getEventsForOpportunity(Id opportunityId) {
        List<Event> events = [
            SELECT Id, Subject, StartDateTime, EndDateTime, Description
            FROM Event
            WHERE WhatId = :opportunityId
            ORDER BY StartDateTime ASC
        ];

        List<CalendarEventWrapper> results = new List<CalendarEventWrapper>();
        for (Event e : events) {
            results.add(new CalendarEventWrapper(
                e.Id,
                e.Subject,
                e.StartDateTime,
                e.EndDateTime,
                e.Description
            ));
        }
        return results;
    }

    public class CalendarEventWrapper {
        @AuraEnabled public Id eventId;
        @AuraEnabled public String subject;
        @AuraEnabled public Datetime startDateTime;
        @AuraEnabled public Datetime endDateTime;
        @AuraEnabled public String description;

        public CalendarEventWrapper(Id eventId, String subject, Datetime startDateTime,
                                    Datetime endDateTime, String description) {
            this.eventId = eventId;
            this.subject = subject;
            this.startDateTime = startDateTime;
            this.endDateTime = endDateTime;
            this.description = description;
        }
    }
}
Sample output
For an Opportunity with three meetings, the LWC will receive a list of wrapper records like:
- Discovery Call – 2026-07-20 10:00 to 11:00
- Demo Session – 2026-07-22 15:00 to 16:00
- Commercial Review – 2026-07-25 09:30 to 10:30
How does this work?
The Apex class uses SOQL to query Event records where WhatId equals the current Opportunity’s Id. It then converts each Event into a CalendarEventWrapper that is safe to expose to LWC using @AuraEnabled. The LWC calls this method and gets a structured list of event data ready to render.Pro Tip: Be mindful of SOQL governor limits. If you plan to support many events per Opportunity, consider adding filters like StartDateTime ranges or limits, and always mark the method as cacheable when data doesn’t change on every load.
Step 2: Create the LWC JavaScript and HTML
In VS Code with Salesforce Extensions or in your preferred setup, create a new LWC named opportunityCalendar.
opportunityCalendar.js
import { LightningElement, api, wire } from 'lwc';
import getEventsForOpportunity from '@salesforce/apex/OpportunityCalendarController.getEventsForOpportunity';

export default class OpportunityCalendar extends LightningElement {
    @api recordId; // Lightning passes the current record Id
    events = [];
    error;

    @wire(getEventsForOpportunity, { opportunityId: '$recordId' })
    wiredEvents({ data, error }) {
        if (data) {
            this.events = data;
            this.error = undefined;
        } else if (error) {
            this.error = error;
            this.events = [];
        }
    }

    get hasEvents() {
        return this.events && this.events.length > 0;
    }
}
opportunityCalendar.html
<template>
    <lightning-card title="Opportunity Calendar">
        <template if:true={hasEvents}>
            <div class="calendar">
                <template for:each={events} for:item="event">
                    <div key={event.eventId} class="calendar-item">
                        <p><strong>{event.subject}</strong></p>
                        <p>
                            {event.startDateTime} – {event.endDateTime}
                        </p>
                        <p>{event.description}</p>
                    </div>
                </template>
            </div>
        </template>
        <template if:false={hasEvents}>
            <p class="slds-p-around_small">
                No scheduled events for this opportunity.
            </p>
        </template>
    </lightning-card>
</template>
Sample result
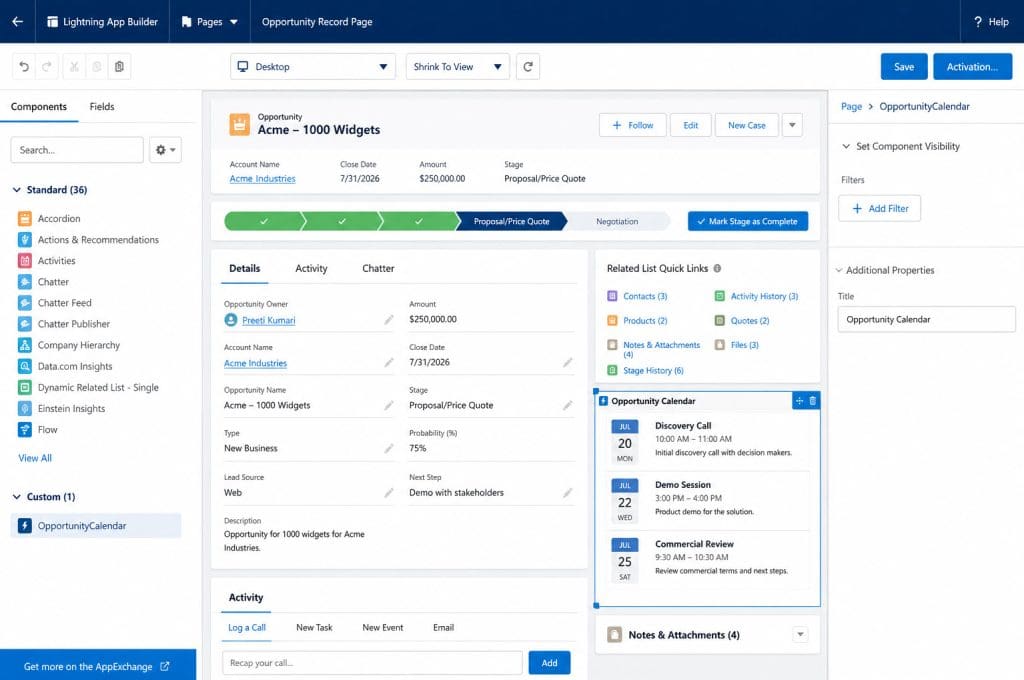
On the Opportunity page, users see a card titled Opportunity Calendar that lists each event with its subject, start/end dates, and description. You can enhance this to show a full calendar grid using libraries like FullCalendar JS, but this template proves the concept.How does this work?
The LWC uses the @wire adapter to call the Apex method getEventsForOpportunity, passing the recordId from the Lightning page. It stores the returned list in events and conditionally renders either a list of events or a friendly “No events” message. This approach is lightweight, responsive, and fully controlled by your code.Pro Tip: If you integrate a full calendar JavaScript library like FullCalendar, host static resources carefully and keep an eye on resource size and page load performance. Also confirm that your LWC API version supports the features you use.
Step 3: Expose the LWC to Record Pages
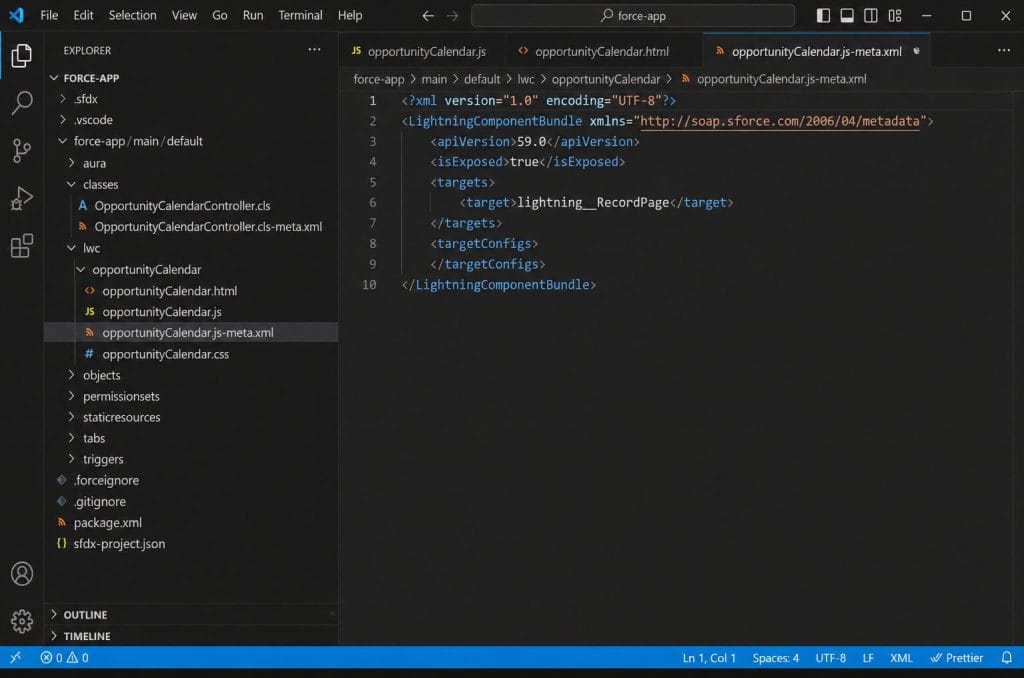
Update opportunityCalendar.js-meta.xml:
<?xml version="1.0" encoding="UTF-8"?>
<LightningComponentBundle xmlns="http://soap.sforce.com/2006/04/metadata">
    <apiVersion>59.0</apiVersion>
    <isExposed>true</isExposed>
    <targets>
        <target>lightning__RecordPage</target>
    </targets>
</LightningComponentBundle>
Deploy this component to your org.
Step 4: Add the LWC to the Opportunity Record Page
- Go to Setup → Object Manager → Opportunity → Lightning Record Pages.
- Click the record page you use (for example Opportunity Record Page), then click Edit.
- In the Lightning App Builder, search for OpportunityCalendar under Custom components.
- Drag it to the layout section where you want to see the calendar (for example under Activity).
- Click Save, then Activate.
- Use App Default → assign to Sales app.
- Choose Form Factor (Desktop and phone) and Profiles if needed.
Pro Tip: Test your LWC in a sandbox first. Check how it behaves with different profiles, sharing settings, and Opportunity volumes. For complex orgs, consider adding component visibility filters so only relevant users see the calendar.
Method 3 – Use Salesforce Object Calendar + Related List
Use this method if you prefer standard Salesforce features with minimal configuration and no custom code. It works well for teams who primarily use standard Events and Tasks and want a calendar linked to record data, but are okay with an indirect calendar mapping.
We’ll use Salesforce Calendar (object calendar) and relate it to Opportunities.
Step 1: Create an Object Calendar in Lightning Experience
- From anywhere in Salesforce Lightning, click the App Launcher → search for and open Calendar.
- On the Calendar page, click the gear icon → New Calendar or Add Calendar depending on your org version.
- Choose Object Calendar (standard option to create a calendar based on an object).
- Pick the Event object (or a custom scheduling object).
- Define a list view filter that only includes records relevant to your Opportunity workflow. You can filter by:
- WhatId is not null
- A custom status or type field
- Choose which date fields drive the calendar (for example StartDateTime and EndDateTime).
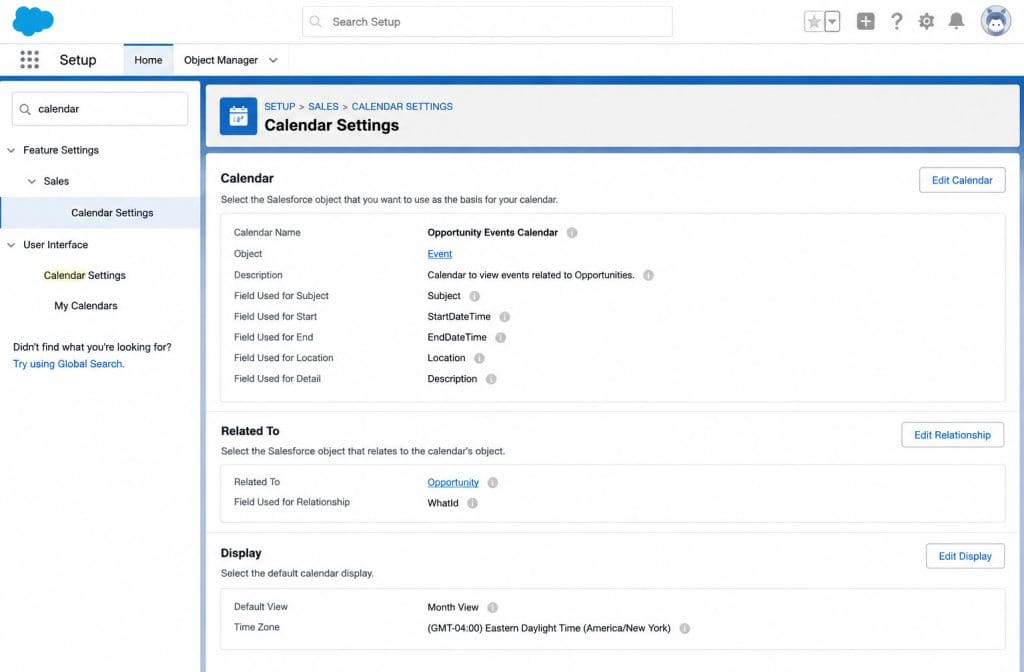
Sample configuration result
You now have a calendar named Opportunity Meetings that shows all Event records with valid Start/End DateTime values that match your filter. Sales managers can switch to this calendar to see an aggregated view of upcoming meetings.How does this work?
Salesforce Object Calendar lets you build a calendar from any object by using a list view as a filter and a date field for calendar entries. It doesn’t embed directly on the record page by default, but it gives you a powerful standard calendar that respects user permissions and sharing settings.Pro Tip: Creating object calendars is great for Managers who need a global view. Use sharing and roles carefully so that they see events for all reps without exposing sensitive records.
Step 2: Surface Calendar Context on the Record Page
To connect the record page experience with the object calendar, you can:
- Add Related Lists (for Events, Tasks, or custom scheduling objects) to the Opportunity record page.
- Use Quick Actions to create new events from the record page so those events automatically appear on the object calendar.
- In Setup → Object Manager → Opportunity → Page Layouts, ensure that Open Activities or Activity Timeline shows events that your calendar uses.
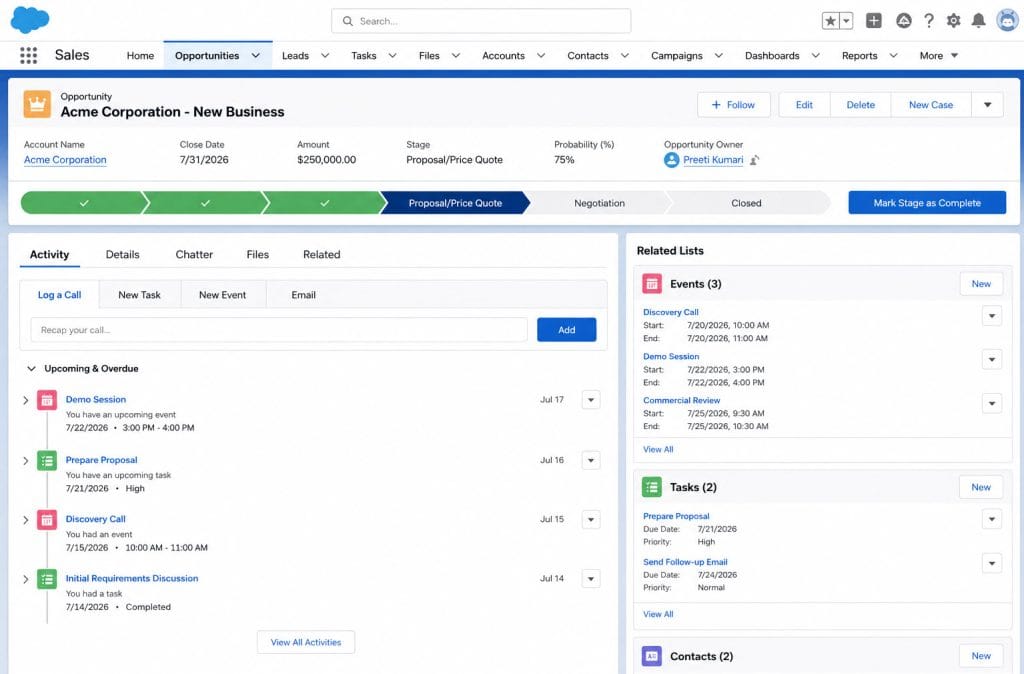
Sample result
When reps open the Opportunity record page, they see all related events in the Activity timeline and know these events also appear on the Opportunity Meetings calendar in the Calendar app. They switch views as needed but stay synchronized.How does this work?
This method doesn’t display a calendar UI directly on the record page, but it aligns your record activity data with an object calendar so the same events appear in both places. It’s quick to configure and uses standard features, so no deployment or Apex is required.Pro Tip: If you need a true, embedded calendar on the record page later, you can combine this approach with Method 1 or Method 2 so your custom calendar reads the same events your object calendar uses.
Things to Keep in Mind
- Check your Salesforce edition. Some AppExchange apps and advanced calendar features work only in Enterprise or above; Essentials and Professional may have limits.
- Mind Apex governor limits. For the LWC approach, limit SOQL queries and avoid querying large date ranges or unrelated records to protect performance.
- Use profiles and permission sets. Calendar components, Apex classes, and LWC must be visible to the right profiles or permission sets; otherwise, your users will see blank components or errors.
- Test in sandbox first. Always add new components, especially managed packages and custom LWCs, in a sandbox environment before deploying to production.
- Check API and LWC versions. Keep your Apex API version and LWC apiVersion aligned with your org; older versions may miss features or cause surprises after releases.
- Plan activation carefully. When you activate a new Lightning Record Page, confirm App, Form Factor, and Assignments so you don’t accidentally override layouts for users who shouldn’t see the calendar.
Frequently Asked Questions
Q1. Can I add multiple calendars to one record page?
Yes. Most AppExchange calendar components and custom LWCs allow multiple instances, provided you have enough page space. You can show different calendars for events, tasks, or custom objects on the same record page.
Q2. Do I need coding skills to add a calendar to a record page?
No, not always. Method 1 (AppExchange component) and Method 3 (object calendar plus related lists) are no-code or low-code. You only need Apex and LWC skills for Method 2.
Q3. Will the calendar respect sharing and security settings?
Yes. Standard calendars, AppExchange components, and LWCs using Apex all respect organization-wide defaults, role hierarchy, sharing rules, and field-level security.
Q4. Can I show calendars for custom objects?
Yes. AppExchange apps and custom LWCs can query custom objects. Salesforce Object Calendar also supports custom objects, as long as they have a date or date-time field.
Q5. How can I track changes and deployments for my calendar setup?
Use a sandbox for testing, change sets or source-driven development for deployment, and document your configuration in a central place like Salesforce Knowledge or your internal wiki.
Conclusion
You’ve seen three practical ways to add or connect a calendar to the Salesforce Lightning record page: a no-code AppExchange component, a custom LWC with Apex, and a standard object calendar combined with record activities.
Use the AppExchange method for speed, the LWC method for full control, and the standard calendar method when you want minimal configuration. I hope you found this article helpful.
What kind of calendar experience are you trying to build first: a simple no-code calendar from AppExchange or a custom LWC tailored to your sales process?
You may like to read:
- Use Salesforce Optimizer to Improve Your Org
- Salesforce Pop-Up Message on Record Page Using EvoluteMessage
- Calculate Business Days in Salesforce Using Apex
- Salesforce for Project Management: Complete Guide for Beginners
- Difference Between Salesforce and Salesforce Lightning

I am Bijay Kumar, the founder of SalesforceFAQs.com. Having over 10 years of experience working in salesforce technologies for clients across the world (Canada, Australia, United States, United Kingdom, New Zealand, etc.). I am a certified salesforce administrator and expert with experience in developing salesforce applications and projects. My goal is to make it easy for people to learn and use salesforce technologies by providing simple and easy-to-understand solutions. Check out the complete profile on About us.
