Every week, your sales reps upload new leads from different sources: web forms, events, and partner lists.
Half of these leads have messy Company names like “Acme Corp – Priority” or “Globex Inc (VIP)”, and you just want the first part for clean reporting and segmentation.
Your dashboards look confusing, and your filters don’t work well because values are inconsistent.
This is where the LEFT function in Salesforce helps you quickly extract the first few characters from a field so you can standardize, categorize, and report on data more easily.
You might use it to get the first 3 letters of a Lead Source, create a short code from an Account Name, or trim a long Campaign Name for a compact dashboard label.
Think of it as a simple text tool you can use in formulas, automation, and even SOQL. In this article, I’ll show you 4 ways to use the LEFT function in Salesforce.
What is the LEFT() Function in Salesforce
The LEFT function in Salesforce is a text function that returns a specific number of characters from the beginning (left side) of a text value or field.
You use it when you want only the first few characters of a field, such as Account Name, Phone, or Opportunity Name, instead of the full text.
Syntax
LEFT(text, num_chars)
- text – The text string or field you want to extract from (for example, Account.Name, Phone, or LeadSource).
- num_chars – The number of characters you want from the left side (e.g., 2, 3, 5).
Example
You have a Contact with Phone stored as:
+91-9876543210
You want to store only the first 3 characters of the phone number (+91) in a formula field called Area Code.
Formula
Create a Formula (Text) field on Contact and use:
LEFT(Phone, 3)
Result
For Phone = “+91-9876543210”, the formula returns:
+91
This same pattern works with any text field, for example:
LEFT(Account.Name, 4)
If Account Name is Acme Corp, the result is:
Acme
Method 1: LEFT Function() in Salesforce with Formula Field
Use this method if you want a no-code, always-up-to-date value on the record for reporting and page layouts. It works best when you need a derived text field, such as a short code or a prefix.
Step 1: Decide the Business Use Case
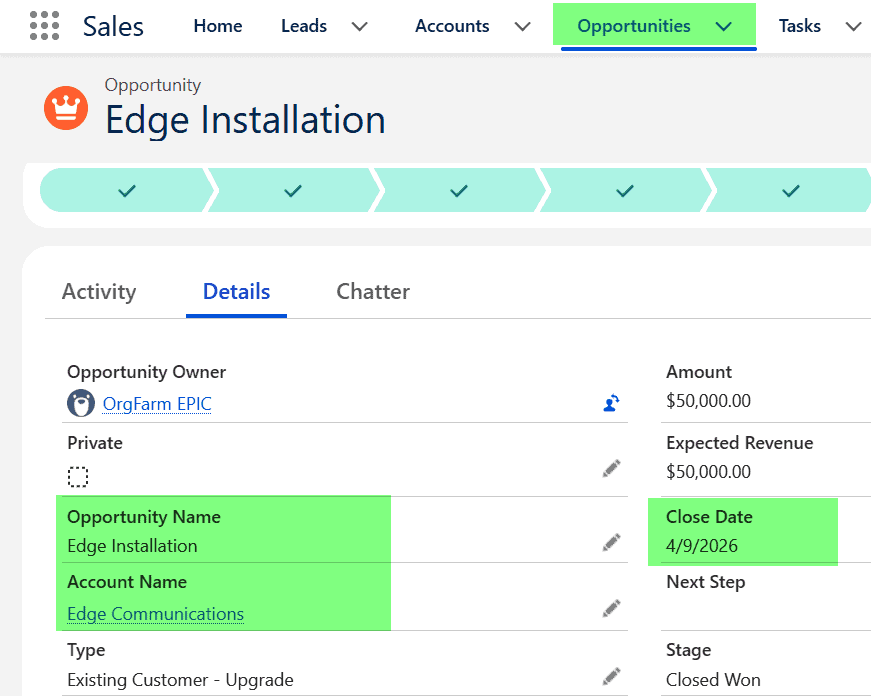
Let’s use a simple B2B scenario: your sales team manages 500+ Opportunities, and you want a short Opportunity Code that takes the first 4 letters of the Account Name plus the Close Date year.
Example:
- Opportunity Name: “Edge Installation”
- Account Name: “Edge Communications”
- Close Date: 15/08/2026
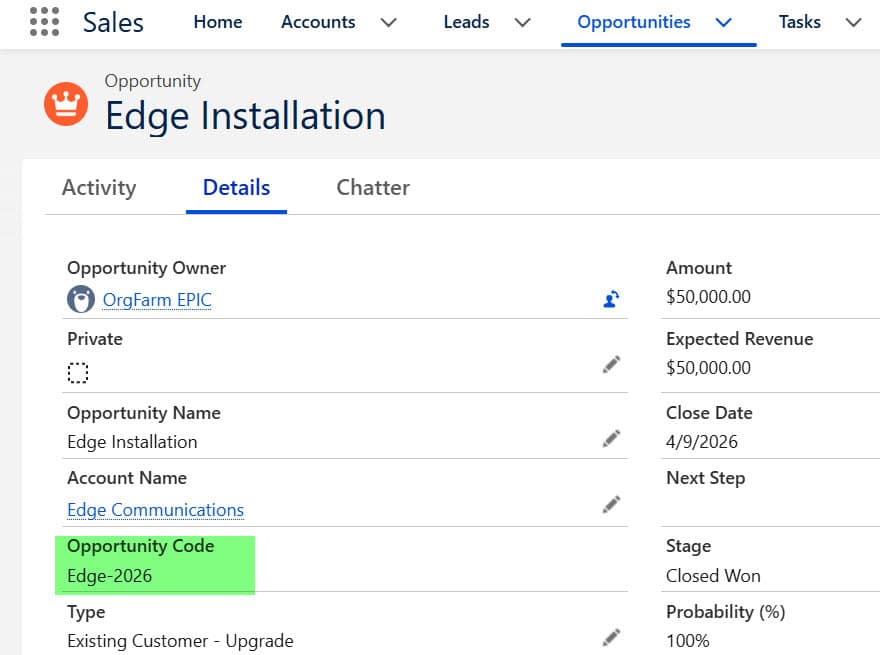
- Opportunity Code: “Edge-2026” [we will create the formula field for this result]
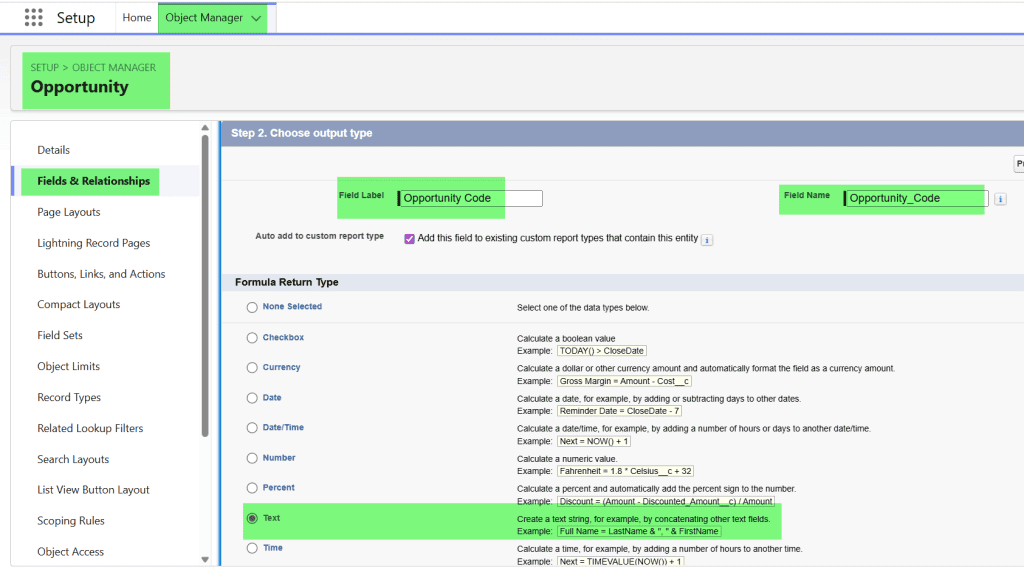
Step 2: Create a Custom Formula Field
- Go to Setup → Object Manager → Opportunity → Fields & Relationships.
- Click New.
- Select Formula as the field type.
- Enter Field Label as Opportunity Code and let Salesforce auto-generate the API name.
- For Return Type, choose Text.
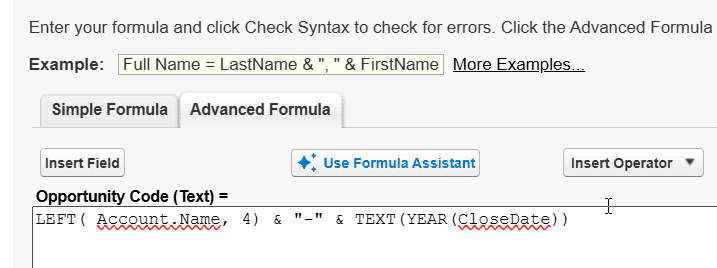
Step 3: Write the LEFT Function Formula
In the formula editor, use:
LEFT(Account.Name, 4) & "-" & TEXT(YEAR(CloseDate))
Sample output for an Opportunity with Account Name “Acme Technologies” and Close Date 04/09/2026:
Acme-2026
How does this work?
- LEFT(Account.Name, 4) takes the first 4 characters from the Account Name.
- YEAR(CloseDate) extracts the year from the Close Date.
- TEXT(…) converts the year to text so you can join it.
- & “-” & joins the pieces with a dash in the middle.
Pro Tip: Keep the number of characters small (3–6) so your formula field stays readable on list views and reports. Large text fields can make report groupings harder to scan.
Step 4: Add Field-Level Security for Fields
- In this step, establish “Field-Level Security“. Choose the profiles to which we wish to grant field-level security edit access to this field. If field-level security is not added, the field will be hidden from all profiles.
- As I want it to be visible to all profiles, I have checked the “Visible” checkbox in this instance. After that, click the “Next” button located at the top.
Step 5: Add Field to Page Layout
- Add the custom field to the “Page Layout“ after setting up the field-level security. Pick the page layout that includes this field. If we do not select a layout, the field will not appear on any pages.
- To save the formula field, click the “Save” button.
Method 2: Use LEFT() Function in Salesforce Validation Rule
Use this method when you want to enforce data quality based on the first characters of a field. It fits best when you need to block bad data entry or enforce a naming convention.
In the same B2B scenario, you decide that all Opportunity Name values must start with the first 3 letters of the Account Name. This keeps names consistent, such as “ACM-New Implementation” or “GLO-Renewal FY26”.
Step 1: Define the Naming Pattern
Pattern:
- First 3 characters of Account Name
- A dash (
-) - Short description
Example:
- Account: “Acme Corp” → Valid Opportunity Name: “Acm-New Deal”
- Account: “Globex Inc” → Valid Opportunity Name: “Glo-Renewal”
Step 2: Create a Validation Rule
- Go to Setup → Object Manager → Opportunity → Validation Rules.
- Click New.
- Enter Rule Name like Enforce_Opportunity_Name_Prefix.
- In Error Condition Formula, use:
NOT(
    BEGINS(
        Name,
        LEFT(Account.Name, 3) & "-"
    )
)
Set the Error Message to something clear, for example: Opportunity Name must start with the first 3 letters of Account Name followed by a dash.
Choose Error Location as Field: Opportunity Name.
Sample behavior:
- Account Name: “Acme Corp”
- Opportunity Name: “Acm-New Deal” → No error
- Opportunity Name: “New Deal for Acme” → Error shown
How does this work?
- LEFT(Account.Name, 3) takes the first 3 characters of the Account Name.
- LEFT(Account.Name, 3) & “-” builds the required prefix.
- BEGINS(Name, …) checks whether the Opportunity Name starts with the specified prefix.
- NOT(…) flips the result so the rule fires when the pattern is wrong.
Pro Tip: Always write a friendly error message. Users will adopt rules faster when they know exactly how to fix the problem rather than guessing why the save failed.
Method 3: Use LEFT() Function in Salesforce Flow (Record-Triggered)
Use this method if you want automation to update fields or create related records when data changes. It fits best when you want to avoid Apex but still use logic with formulas.
We will auto-fill a new Text field on Opportunity called Short Account Code using the first 5 characters of the Account Name whenever an Opportunity is created or updated.
Step 1: Create the Target Field
- Go to Setup → Object Manager → Opportunity → Fields & Relationships.
- Click New → choose Text.
- Set Field Label to Short Account Code.
- Set Length to 10 (enough for future changes).
- Click Next, set field-level security, and add it to the Opportunity page layout.
Step 2: Create a Record-Triggered Flow
- Go to Setup → Process Automation → Flows (or Setup → Flows in Lightning).
- Click New Flow.
- Choose Record-Triggered Flow.
- Set Object to Opportunity.
- Trigger the flow when a record is created or updated.
- Choose “Run the Flow” after the record is saved.
Step 3: Add an Assignment Element with LEFT
- From the Elements panel, drag an Assignment element into the canvas.
- Name it Set Short Account Code.
- In the Set Variable Values section, set:
- Variable: $Record.Short_Account_Code__c
- Operator: Equals
- Value: Use a Formula with the LEFT function.
The formula in the Flow formula builder:
LEFT($Record.Account.Name, 5)
Sample behavior:
- Account Name: “Acme Technologies” → Short Account Code: “Acme ” (with space as the 5th character)
- Account Name: “Globex” → Short Account Code:
"Globe"
How does this work?
- $Record refers to the current Opportunity record in the Flow.
- $Record.Account.Name reads the related Account Name.
- LEFT(…, 5) takes the first 5 characters and stores them in Short Account Code.
Pro Tip: In Flows, always handle null values. Add a Decision element before the assignment to check if AccountId is not blank. This avoids runtime errors when Opportunities don’t have an Account yet.
Method 4: Use LEFT() Function in SOQL and Apex
Use this method when you need advanced logic, want to work with large volumes of data, or need to integrate with external systems. It is best suited to developers building custom logic in Apex classes or Lightning components.
In the same scenario, your sales ops team wants to generate a nightly summary of Opportunities grouped by the first 3 letters of the Account Name and send it to a data warehouse via an integration.
Step 1: Use LEFT in a SOQL Query (String Method in Apex)
Salesforce SOQL does not support the LEFT() function directly, but you can simulate it in Apex using string methods after fetching the data.
In an Apex class, you can write:
public with sharing class OpportunityCodeService {

    public static List<String> getAccountPrefixesForOpenOpps() {
        List<Opportunity> opps = [
            SELECT Id, Name, Account.Name
            FROM Opportunity
            WHERE IsClosed = false
            LIMIT 500
        ];

        List<String> prefixes = new List<String>();

        for (Opportunity opp : opps) {
            if (opp.Account != null && opp.Account.Name != null) {
                String accountName = opp.Account.Name;
                Integer lengthToUse = Math.min(3, accountName.length());
                String prefix = accountName.substring(0, lengthToUse);
                prefixes.add(prefix);
            }
        }

        return prefixes;
    }
}
Sample output for open Opportunities with Accounts “Acme Corp”, “Globex Inc”, and “Zen Labs”:
["Acm", "Glo", "Zen"]
How does this work?
- The SOQL query returns Opportunity records with related Account Name.
- substring(0, lengthToUse) mimics LEFT(Account.Name, 3) by taking characters from index 0 to 2.
- Math.min(3, accountName.length()) ensures you never try to take more characters than exist, avoiding exceptions.
Pro Tip: When looping in Apex, keep governor limits in mind. Large queries should use Batch Apex or Queueable jobs rather than a single synchronous method, especially when dealing with thousands of records.
Things to Keep in Mind
- Handle short text values. If a field has fewer characters than you expect, your formula or Apex code should handle it gracefully to avoid errors or strange outputs.
- Watch for null values. Always check that related objects, such as Account, or fields, such as Name, are not blank before using LEFT in Flows or Apex.
- Profile and permission sets. Users need access to the fields and objects used by your LEFT formulas; otherwise, they will see blank values or errors on save.
- Sandbox first, then production. Create and test formula fields, validation rules, Flows, and Apex using a sandbox before deploying via change sets or DevOps tools.
- Edition limitations. Some automation features (such as Record-Triggered Flows) are not fully available or behave differently in the Essentials or Professional editions than in the Enterprise edition.
- API version and UI differences. LEFT formulas work the same across Classic and Lightning Experience, but navigation paths and menu labels may look different for admins and developers.
Frequently Asked Questions
The LEFT function takes a text value and returns the first N characters, where N is a number you specify, such as LEFT(Company__c, 3).
Yes, but you must convert them to text first using the TEXT function, for example LEFT(TEXT(Amount), 2) to get the first two characters of an Amount field.
You can use LEFT in report formula fields and row-level formulas, then use those fields to group, filter, or display short codes in your reports and dashboards.
No, SOQL does not support LEFT() as a built-in function. You fetch full values in SOQL and then mimic LEFT using Apex string methods like substring.
There is no fixed limit in the function itself, but keep field length and readability in mind. For most CRM use cases, 3–10 characters is usually enough.
Conclusion
You learned four practical ways to use the LEFT function in Salesforce with formula fields, validation rules, Flows, and Apex.
Use formula fields and validation rules for simple, declarative solutions; Flows for flexible automation without code; and Apex when you need full control and performance at scale. I hope you found this article helpful.
You may like to read:
- Salesforce Year Function
- Salesforce Formula Datetimevalue
- Lpad Function in Salesforce
- Salesforce Isnull Function
I am Bijay Kumar, the founder of SalesforceFAQs.com. Having over 10 years of experience working in salesforce technologies for clients across the world (Canada, Australia, United States, United Kingdom, New Zealand, etc.). I am a certified salesforce administrator and expert with experience in developing salesforce applications and projects. My goal is to make it easy for people to learn and use salesforce technologies by providing simple and easy-to-understand solutions. Check out the complete profile on About us.
