
When Salesforce first introduced Agentforce, one of my clients, a mid-size support team handling around 500 cases a month, asked me a simple question: “Where do we even start with Agentforce?”
They already used Service Cloud, Omni-Channel, and classic automation, but the idea of AI agents answering customers and assisting agents felt overwhelming.
If you’re in the same place, you’re not alone. Maybe you have some Flows, a few Apex classes, and even a working Omni-Channel setup, but Agentforce feels like a different world.
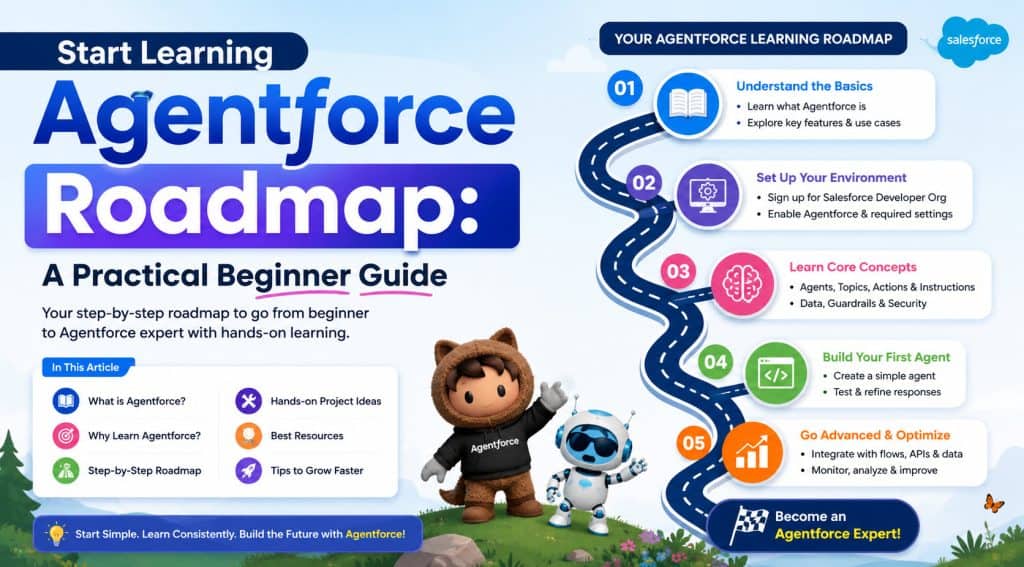
The good news is that you don’t need to learn everything at once. You just need a clear, practical Agentforce learning roadmap.
In this guide, I’ll walk you through a realistic, step-by-step path to start learning Agentforce from concepts to your first working AI agent, using examples from real projects.
Why You Need an Agentforce Roadmap
When you jump into Agentforce without a plan, you usually hit one of these problems:
- You start clicking around Agentforce Builder with no idea what to build.
- You create a demo that looks cool but has no real business value.
- You get stuck on data, permissions, or routing and give up.
A roadmap solves this by answering three questions:
- What should I learn first, second, and third?
- Which real business problems should I target?
- How does Agentforce connect with what I already know — Flows, Omni-Channel, Apex, Reports, and Slack?
If you want to see where Agentforce fits in different business areas, this post on Agentforce for Sales, Service, and Employee Support gives you a nice high-level view that complements this roadmap.
Step 1: Understand What Agentforce Really Is
Before touching any setup, you need a clear picture of what Agentforce actually does in a Salesforce org.
At a high level, Agentforce lets you build AI agents that can:
- Answer questions using your Salesforce data and knowledge.
- Guide users through processes.
- Trigger actions like creating, updating, or routing records.
Start with these key concepts:
- Agent: The AI “persona” that users interact with.
- Data Library: The set of objects, fields, and content the agent can access.
- Prompt Template: The instructions that shape how the agent responds.
- Custom Actions: The operations the agent can perform (for example, create a Case, update a Contact, escalate to support).

You can see how Agentforce actually solves business problems in this post: Real Business Problems You Can Solve with Agentforce.
Pro Tip: I’ve found that teams who start with “what can the agent do for our customers or employees” instead of “let’s try this new AI feature” get adoption much faster. Always start from a business scenario, not from the feature.
Step 2: Pick One Clear Use Case
You don’t need ten use cases on day one. You need one clear, focused scenario.
For example, for a support team:
- Let Agentforce answer “Where is my order?”, “How do I reset my password?”, “How do I update my address?” using existing Cases, Knowledge Articles, and FAQs.
- Let Agentforce create a new Case when it can’t solve the problem.
For a sales team:
- Let Agentforce summarize Opportunities and recent activities for an account executive before a call.
- Let Agentforce suggest next-best actions using existing fields and Reports.
This article on Agentforce for Sales, Service, and Employee Support has more ready-made scenarios you can adapt.
Once you pick your use case, write it down in one sentence. For example:
“Agentforce will help support agents quickly summarize cases, suggest responses, and create follow-up tasks for Product Issues.”
This sentence will drive your Prompt Templates, Data Library, and Custom Actions.
Step 3: Get the Org and Access Ready
Before you build, make sure your Salesforce org is ready for Agentforce and that you have the right access.
At a minimum, you should:
- Work in a Sandbox or Developer environment, not directly in production.
- Have the right permissions and profiles or permission sets to work with Agentforce.
If you’re new to identity and user access in Salesforce, this guide on Identity User in Salesforce gives a good foundation.
You’ll also want to:
- Ensure you can access Omni-Channel if you plan to route conversations. The article on Setting Up Omni-Channel in Salesforce will help you validate and configure that.
- Confirm you can sign in and access AI features in your org. This post on Access Einstein Copilot in Salesforce shows what access usually looks like.
Pro Tip: In my experience, most Agentforce projects slow down because of permissions, not AI. Get your permission sets and identity model clean early on so you don’t chase “access denied” errors in the middle of a demo.
- Salesforce Setup Home with the Agentforce or AI section highlighted.
- User detail page showing permission set assignments related to AI/Agentforce.
Step 4: Learn the Agentforce Basics in Your Org
Now you’re ready to open the actual tools and see Agentforce in context.
Explore Agentforce and Prompts
Start with the core UI elements:
- Agentforce Builder: Where you define agents, data, and actions.
- Prompts and Prompt Builder: Where you design the instructions and structure for the AI.
To go deeper into prompts, check out Prompts and Prompt Builders in Salesforce Agentforce. That post walks through how prompts shape your agent’s behavior and how to structure them.
If your use case depends on summarizing records for agents, this guide on Agentforce Record Summary Prompt Template is a great hands-on example.
- The Agentforce Builder home screen showing a list of agents.
- A Prompt Template screen with prompt text and variables visible.
Step 5: Build Your First Simple Agentforce Agent
Now we’ll walk through a simple, practical Agentforce agent build, using a support example.
Assume you have:
- A Case object with standard fields (Subject, Description, Status, Priority).
- A support team handling around 500 cases per month.
- Some basic routing already done via Omni-Channel.
5.1 Create an Agentforce Agent
At a high level, you will:
- Open Agentforce Builder.
- Click New Agent.
- Enter a name like “Support Triage Agent”.
- Assign the appropriate Data Library.
- Select where the agent will be available (for example, internal agents, Slack, or a support console).
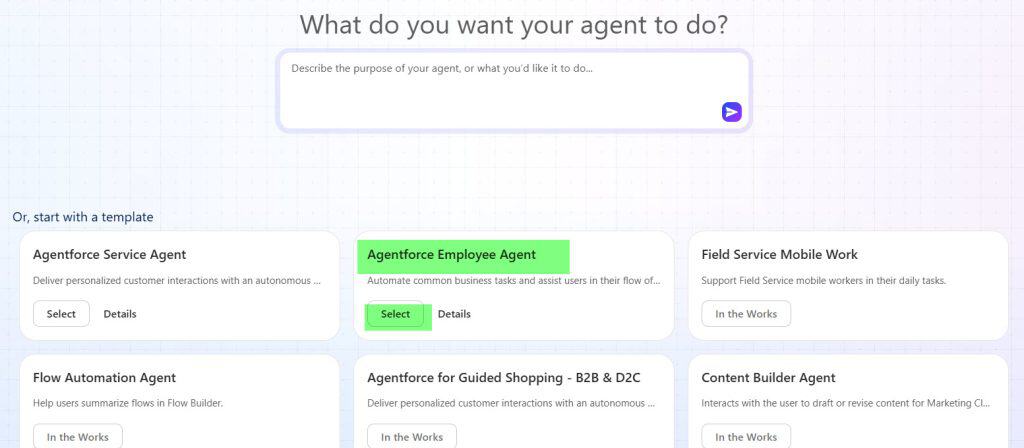
If you want a more guided approach specifically for employee-facing agents, this tutorial on Salesforce Create Agentforce Employee Agent walks you step by step.
- The New Agent creation screen with Name, Description, and channel options.
- The Agent configuration screen showing Data Library and actions.
Step 6: Connect Data with a Data Library
An Agentforce Data Library defines what data your agent can “see” and use to answer questions. For our support agent, that might include:
- Case records.
- Contact and Account records.
- Maybe Knowledge or FAQ content.
Typical steps include:
- Create or select a Data Library.
- Add relevant objects and fields.
- Assign that library to your Agentforce agent.
Pro Tip: I always start with fewer objects and fields, then expand. Too much data confuses the agent and makes troubleshooting harder. Start with Cases and one or two related objects, then evolve.
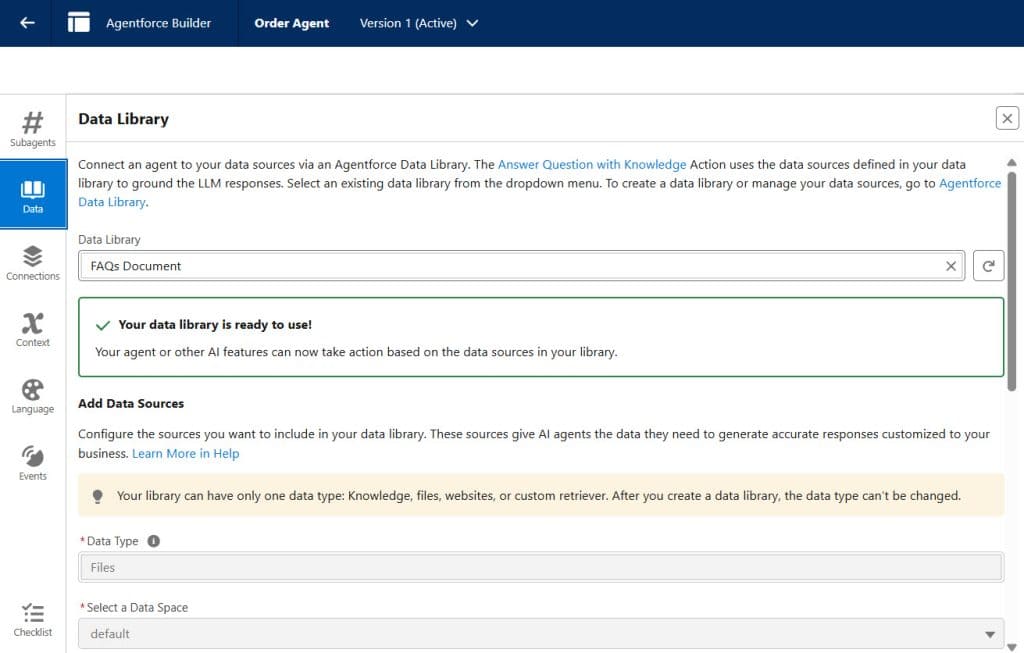
- Data Library configuration screen showing objects and fields.
- The agent’s Data Library assignment section.
Step 7: Design Useful Prompt Templates
Prompt Templates let you control how the agent behaves and responds. They’re just structured instructions for the AI.
For our support agent, we might use a Record Summary Prompt Template that:
- Summarizes the Case.
- Highlights recent customer interactions.
- Suggests a recommended next step.
As you design your prompt:
- Explain the role (“You are a support triage assistant…”).
- Define the tone and level of detail.
- Specify what fields to focus on (for example, Subject, Description, Priority, Latest Case Comments).
- Add clear instructions for when the agent should ask for more context.
If you plan to route specific actions based on the prompt, you can reuse patterns from the Assign Prompt Template to Agent in Salesforce article.

- The Prompt Template editing page with the main instruction text.
- The Prompt assignment screen showing which agent uses which template.
Step 8: Add Custom Actions for Real Automation
A static, “read-only” agent that responds with text is nice, but the real power comes from Custom Actions.
Custom Actions let Agentforce:
- Create or update records.
- Call external APIs.
- Trigger Flows or other automation.
For our support agent, you might add actions to:
- Create a new Case when the issue is new.
- Add a Case Comment.
- Update Case Status or Priority.
Pro Tip: In my experience, you should keep initial actions simple — create or update one record at a time. Don’t build complex, multi-step automations in your first version. Instead, use Flow or Apex behind the scenes and let the agent trigger them.
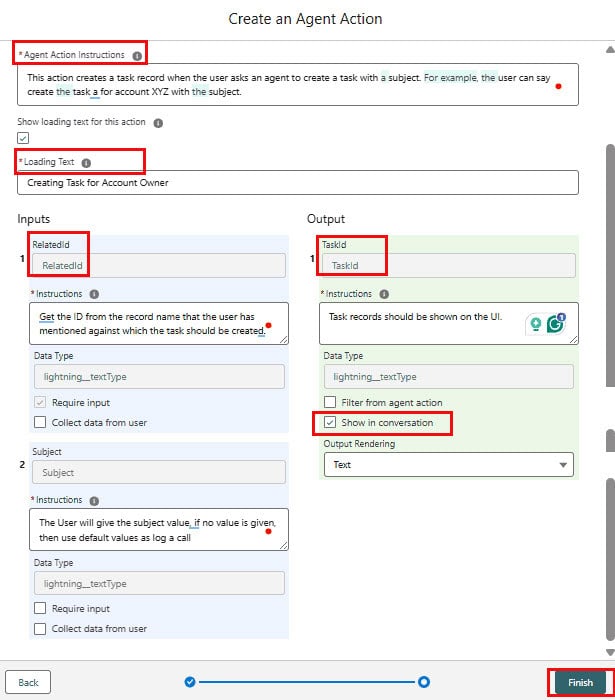
- Custom Action list for an agent.
- A Custom Action configuration screen showing action type and fields.
Step 9: Configure Routing and Handoffs
Agentforce does not live in isolation. It needs to work with your Omni-Channel or routing setup, and you must plan for AI-to-human handoffs.
For routing:
- Use this guide to configure routing:
Create the Routing Configuration in Salesforce - Then, connect that routing to your Agentforce experience with Inbound Omni-Channel flows:
Salesforce Agentforce Inbound Omnichannel Flow
Pro Tip: I always build and test the “transfer to human” path early. A great AI experience still fails if customers get stuck or dropped during handoff. Make sure your agents know when and how they’ll receive these escalations.
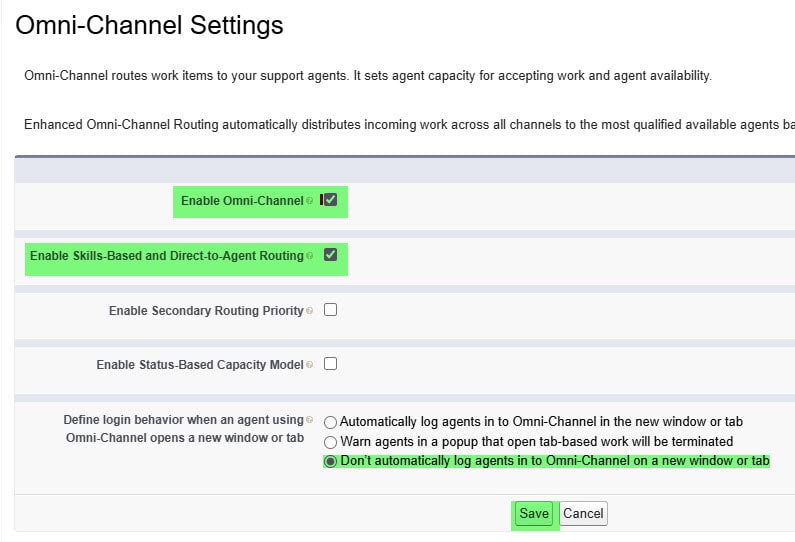
- Routing Configuration settings.
- A Flow or Omni-Channel configuration showing the AI-to-human transfer path.
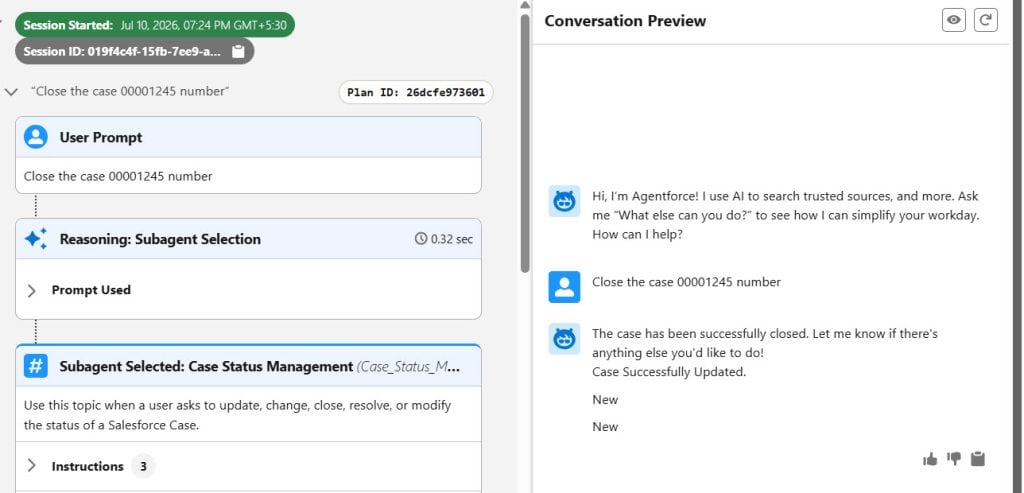
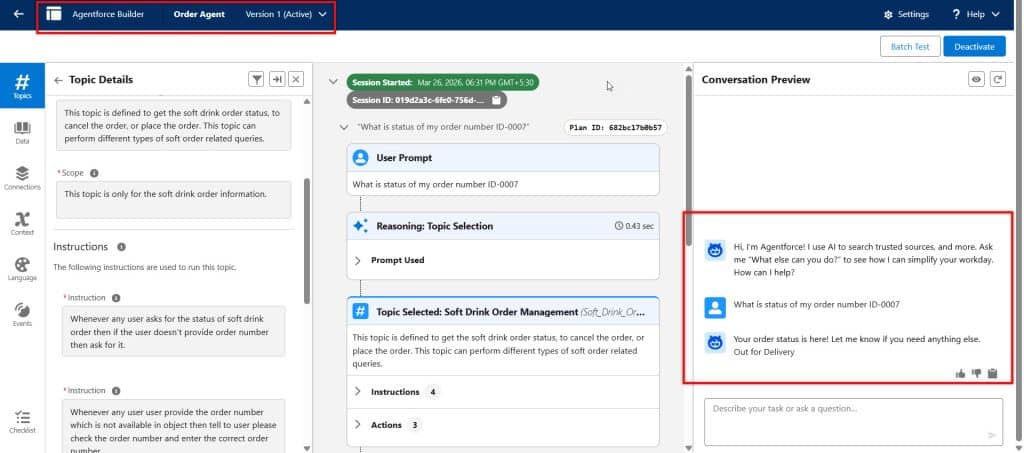
Step 10: Test Your Agent with Realistic Scenarios
Once your agent has data, prompts, and actions, it’s time to test.
Don’t test with random questions. Use realistic, previously handled cases. For a support example:
- “I want to change the shipping address on my last order.”
- “My order is late, can you check the status?”
- “I want to cancel my subscription.”
Use these steps:
- Run conversations through the agent in a sandbox.
- Check that the agent:
- Reads the right data.
- Suggests the right actions.
- Only performs actions when it should.
- When needed, refine prompts and data libraries.
- An Agentforce conversation transcript showing a realistic test.
- The debug or logs view, if available, to illustrate how you inspect behavior.
Step 11: Deploy Your Agent to Channels (Slack, Console, etc.)
Once you’re happy with your tests, you can deploy your agent to real channels.
Two common patterns:
- Deploy to Slack for internal users (sales or support teams).
- Deploy to a Service Console workspace for agents.

If your use case involves customer contact requests, you can connect with this setup:
Configure Customer Contact Requests in Salesforce
- Slack window showing the Agentforce app or conversation.
- Service Console view showing the agent panel.
Step 12: Add Branding and Personalization
Once things work, you can make the agent feel more “yours” by adding branding and personalization.
For personalization:
- Greet your agent users by name: Greet Agentforce Agent by Name
Branding helps with user trust, while personalization improves engagement and makes the agent feel less generic.
Pro Tip: I’ve seen adoption jump when we personalize responses with the user’s first name and use clear company branding. People trust the agent more when it “feels” like part of your company, not a generic AI bot.

- Agent branding settings showing logo and color.
- A conversation where the agent greets the user by name.
Step 13: Plan the Next Levels of Your Agentforce Learning
Once your first agent is live, your learning roadmap continues in stages.
Level 1: Foundation (You’ve already covered this)
- One agent in a limited use case.
- Basic prompts and data libraries.
- Simple custom actions.
Level 2: Multi-channel and Advanced Routing
- Add more channels with Omni-Channel.
Use Outbound Omni-Channel Flow in Salesforce to handle outbound routing patterns. - Build specialized agents for different queues (for example, Billing vs Technical Support).
Level 3: Developer-Level Customization
- Deep integration with Apex and APIs via custom actions.
Check Salesforce Agentforce Action Call External APIs. - Use advanced prompt patterns and tooling for summaries and complex workflows.
Level 4: End-to-end AI Experience
- Combine Agentforce with Flows and existing automation.
Articles like Avoid Validation Rules Using Salesforce Flow and Migrate Workflows and Process Builder to Salesforce Flow show how to keep underlying automation clean as AI triggers more processes. - Add monitoring and reporting (for example, measure agent impact on case resolution using Reports and Dashboards, such as Create a Revenue by Lead Report in Salesforce or Create an Open Cases by Owner Report in Salesforce, and adapt them for Agentforce metrics).
Suggested screenshots from Salesforce:
- A dashboard showing key AI or Case metrics.
- A Flow diagram that’s triggered from Agentforce actions.
Things to Keep in Mind
- Start with one use case: Don’t try to solve everything at once. One strong Agentforce use case beats five half-baked experiments.
- Keep Data Libraries focused: Give the agent only the data it needs. Too many objects or fields create noise and unpredictable answers.
- Design prompts intentionally: Treat Prompt Templates like code — version them, review them, and keep them simple and clear.
- Plan AI-to-human handoffs early: A great agent still fails if customers or employees get stuck when they need a human. Configure and test AI-to-human transfers first.
- Secure access with profiles and permission sets: Ensure only the right users and channels can trigger powerful actions. Combine Agentforce with good identity and access control.
- Monitor and iterate: Use Reports, feedback, and logs to see where the agent fails, and improve prompts, data, and actions over time.
Frequently Asked Questions
How do I start learning Agentforce if I’m new to AI?
Begin with a single, narrow use case and build one agent around it. Use resources like Agentforce for Developers in Salesforce and Agentforce for Sales, Service, and Employee Support to understand where Agentforce fits. Focus on basic prompts, a small Data Library, and one or two simple custom actions before you worry about advanced AI features.
Do I need to know Apex to use Agentforce?
No, you can build useful Agentforce agents without Apex by relying on Custom Actions and Flows. However, Apex becomes very helpful when you want to perform complex logic or call external systems, as shown in Custom Actions Using Apex for Agentforce. My advice is to start with no-code actions, then layer Apex where performance, control, or integrations demand it.
How does Agentforce work with Omni-Channel?
Agentforce fits naturally with Omni-Channel by handling certain interactions and then handing off to human agents when needed. Use Salesforce Agentforce Inbound Omnichannel Flow for inbound flows, and Outbound Omni-Channel Flow in Salesforce when you need proactive outreach. Always test your routing and handoff paths thoroughly before going live.
Can I deploy Agentforce to Slack for my internal teams?
Yes, you can deploy Agentforce agents directly to Slack to support internal teams like sales or support. Follow the Create and Deploy Slack Agent from Salesforce Slack to build the integration, and then Deploy Agentforce Agent to Slack to roll it out. This is one of the fastest ways to get user feedback on your early agents.
How do I control what data Agentforce can see?
You control what Agentforce can access through Data Libraries and your existing security model (profiles, permission sets, and record access). Start with Assign Data Library to Agentforce Agent to define and assign the right datasets. Always respect existing security rules and avoid granting broad access just for the agent.
What’s the best way to grow my Agentforce skills over time?
Think in stages: first build one agent, then add routing, more actions, and channel support. Use articles like Agentforce Transfer Request from AI to Human, Salesforce Agentforce Action Call External APIs, and Prompts and Prompt Builders in Salesforce Agentforce to deepen your understanding. Over time, combine Agentforce with strong Flow and Apex patterns to build full end-to-end AI-powered experiences.
Conclusion
You’ve now seen a complete Agentforce learning roadmap, from your first agent and data library to prompts, actions, routing, and deployment. Start small, focus on one real business use case, test with real data, and layer complexity only after your basic agent is stable and trusted. I hope you found this article helpful
You May Also Like
- Agentforce for Developers in Salesforce
- Salesforce Agentforce Inbound Omnichannel Flow
- Agentforce Transfer Request from AI to Human
- Custom Actions Using Apex for Agentforce
- Prompts and Prompt Builders in Salesforce Agentforce

Shubham is a Certified Salesforce Developer with technical skills for Building applications using custom objects, approval processes, validation rules, Salesforce flows, and UI customization. He is proficient in writing Apex classes, triggers, controllers, Apex Batches, and bulk load APIs. I am also familiar with Visualforce Pages and Lightning Web Components. Read more about me.
