Have you ever noticed that some support agents are overloaded with cases while others are sitting idle?
Imagine all your email cases, web-to-case requests, and phone support cases are mixed together in one place. One agent is handling 10 cases, while another has only 1.
Because of this, high-priority customer issues can remain in the queue for a long time, and agents don’t know which case they should work on next.
This is where Omni-Channel and Queue-Based Routing in Salesforce help.
In this step-by-step guide, you’ll learn how to set up Omni-Channel and Queue-Based Routing in Salesforce. By the end of this tutorial, you’ll have a fully working routing setup that automatically assigns cases from a queue to the right support agents.
What is Omni-Channel in Salesforce?
Omni-Channel is a Salesforce feature that automatically distributes work items to agents based on predefined routing rules. Instead of allowing agents to manually choose records, Salesforce decides which agent should receive the next work item.
Omni-Channel supports many Salesforce records and channels, including:
- Cases
- Leads
- Chats
- Messaging Sessions
- Voice Calls
- Work Orders
- Custom Objects
The routing decision depends on several factors, such as:
- Agent availability
- Agent capacity
- Routing model
- Queue priority
- Skills (if Skill-Based Routing is enabled)
This ensures that work is assigned fairly and that agents are not overloaded with too many records.
What is Queue-Based Routing in Salesforce?
Queue-Based Routing is one of the routing models available in Omni-Channel.
In this routing method, work items are first stored inside Salesforce Queues. Omni-Channel continuously monitors these queues and automatically assigns records to available agents based on your routing configuration.
For example, imagine your company has two support teams.
Technical Support Queue
- Login Issues
- API Errors
- Integration Problems
Billing Support Queue
- Refund Requests
- Invoice Questions
- Payment Failures
Whenever a customer creates a technical support case, Salesforce automatically places it into the Technical Support Queue. Omni-Channel then checks which technical support agent is available and immediately assigns the case to that agent.
The support agent doesn’t need to search for or manually claim the case. Salesforce automatically delivers the work item to the right person.
How Does Omni-Channel Queue-Based Routing Work?
The routing process is simple once all configurations are complete.
- A customer creates a Case. This can happen through:
- Email-to-Case
- Web-to-Case
- Manual Case Creation
- API
- Flow
- Apex
- Salesforce places the Case into the appropriate Queue.
- Example:
- Technical Queue
- Billing Queue
- Sales Queue
- Example:
- Omni-Channel monitors all configured queues.
- Salesforce checks:
- Which agents are Online?
- How much capacity does each agent have?
- Which routing configuration should be used?
- The next available agent automatically receives the Case.
- The agent simply accepts the work item and starts helping the customer.
- This entire process happens within seconds without any manual assignment.
Why Use Omni-Channel with Queue-Based Routing?
Using Omni-Channel provides many benefits for support teams.
- Automatic Case Assignment
- Salesforce automatically assigns records, eliminating the need for managers or agents to manually distribute work.
- Balanced Workload
- Agents receive work according to their available capacity, preventing some agents from becoming overloaded while others remain idle.
- Faster Customer Response
- Cases are assigned immediately upon entering the queue, reducing customer wait times.
- Better Agent Productivity
- Agents spend more time resolving customer issues instead of searching for records.
- Improved Customer Satisfaction
- Customers receive faster responses because work is routed to the next available support representative.
- Easy to Scale
- As your support team grows, you can simply add more queues, routing configurations, and agents without changing the overall process.
Example of Queue-Based Routing
Let’s understand the process with a real-world example. Suppose your company sells laptops and provides customer support.
Customers can contact your company for different reasons.
| Customer Request | Assigned Queue |
|---|---|
| Laptop not starting | Technical Queue |
| Refund request | Billing Queue |
| Product inquiry | Sales Queue |
Now assume three support agents are online.
| Agent | Current Workload |
|---|---|
| Alex | 8 Cases |
| Jimmy | 2 Cases |
| John | Offline |
A new technical support case is created.
Since Jimmy has more available capacity than Alex, Omni-Channel automatically routes the case to Jimmy instead of Alex.
This ensures that work is distributed fairly across the team.
Set Up Omni-Channel & Queue-Based Routing in Salesforce
Follow the steps below to set up Omni-Channel and Queue-Based Routing in Salesforce.
Once the setup is complete, Salesforce will automatically route new cases from the queue to the next available support agent based on your routing configuration.
Step 1: Enable Omni-Channel
Go to Setup → Feature Settings → Service → Omni-Channel → Omni-Channel Settings.
- Check Enable Omni-Channel.
- If you see options like Route Work to Agents, keep them turned on.
- Click Save.
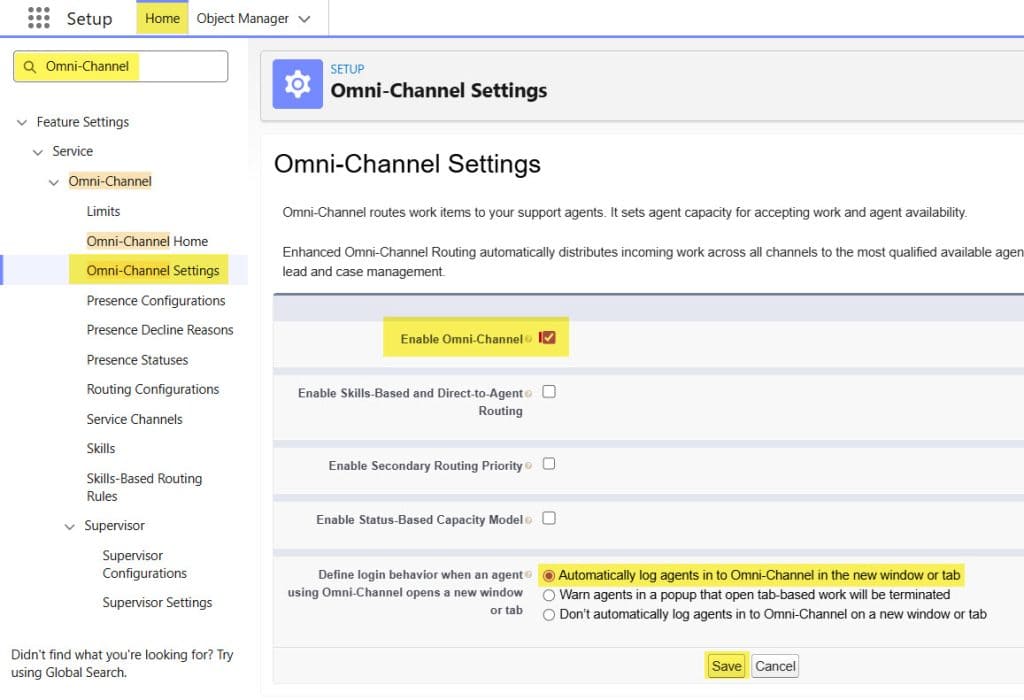
How does this work?
When you enable Omni-Channel, you switch on the routing engine in Salesforce. This lets Salesforce send work items (like Cases) to agents instead of agents having to manually pull them from a list.
Step 2: Create a Service Channel for Cases
Now tell Omni-Channel which object you want to route.
Go to Setup → Feature Settings → Service → Omni-Channel → Service Channels → New.
- Channel Type: Case
- Name: Support Cases
- Developer Name: auto-filled
- Click Save.
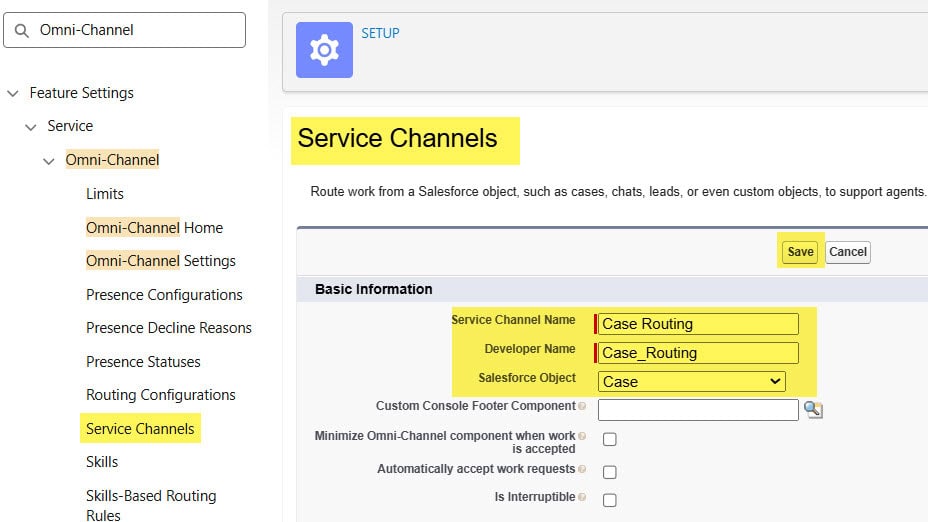
How does this work?
A Service Channel tells Omni-Channel that Cases are work items that can be routed. Any case that enters this channel becomes a piece of work that can be pushed to agents.
Step 3: Create a Routing Configuration
Next, define how Omni-Channel should route work.
Go to Setup → Feature Settings → Service → Omni-Channel → Routing Configurations → New.
- Routing Configuration Name: Standard Case Routing
- Routing Priority: 1 (1 means highest priority)
- Unit of Capacity: 2 (each case uses two units)
- Capacity Model: Least Available
- Click Save.
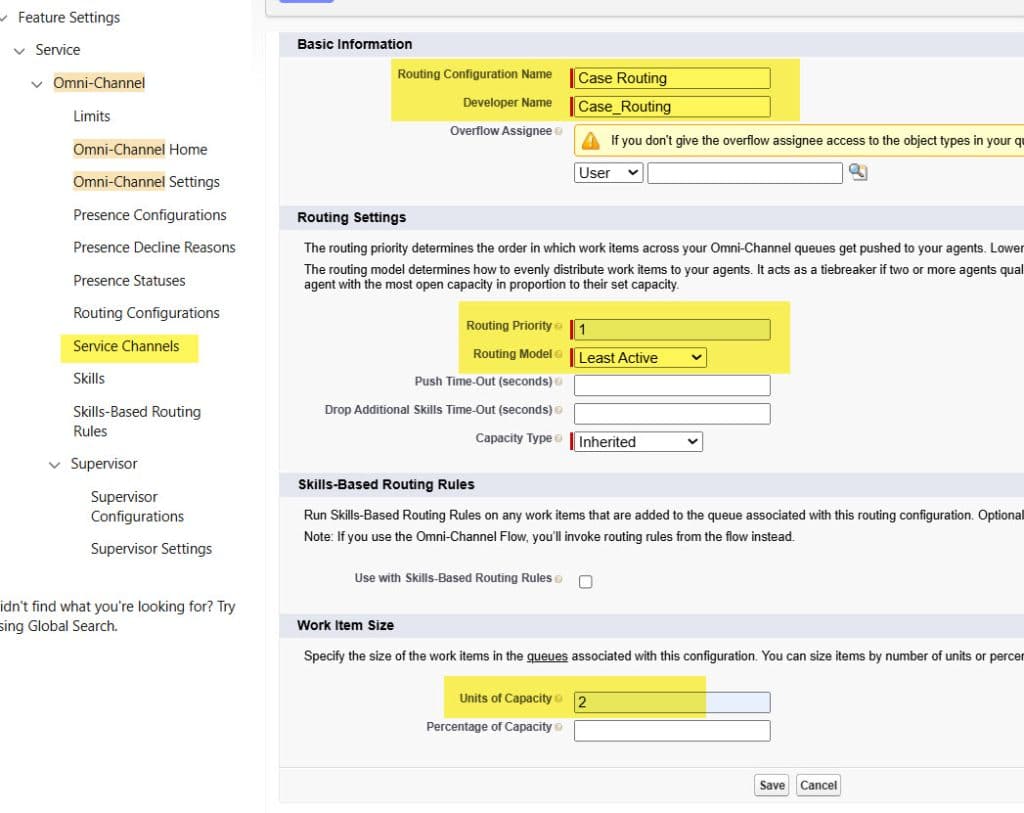
How does this work?
A Routing Configuration controls which work goes first and how many items each agent can handle. Most Available routes the next case to the agent with the most available capacity, helping balance workloads.
Pro Tip
Create a second routing configuration (e.g., Standard Case Routing – Normal) with a lower priority for non-urgent work. This way, high-priority cases always go out first.
Step 4: Create a Case Queue
Go to Setup → Users → Queues → New.
- Queue Label: High-Priority Cases
- Queue Name: auto-filled
- Find Routing Configuration.
- Select the Routing Configuration created in the above step.
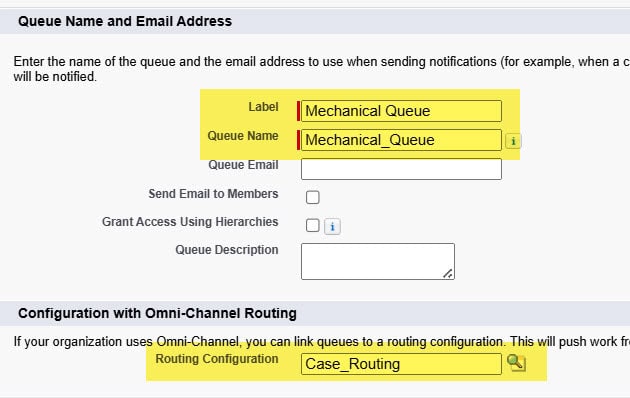
- Under Supported Objects, move Case to Selected.
- Under Queue Members, add:
- Users: your support agents
- (Optional) Public Groups: such as Support Team
- Click Save.
Pro Tip
The user you are adding to the queue should have Service Cloud User permission on the User Setup Page.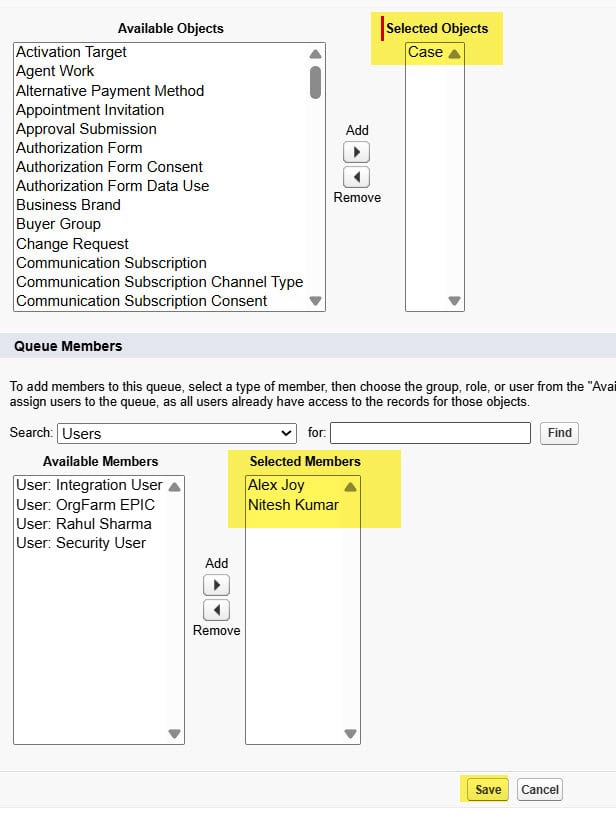
How does this work?
A Queue is a holding area for work. When a case is owned by a queue, it waits there for Omni-Channel to route it to an agent. Only members of the queue can receive that work.
Connecting a Queue to a Routing Configuration tells Omni-Channel how to handle work from that queue. Every case that enters High-Priority Cases will use the rules defined in Standard Case Routing.
Step 5: Make New Cases Enter the Queue
You now need new cases to go into the queue. For Web-to-Case:
- Go to Setup → Feature Settings → Service → Web-to-Case.
- Edit your web form settings.
- Set Default Case Owner to Mechanical Queue.
- Save.
For Email-to-Case:
- Open Email-to-Case Routing Addresses in Setup.
- For the email address used for urgent issues, set Case Owner to High-Priority Cases.
How does this work?
When a new case is created from the web or email, Salesforce sets the Owner to the queue. Omni-Channel then sees the case in the queue and treats it as a work item ready for routing.
Pro Tip
Use different queues for different channels or teams (e.g., Email Cases, Web Cases, Billing Cases) so you know exactly where each type of request is going.
Step 6: Create a Presence Configuration
Go to Setup → Feature Settings → Service → Omni-Channel → Presence Configurations → Create New Or Edit Default. Here I’m editing the default presence configuration
- Name: Support Team Presence
- Set Capacity (for example, 10).
- Click Save.
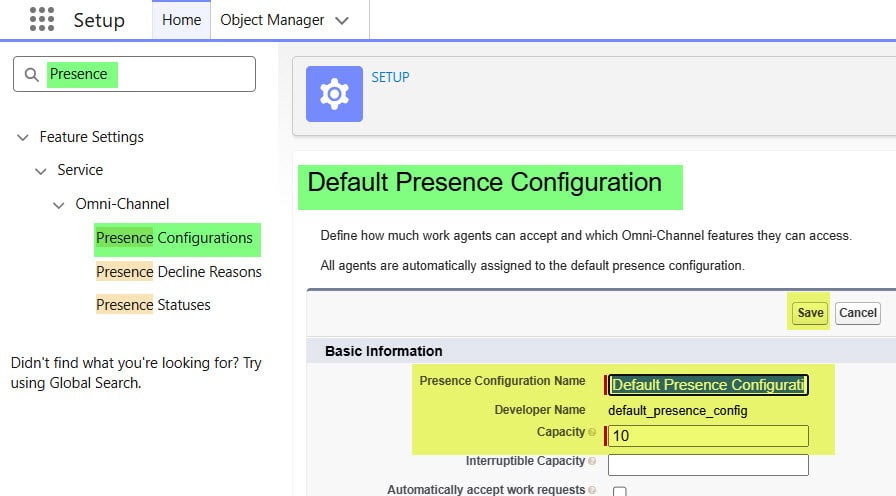
How does this work?
A Presence Configuration defines how many items an agent can handle simultaneously and which profiles can use Omni-Channel statuses. It’s the base for agent availability.
Step 7: Create a Simple Presence Status
Go to Setup → Feature Settings → Service → Omni-Channel → Presence Statuses → New.
- Status Name: Available – Cases
- Status Option: Online
- Under Channels, select the case channel (Support Cases).
- Click Save.
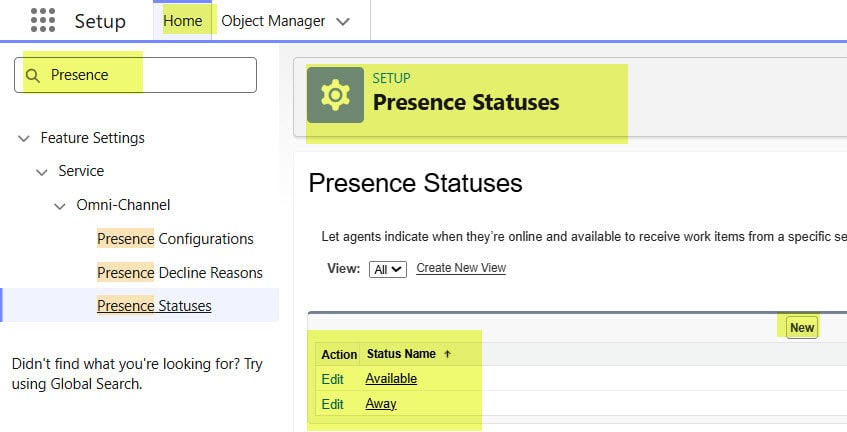
How does this work?
A Presence Status like Available – Cases is what agents choose in the Omni-Channel widget. Only agents with an “Online” status can receive routed cases.
Step 8: Give Profiles Access to Presence Statuses
Go to Setup → Users → Profiles → [Your Support Profile].
- Scroll to Enabled Service Presence Status Access.
- Click Edit.
- Move Available – Cases to Enabled Service Presence Statuses.
- Click Save.
How does this work?
This step lets users with that profile see and use the Available – Cases status. Without this, the status will not appear in the Omni-Channel widget, and routing will not work for them.
Pro Tip
Create one Available status per main channel (e.g., Available – Cases, Available – Chat) so agents can control what type of work they are ready to handle.
Step 9: Add Omni-Channel to the Service Console.
Go to Setup → Apps → App Manager.
- Look for Service Console (or your support console app).
- Click the dropdown arrow next to it.
- Click Edit.
- Click Utility Items (Desktop Only).
- Click Add Utility Item.
- Choose Omni-Channel from the list.
- Keep the default label or change it to something simple like Omni-Channel.
- Click Save.
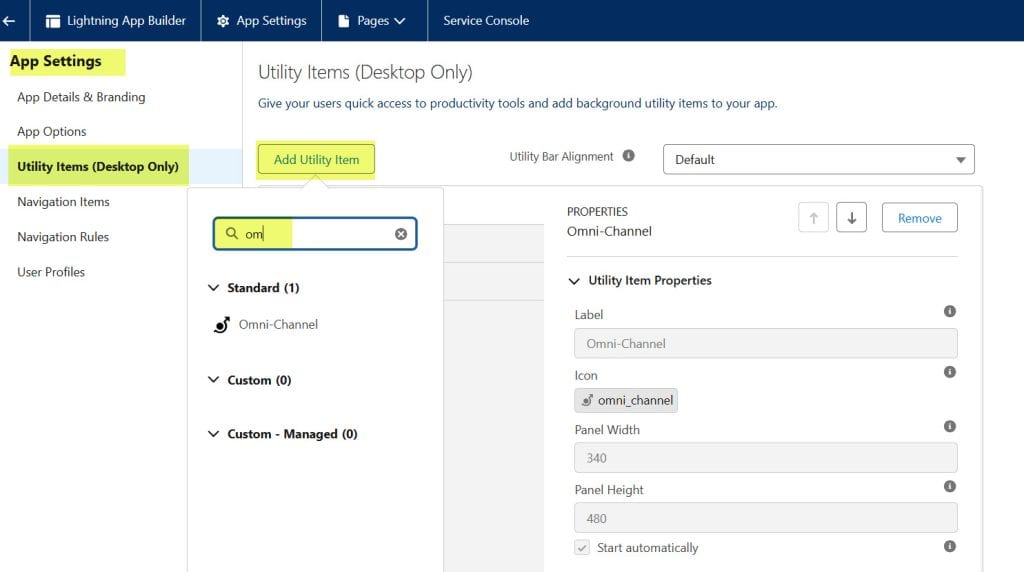
How does this work?
A Utility Item appears in the footer of the console. When you add the Omni-Channel utility, agents will see a panel at the bottom of the screen where they can change presence and accept incoming work.
Pro Tip
Pin the Service Console app for your support users and make it the default app, so they always open the console where Omni-Channel is ready.
Step 10: Open Service Console and Set Presence
Log in as the test user (or use Login As):
- Open Service Console from the App Launcher.
- Click the Omni-Channel icon in the footer.
- Change status to Available – Cases.
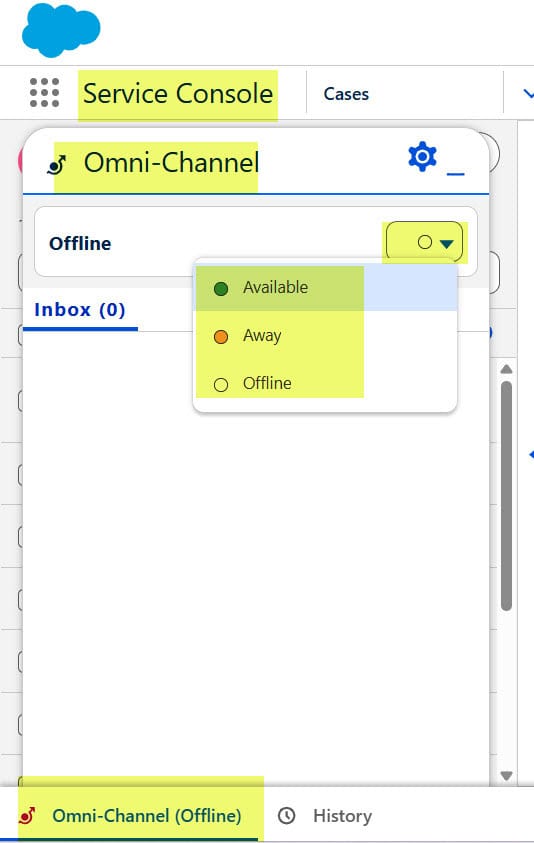
How does this work?
When the agent sets presence to Available – Cases, they are marked as ready to receive case work from Omni-Channel.
Step 11: Create a Test Case into the Queue
Create a new case:
- Go to App Launcher → Cases → New.
- Fill in the basic fields such as Contact Name, Subject, and Description.
- Set Owner to Mechanical Queue.
- Save the case.
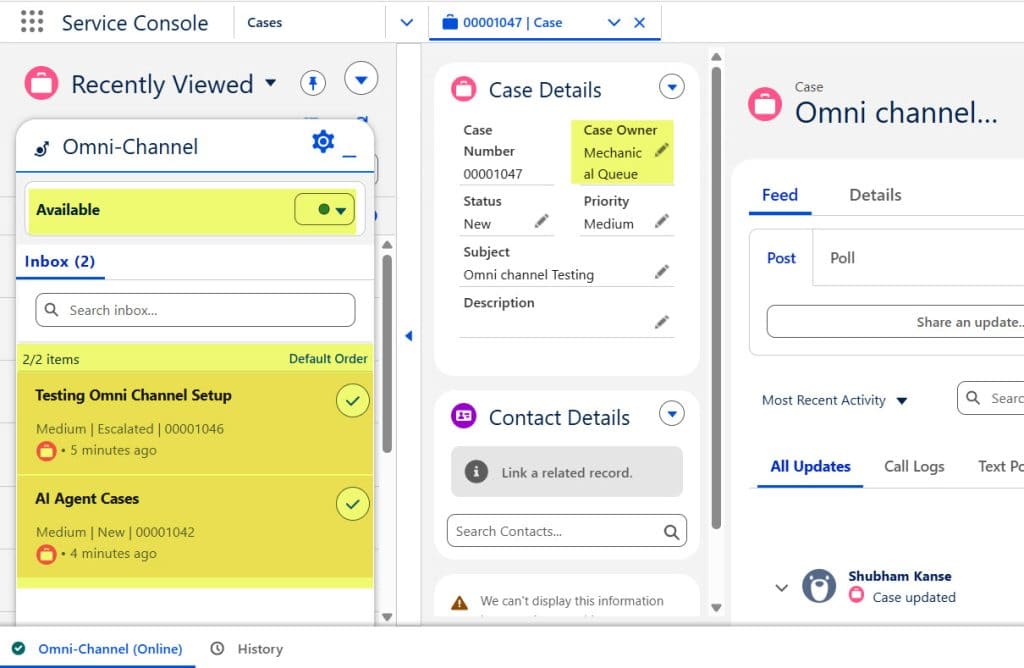
How does this work?
The case enters the High-Priority Cases queue, Omni-Channel checks the queue’s routing configuration, finds an available agent with the right presence, and pushes the case to that agent’s Omni-Channel panel.
Pro Tip
Always test with at least two agents—one Available – Cases and one Offline—so you can confirm that only available agents receive work.
Things to Keep in Mind
- Check your Salesforce edition
Omni-Channel is part of Service Cloud, and some features may not be available in lower editions. Confirm your licenses before you plan a big rollout. - Profiles and permission sets matter
If agents can’t see the console or Omni-Channel, it’s usually a profile or permission issue. Make sure they have access to Service Console, Presence Statuses, and Queues. - Sandbox first, production later
Always build and test your Omni-Channel setup in a sandbox. Once routing works well, move your changes to production using Change Sets or other deployment tools. - Watch limits when you add automation
If you use Flows or Apex triggers for case creation or ownership changes, keep the logic simple and monitor governor limits. Excessive processing during case creation can slow routing. - Keep names simple and clear
Use readable names for Queues, Routing Configurations, and Presence Statuses (for example, High-Priority Cases, Normal Cases Routing, Available – Cases) so anyone can understand your setup. - Document your routing rules
Write a short document that explains which queues exist, which routing configurations they use, and what each presence status means. This makes training and troubleshooting much easier.
Frequently Asked Questions (FAQs)
What is Omni-Channel in Salesforce?
What is Queue-Based Routing in Salesforce?
What is the difference between a Queue and Omni-Channel?
Can Omni-Channel route Cases automatically?
Which Salesforce objects are supported by Omni-Channel?
What is Agent Capacity in Omni-Channel?
Conclusion
Setting up Omni-Channel with Queue-Based Routing helps automate the way customer cases are assigned in Salesforce.
Instead of manually distributing work, Salesforce automatically routes cases from a queue to the next available agent based on your routing configuration, availability, and capacity. This creates a balanced workload, reduces response time, and improves the overall support experience.
By following the six steps in this guide, you can build a complete Queue-Based Routing setup for your support team. Once everything is configured correctly, agents receive work automatically, allowing them to focus on resolving customer issues instead of searching for records.
As your support team grows, you can easily extend this setup by adding more queues, configuring routing, or adopting advanced routing methods such as Skill-Based Routing.
You may like to read:
- Salesforce Omni-Channel Web Chat Setup
- Salesforce Omni-Channel Skill-Based Routing Setup
- Salesforce Omni-Channel Skills-Based Routing using Apex
- Skill-Based Routing Salesforce Omni-Channel Flow
- Salesforce Omni-Channel Secondary Routing Priority

Shubham is a Certified Salesforce Developer with technical skills for Building applications using custom objects, approval processes, validation rules, Salesforce flows, and UI customization. He is proficient in writing Apex classes, triggers, controllers, Apex Batches, and bulk load APIs. I am also familiar with Visualforce Pages and Lightning Web Components. Read more about me.
