Decorators in Lightning Web Components (LWC) look scary at first, but once you understand what each one does, they become some of the most useful tools in your toolbox.
As a Salesforce developer, whenever we want to create a Lightning Web Component that displays details from sObjects.
To retrieve the recordId and fetch data dynamically from the Salesforce org into the component, we use decorators to establish a connection between LWC and the Salesforce org.
In this article, we will learn about decorators in Lightning Web Components. I will explain what decorators are in LWC, their types, their uses, and how to use them in Salesforce LWC with real-time scenarios and explanations.
What are decorators in LWC?
In LWC, a decorator is something you put in front of a property or method (like @api, @track, or @wire) to give it special behavior.
You can think of them like labels that tell the LWC engine:
- “This property is public and can be set from outside.”
- “This private property should be reactive.”
- “This property or method is connected to Salesforce data.”
In LWC, we mainly use three decorators:
- @api – expose public properties and methods.
- @track – make private properties reactive (mostly for objects and arrays).
- @wire – fetch Salesforce data in a reactive way.
Decorators in Salesforce Lightning Web Component (LWC)
The decorators in LWC are JavaScript annotations that modify the behaviour of properties and methods.
They act as special markers that provide additional information (metadata) to the LWC framework about how to handle certain variables or methods in a component.
For example, you are creating a component that displays account details. The decorator allows the component to receive the recordId from a parent component or record page and dynamically fetches account data from Salesforce when the recordId changes.
Now, let’s understand the uses of the above decorators and how to use them in the Lightning Web Component.
Decorators in Lightning Web Components
Below, I will explain decorators in Lightning Web Component.
@api Decorator in LWC (Lightning Web Components)
The @api decorator exposes a public property or method declared in the JS file.
Public properties are reactive, also known as public reactive properties, because if the value of a property changes, the component’s value changes too.
- Public properties define the API of a component, whereas public methods are part of a component’s API.
- To pass data from the parent component to the child component, the @api decorator in the child component exposes a property as public, allowing the parent component to update it.
- @api properties can be exposed in an App builder.
Use @api Decorator in Salesforce Lightning Web Component
In the LWC, I will explain how to use the @api decorator in Salesforce Lightning Web Components to make a variable or property public.
First, we will take an example to understand the @api decorator in Salesforce LWC. In that, I will explain what will happen if we do not declare @api in the LWC component, and then we will see after declaring @api decpoartor what changes will happen after declaring the @api decorator.
1. Create LWC JS File: (Without Using @api Decorator)
1. JS File:
First, we created a JS file that declared variables to store the message and the record ID. However, we didn’t declare the @api decorator in this JS file.
import { LightningElement } from 'lwc';

export default class ApiDecorator extends LightningElement {

    message = 'Private Property';
    recordId;
}
2. HTML File:
Then, in the HTML file, we added a Lightning Card to display the information with a title and an icon. After that, we added labels and passed JS variables to them to display information about the declared variables.
Then we added a condition to display the message only when the record ID is fetched, i.e., true={recordId}. Then display the fetched record ID. Otherwise, display the message ‘No Record ID Found’.
<template>
    <lightning-card title="Account Info" icon-name="standard:account">

        <p class="slds-p-around_medium">Message: {message}</p>
        <p class="slds-p-around_medium">Record ID: {recordId}</p>

        <template if:true={recordId}>
            <p class="slds-p-around_medium">Fetched Record ID: {recordId}</p>
        </template>

        <template if:false={recordId}>
            <p class="slds-p-around_medium">No Record ID Found</p>
        </template>

    </lightning-card>
</template>
3. XML File:
In the XML file, we need to specify where we want to place the created component. We can add the component to the following places in the Salesforce org.
- lightning__AppPage: This allows you to add a component to the App Page in Salesforce org (e.g., Sales App).
- lightning__RecordPage: This allows you to add a component to the Record Page in Salesforce org (e.g., Any Account Record).
- lightning__HomePage: This allows you to add a component to the Home Page in Salesforce org.
By default, the <isExposed>tag is false. You need to make it true, then specify where you want to add the component. After that, deploy the LWC component to the org.
<?xml version="1.0" encoding="UTF-8"?>
<LightningComponentBundle xmlns="http://soap.sforce.com/2006/04/metadata">
    <apiVersion>62.0</apiVersion>

    <isExposed>true</isExposed>
    <targets>
        <target>lightning__RecordPage</target>
    </targets>

</LightningComponentBundle>
2. Deployed Component (Without Using @api Decorator)
In the image below, you can see we have added the LWC component to the account record page, displaying only the message variable value that we provided in the JS file. However, it should also display the currently opened account record ID in the Record ID field.
Instead of displaying the ‘No Record ID Found’ message. This happened because we didn’t apply the @api decorator to the recordId variable in the JS file.

3. Create LWC JS File: (Using @api Decorator)
Now, let’s declare the @api decorator in the JS file before the variable name in the import statement. This will allow us to expose a public property (variable) or a public method declared in the JS file so that the record ID can be displayed in the deployed component in the Salesforce org.
Then don’t change the HTML and XML file. Save the JS file, then redeploy the LWC component to the Salesforce org again.
import { LightningElement, api } from 'lwc';

export default class ApiDecorator extends LightningElement {

    message = 'Private Property';
    @api recordId;
}
4. Deployed Component (Using @api Decorator):
Now you can see the deployed component, which shows the ID of the currently opened account record.
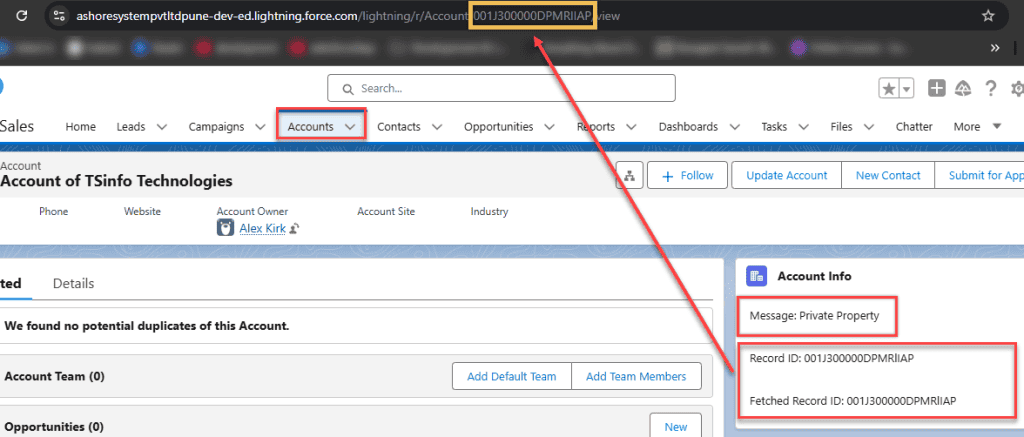
In this way, we can use the @api decorator in Salesforce LWC to make variables and methods declared in the JS file public.
@track Decorator in Salesforce Lightning Web Component
The @track decorator in Salesforce LWC was used in earlier versions of LWC to make properties reactive, but it is now used for simple properties, such as @track myVar(variable name).
Since Spring ’20, all properties in a component are reactive by default. If LWC contains objects or arrays, we need to use the @track decorator.
Use @track Decorator in Salesforce Lightning Web Component
Here, I will explain why and how we used to declare the @track decorator before the Spring ’20 release. In the same LWC component, I will also explain the changes made to the @track decorator after the release.
1. Create LWC JS File:
In the JS file, first, we declared greetingMessage with the @track decorator, which is used to make properties reactive, meaning they automatically trigger re-rendering when their value changes.
But after the Spring 20 release, we no longer need to use the @track decorator to achieve that functionality. So, while declaring a variable, I didn’t use a decorator, and I will see that even though the @track decorator’s functionality will work.
We declared the event so that when it occurs, the declared variable value will be rendered in the HTML field.
import { LightningElement } from 'lwc';

export default class TrackAPI extends LightningElement {

    // @track greetingMessage = 'World';
    greetingMessage = 'World';

    changeHandler(event) {
    this.greetingMessage = event.target.value;
    }
}
2. Create LWC HTML File:
In the HTML file, we displayed the value of the JS variable and then called the event handler that runs on change.
<template>
    <lightning-card title="Hello World" icon-name="custom:custom14">
      <div class="slds-m-around_medium">
        <p>Hello, {greetingMessage}!</p>
        <lightning-input label="Name" onchange={changeHandler}></lightning-input>
      </div>
    </lightning-card>
  </template>
3. XML File:
In XML, we need to declare which page we want to place the created component on. After that, save the files and deploy to the Salesforce org.
<isExposed>true</isExposed>
    <targets>
    <target>lightning__RecordPage</target>
    </targets>
4. Deployed Component (Without Using @track Decorator)
Now, here you can see we don’t even use the @track decorator, and even when we provide a value in the name field, it renders after the ‘hello’ word.

@wire Decorator in Salesforce Lightning Web Component
The @wire decorator in Salesforce LWC is used to fetch data from an Apex class into Lightning web components. That means it is a way to get and bind data from Apex.
Use @wire Decorator in Salesforce Lightning Web Component
In the example below, I explained how to use @wire to fetch account records and display them in an LWC component.
1. Create Apex Class:
In the Apex class below, the @AuraEnabled(cacheable=true) annotation makes the method accessible in LWC and improves performance by enabling caching.
Then we created a list collection with the method that returns a list of account records with selected fields.
public with sharing class accountController {
    @AuraEnabled(cacheable=true)
             public static List<Account> getAccounts() {

                    return [SELECT Id, Name, Account_Priority__c, Rating FROM Account WHERE  Account_Priority__c != NULL  LIMIT 10];

      }
}
2. Create LWC JS File:
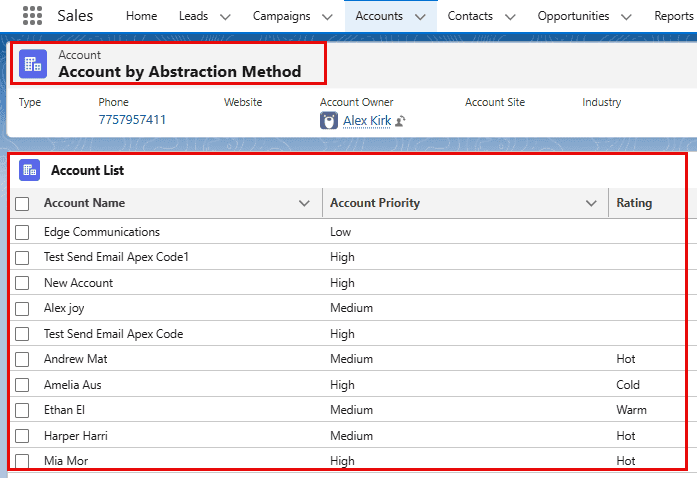
The AccountList LWC fetches and displays a list of accounts, with some fields, using the @wire decorator.
In the LWC JavaScript file, we declared the wire decorator in the import statement first to make it usable. Then, in another import statement, we provided the method name from the class path and again the method name.
It retrieves the data from an Apex method (getAccounts) that queries account records. The component defines a columns array that specifies the table headers and maps them to the corresponding field names in Salesforce.
The @wire function dynamically handles data retrieval: if successful, the account records are stored in this.accounts, making them available for display; otherwise, any encountered error is stored in this.error for handling.
The component is intended to be used with a lightning-datatable in the HTML file to present the account information in a structured format.
import { LightningElement, wire } from 'lwc';
import getAccounts from '@salesforce/apex/AccountController.getAccounts';

export default class wireDecorator extends LightningElement {
    accounts;
    error;

    columns = [
        { label: 'Account Name', fieldName: 'Name' },
        { label: 'Account Priority', fieldName: 'Account_Priority__c' },
        { label: 'Rating', fieldName: 'Rating' }
    ];

    @wire(getAccounts)
    wiredAccounts({ data, error }) {
        if (data) {
            this.accounts = data;
            this.error = undefined;
        } else if (error) {
            this.error = error;
            this.accounts = undefined;
        }
    }
}
3. Create LWC HTML File:
This HTML template displays a list of accounts in a table using a lightning-datatable. Then the component checks if the accounts data exists using <template if:true={accounts}>. If data is available, it displays in a lightning-datatable, using.
If an error occurs while fetching the data, the <template if:true={error}> condition displays an error message (slds-text-color_error).
<template>
    <lightning-card title="Account List" icon-name="standard:account">
        <template if:true={accounts}>
            <lightning-datatable
                key-field="Id"
                data={accounts}
                columns={columns}>
            </lightning-datatable>
        </template>
        <template if:true={error}>
            <p class="slds-text-color_error">Error loading accounts!</p>
        </template>
    </lightning-card>
</template>
4. XML File:
In XML, we need to declare which page we want to place the created component on. After that, save the files and deploy to the Salesforce org.
<isExposed>true</isExposed>
    <targets>
    <target>lightning__RecordPage</target>
    </targets>
5. Deployed Component (Using @wire Decorator)
Now, here you can see the fields and records we retrieved in the Apex class; we displayed them in the data table using an HTML file. To use the retrieved account data in the LWC, we used the @wire decorator to access the data from the Apex class.
When should I use which decorator?
Here’s a quick summary of how I decide:
- I use @api when:
- A parent component needs to set a value on the child.
- A parent needs to call a method on the child.
- I want something configurable in Lightning App Builder.
- I use @track it when:
- I’m working with older code that already uses it.
- I want to make an object/array reactive using the classic approach.
- I need compatibility with the project’s existing patterns.
- I use @wire when:
- I want to fetch Salesforce data reactively.
- I’m using Lightning Data Service adapters, such as getRecord.
- I’m calling cacheable Apex methods and want auto‑refresh when parameters change.
Conclusion
I hope you have got an idea about decorators in Lightning Web Components. I have explained what decorators are in LWC, their types, their uses, and how to use them in Salesforce LWC with real-time scenarios and explanations.
You may like to read:
- Add a toggle button for LWC Lightning Datatable
- Salesforce LWC Lightning Data Table With Search Bar
- Show Image in Salesforce LWC Data Table
- Implement Conditional Rendering in Lightning Web Component
- Upload a File Using Lightning Web Component in Salesforce

Shubham is a Certified Salesforce Developer with technical skills for Building applications using custom objects, approval processes, validation rules, Salesforce flows, and UI customization. He is proficient in writing Apex classes, triggers, controllers, Apex Batches, and bulk load APIs. I am also familiar with Visualforce Pages and Lightning Web Components. Read more about me.
