I created an Agentforce Agent for one of our clients who uses Salesforce to manage their business operations.
After creating the agent, the next step was to decide what tasks the AI agent should perform automatically. For this, we created Agentforce Actions and connected them with Salesforce Flows and logic.
These actions allow the agent to fetch customer details, check related records such as Accounts or Cases, and update record information when the user provides a prompt.
In this article, we will learn how to create and assign actions to Agentforce agents in Salesforce so the AI agent can automatically perform tasks such as fetching data, updating records, and assisting users without manual effort.
Agentforce Actions in Salesforce
Whenever we give a prompt to an Agentforce agent, the agent can perform the task because of the actions assigned to it.
Actions are the components that actually perform work in Salesforce. They handle tasks such as creating a draft order, booking an appointment, or fetching record details from Salesforce.
We will create both standard and custom actions to meet the organization’s business needs. Each action is designed to solve a specific task.
Custom actions can be built using Salesforce Flows, Apex, and prompt templates, enabling the Agentforce agent to perform intelligent, automated actions based on user prompts.
- Standard Actions: When we enable the agent, the actions provided by Salesforce are standard.
- Custom Action: Salesforce users create custom actions to address business-specific tasks.
The following are ways to create custom actions in Salesforce:
- External Services: No-code integration with external APIs.
- Apex: Salesforce programming language.
- Flows: No code Salesforce automation tool.
- Prompt Template: Reusable prompts written with natural language.
Create and Assign Actions to Agentforce Agents in Salesforce
In the step below, I have created a custom action using a Salesforce flow so that when agents need automation, the flow can be used as a custom action.
So, let’s take a scenario to create a custom action in Agentforce. The agent has to automatically create a task or activity record on an account or any other standard or custom object.
Since users work on multiple accounts, this requires many clicks, so it would be very helpful if their AI assistant could handle it. For that, let’s create a custom action using the flow.
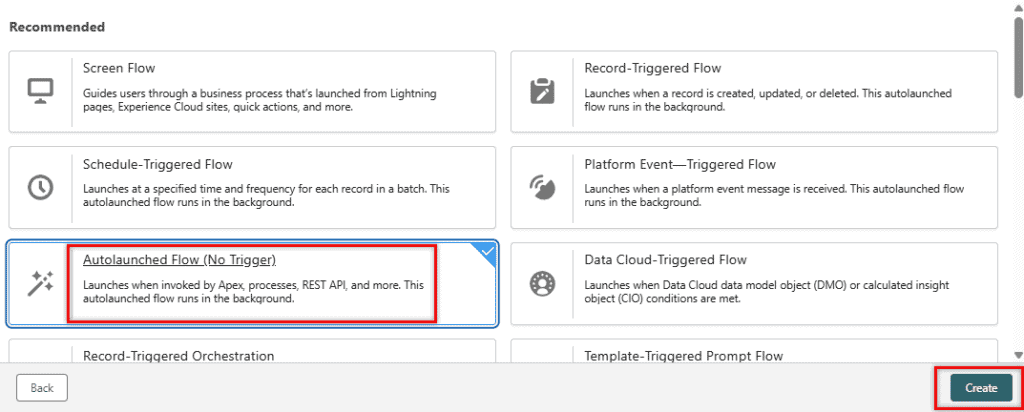
Important: We can only use invokable or auto launched flows to create the custom action to assign to and agents in Agentforce.1. Create an Auto-Launched Flow to Automate the Process
Navigate to Setup -> In Quick Find, search for Flows -> Click New Flow button -> Select Auto-launched Flow-> Click Create button.
Here, I created three text variable resources: RelatedId, Subject (available for input), and TaskId (kept available for output). In the step below, I have shown an image to create the variable.

Here, you can see that I created a Variable with Text as the data type, set it to be available for input, and clicked the Done button.

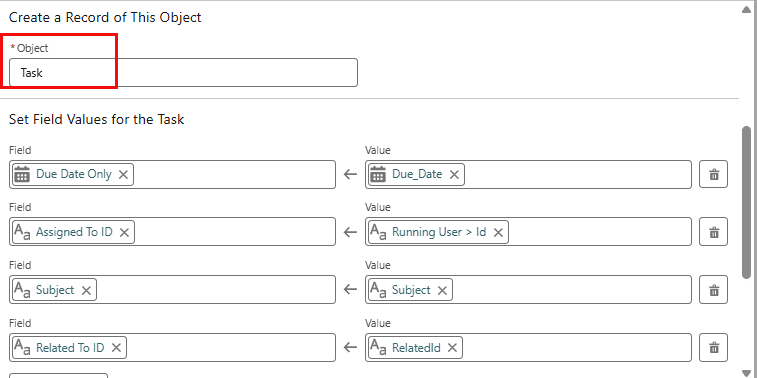
Then, to assign the task to the record owner, we need to add the Create Record element. Provide details; in the object, select the Task object. Below, I have explained Set Field Values for the Task:
- Due Date Only: On the due date, I have set the formula to set the due date within the next 3 days when the task is assigned.
- Assigned To ID: Here, we specify to whom we want to assign the task; I assigned it to the current user.
- Subject: The subject will be whatever he has sent, and the related ID will become the whatId
After that, we set the TaskId variable to be available for output, added it here, and stored the task record ID. That means it will appear as an output field in the custom action.

After creating the flow, save it and ensure it is activated before using it as a custom agent action in Salesforce Agentforce.
2. Use Salesforce Flow to Create an Action for Agentforce Agents
Now, we will create a new Agent custom action so that when the user asks a question, the agent performs the requested task and responds to the user.
For that, go to Setup. In the Quick Find, search for Agent Action. Click on New Agent Action.

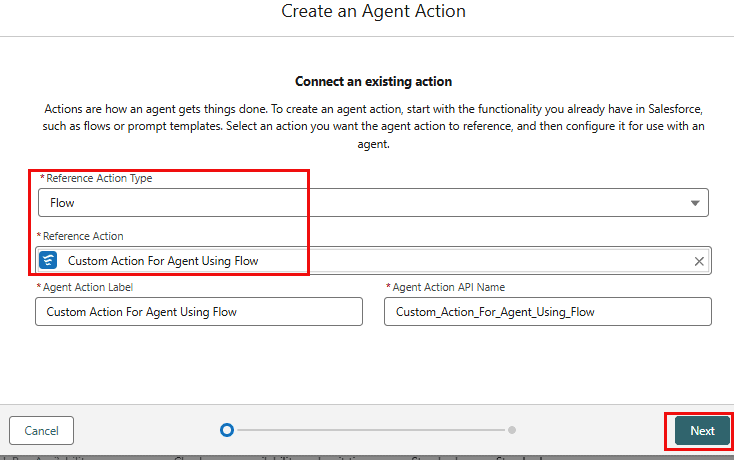
Fill in the details below:
- Referenced Action Type: Previously, we selected Apex; now, as we are creating actions using flows, we need to select Flow.
- Referenced Action: Here, select the label you provided in the auto-launched flow we created.
- Then, the Agent Action Label and API Name will automatically populate.
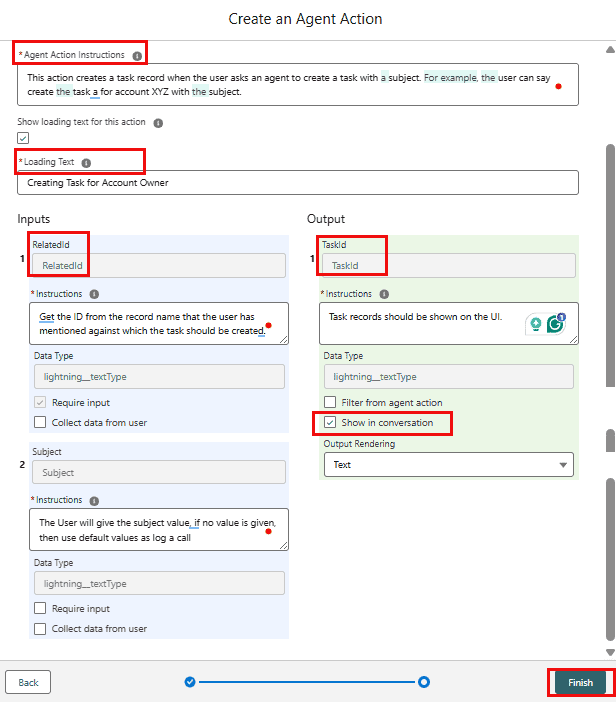
So here, we need to provide instructions to the agent. In Agent Action Instruction, I have provided instructions to the agent so that whenever it receives such a prompt, it will be easy for the agent to understand that this action will satisfy the exact requirement.
Again, we have an input field and an output field. Here, also, we have to give the instructions. Then click the Finish button.
I have explained how to create an action in Agentforce.
As you click the finish button, you can see that the Agent custom action has been successfully created.

3. Assign Action to Agentforce Agent in Salesforce
In the steps below, I will assign the custom action to the agent that we created using the screen flow to create a task when the agent gets such a prompt.
Before assigning the action to an agent, let’s ask the agent to create a task record for a particular account with a subject. Below the image, you can see the prompt response to the ‘search query isn’t supported’.

Now, let’s assign the created custom action to an agent. For that, navigate to the Setup -> In Quick Find, search for the Agents -> Select the Agent for which you want to assign a custom action.
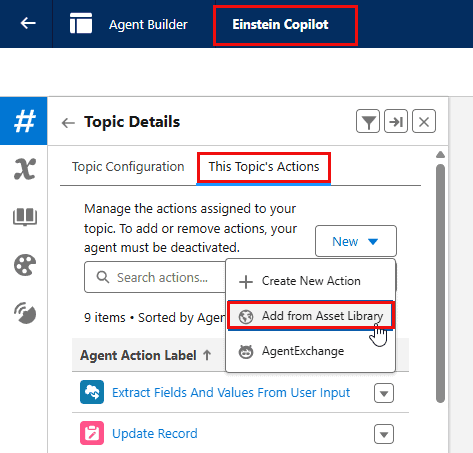
Here, I have selected Einstein Copilot, which is Agentforce. -> Then click on the Open in Builder button to add an action.
After that, select the Topic to which you want to add the custom action. Then click This Topic’s Actions tab, click the New button, and select the Add from Asset Library option to select the action that we created.
Then select the Action that you want to assign to this agent. You can also select multiple actions, including standard and custom actions. Then click the Finish button.

After assigning the custom action to the agent, I again asked the agent to create a task for the XYZ account with the subject ABC. You can see how the agent responded to a task created with the provided details.

Also, as I navigate to the Task object, the new record has been created with the values that we provided in the prompt and the auto-launched flow.

In this way, we can create custom actions in Salesforce Flow for Agentforce to automate any task when the agent receives such a prompt.
Conclusion
I hope you have an idea about how to create and assign actions to Agentforce agents in Salesforce so the AI agent can automatically perform tasks such as fetching data, updating records, and assisting users without manual effort.
Using the use case, I have explained what a custom action is, which flow supports creating custom agent actions, how to create a flow, how to create a new action, and how to assign custom actions to agents in Salesforce after creating them.
You may like to read:
- Einstein Trust Layer in Salesforce Agentforce
- Salesforce Employee and Service Agent in Agentforce
- Create Agentforce-Enabled Scratch Orgs From Salesforce Developer Edition
- Agentforce for Developers in Salesforce
- What is Agentforce Data Library in Salesforce?

Shubham is a Certified Salesforce Developer with technical skills for Building applications using custom objects, approval processes, validation rules, Salesforce flows, and UI customization. He is proficient in writing Apex classes, triggers, controllers, Apex Batches, and bulk load APIs. I am also familiar with Visualforce Pages and Lightning Web Components. Read more about me.
