
Headless commerce sounds great on paper until your sales team complains that product data in Salesforce never matches what customers see on the website.
Your CRM shows one price, your headless storefront shows another, and support agents waste time reconciling data in spreadsheets.
You want a clean way to connect your headless 360 architecture to Salesforce without disrupting existing processes or confusing business users.
Salesforce Headless 360 means using Salesforce as the central brain for customer, product, and order data, while your front‑end (website, mobile app, portal, chatbot) is completely decoupled and talks to Salesforce only via APIs.
You keep a 360‑degree view of the customer inside Salesforce, but your UI layers are free to use any framework or platform.
Think of a B2B sales team using a custom React portal for orders, while Salesforce keeps all Account, Contact, Product, and Order records in sync behind the scenes.
In this article, I’ll show you 4 ways to implement Salesforce Headless 360 in Salesforce.
What Is Salesforce Headless 360?
In simple terms, Salesforce Headless 360 is a way to use Salesforce without relying on the browser UI. Instead of users clicking around in Lightning Experience, all the important parts of Salesforce data, workflows, approvals, business logic, and security are exposed as APIs, MCP tools, and CLI commands.
You can think of it as making Salesforce the engine that runs in the background, while your front‑end (Slack, Teams, WhatsApp, custom web app, mobile app, IDE, or AI agent) becomes the dashboard on top.
Users and AI agents can trigger actions, update records, and run workflows wherever they work, without ever opening a Salesforce tab.
From a developer point of view, Headless 360 combines Salesforce’s existing 4,000+ APIs, CLI commands, and new MCP tools into a unified, API‑first surface that any compatible client or agent can call. The browser becomes optional; the platform is now fully programmable from any tool that speaks HTTP, MCP, or CLI.
Real‑World Examples of Headless 360 in Salesforce
Here are some practical scenarios you can use as examples in the article:
- Sales reps working in Slack
A sales rep never logs into Salesforce. They chat with a bot in Slack, and that bot (powered by Headless 360 APIs and MCP tools) creates Opportunities, updates pipeline stages, and logs activities directly in Salesforce. - Support team in Microsoft Teams or WhatsApp
Support agents handle cases entirely inside Microsoft Teams or WhatsApp. When a customer sends a message, an AI agent retrieves the Case, updates the Status, and triggers a Flow to send follow‑up emails — all via Headless 360, with Salesforce acting as the case management engine behind the scenes. - Developers in their IDE (VS Code, Cursor, Claude Code)
A developer never opens Setup. Instead, they use CLI and MCP tools from their IDE (for example, Cursor or Claude Code) to query objects, deploy metadata, run tests, and manage workflows. Headless 360 gives these tools direct, governed access to the org. - AI agents running business processes end‑to‑end
An AI agent qualifies leads, updates Opportunity stages, generates quotes, and runs approvals without human clicks. It uses Headless 360 APIs and skills to invoke Salesforce workflows, respect approval chains, and automatically follow compliance rules. - Frontline workers without Salesforce licenses
Field technicians use a simple mobile app or WhatsApp bot. They log job status, capture photos, and request parts. The app communicates with Salesforce via Headless 360 APIs, updating Work Orders, Assets, and Cases in real time, even though the technicians never see the Salesforce UI.
You can tie all these examples back to your main B2B scenario in the article (for example, a sales team managing 500 opportunities across web, mobile, and chat channels).
Key Benefits of Salesforce Headless 360
You’ll want a short sub‑section like this under the intro or right after the “What is” section.
- Higher adoption – Users work in tools they already use (Slack, Teams, WhatsApp, IDEs), while Salesforce runs in the background. This removes the friction of “please log into Salesforce” and increases actual usage of your processes.
- Greater reach – Non‑CRM users, such as frontline workers, partners, or temporary staff, can participate in Salesforce‑powered workflows via lightweight apps or chat, without full Salesforce licenses or training.
- More speed and less context switching – Workflows run where conversations happen, and agents or users are not constantly switching between browser tabs and tools. That improves daily productivity and reduces time to complete tasks.
- API‑first flexibility – Because everything is exposed as APIs, MCP tools, and CLI, you can connect Salesforce to any system: custom portals, mobile apps, messaging platforms, or AI agents. This supports modern, composable architectures.
- Scalability and automation – Processes execute in the background without manual clicks. Systems talk directly to Salesforce, so you can scale volume (more leads, more orders, more cases) without scaling human effort at the same rate.
- Strong governance and security – Agents and external tools inherit Salesforce permissions, approval chains, and compliance rules, so you don’t have to rebuild governance in each integration. That makes AI and automation safer to run in production.
- Faster time‑to‑value for AI – Enterprises can plug AI agents directly into trusted Salesforce data and workflows instead of building new backends from scratch, which shortens deployment time for agentic use cases.
Method 1 – Use Salesforce REST API for Headless Product and Order Sync
Use this method if you want a flexible, API‑first integration from your headless front‑end (React, Angular, mobile app) directly into Salesforce, with full control over requests and responses. This works best when your dev team is comfortable with HTTP and JSON and wants to avoid heavy middleware.
Step 1: Enable and Review Salesforce REST API Access
- Go to Setup → Users → Profiles.
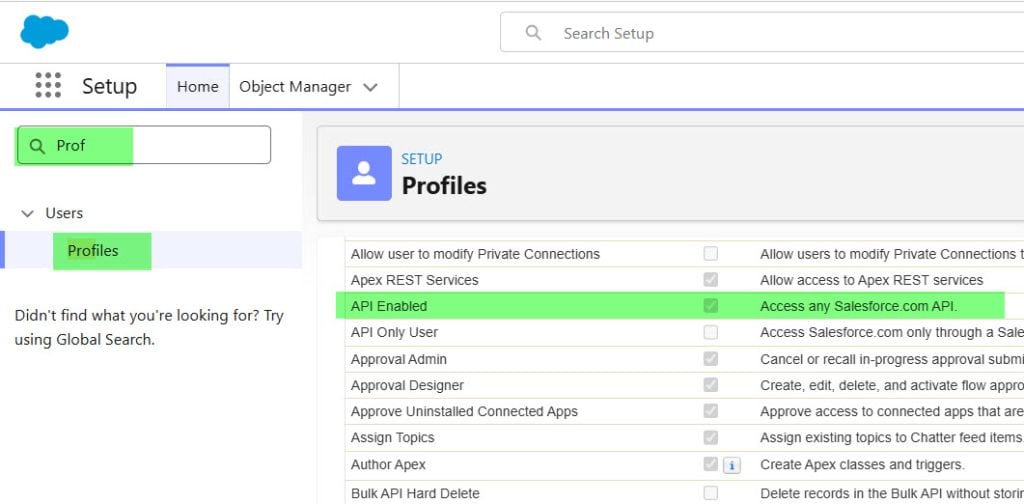
- Open the System Administrator profile (or the profile for your integration user).
- Make sure API Enabled is checked under Administrative Permissions.
- If you use an Integration User, confirm it has access to Account, Contact, Product2, PricebookEntry, and Order objects.
Step 2: Create a Connected App for Headless 360
- Go to Setup → App Manager.
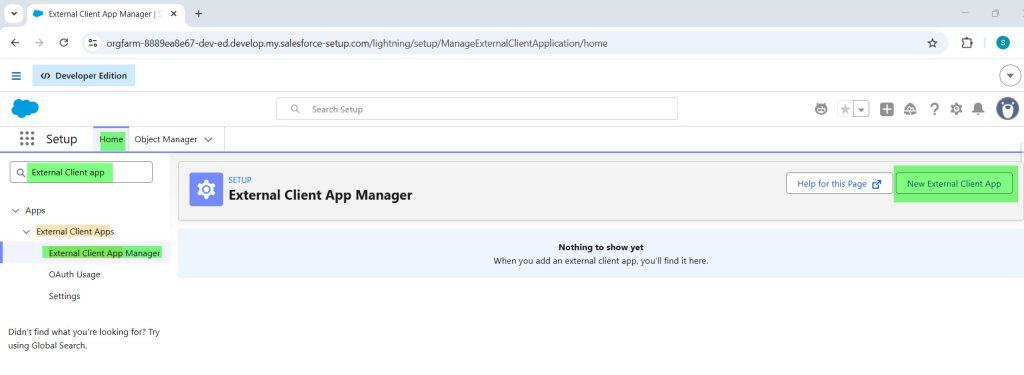
- Click New Connected App.
- Set Connected App Name to something like Headless360App and API Name to Headless360App.
- Under API (Enable OAuth Settings), check Enable OAuth Settings.
- Set a Callback URL (for example, your middleware or auth server endpoint).
- Under Selected OAuth Scopes, add:
- Full access (full)
- Access and manage your data (api)
- Save, wait for the app to be created, then note the Consumer Key and Consumer Secret.
Pro Tip:
If you only need server‑to‑server calls, use the OAuth 2.0 Client Credentials flow in Experience Cloud or with an external identity provider, and lock scopes down to api.
Step 3: Call Salesforce REST API from Your Headless Front‑End
Below is a sample REST call to create an Order record for a B2B customer from a Node.js‑based headless store. This assumes you already retrieved an OAuth access token.
POST https://yourInstance.salesforce.com/services/data/v61.0/sobjects/Order

Authorization: Bearer 00Dxx0000001gPTEAY!AQcAQ...
Content-Type: application/json

{
  "AccountId": "001xx000003DGb4AAG",
  "EffectiveDate": "2026-07-09",
  "Status": "Draft",
  "Description": "Headless 360 order from React portal",
  "Pricebook2Id": "01sxx000004TtV2AAK"
}
Sample Output (Response JSON)
{
  "id": "800xx000000J8xZAAS",
  "success": true,
  "errors": []
}
How does this work?
Your headless front‑end sends a JSON payload to the Order object endpoint using the REST API, authenticated with an OAuth access token. Salesforce validates the fields, creates a new Order record, and returns the new record Id plus any errors, so you can show a confirmation to the user or handle failures.
Pro Tip
Watch out for API limits on large sites. Use Bulk API for mass imports and cache frequently‑used reference data (such as Product2 and PricebookEntry) on the front‑end to reduce calls.
Method 2 – Orchestrate Headless 360 with Salesforce Flow (No‑Code)
Use this method if you want a low‑code or no‑code solution where business admins can control integrations via Salesforce Flow.
This works best when your headless layer already pushes data to Salesforce (via API, import, or middleware) and you need Salesforce to respond and maintain the 360‑degree view.
We’ll use a common scenario: each time a headless order hits Salesforce, you want to automatically update the customer’s Total Headless Revenue on the Account.
Step 1: Create Custom Fields for Headless 360
- Go to Setup → Object Manager → Account → Fields & Relationships.
- Click New.
- Choose Currency as the data type.
- Name the field Total Headless Revenue and set Length and Decimal Places as needed.
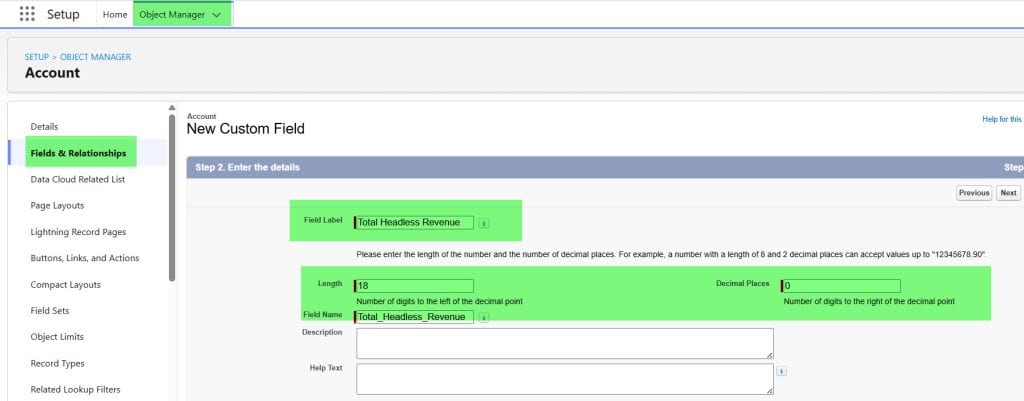
- Add the field to page layouts for Sales and Service users.
Step 2: Build a Record‑Triggered Flow for Orders
- Go to Setup → Process Automation → Flows.
- Click New Flow.
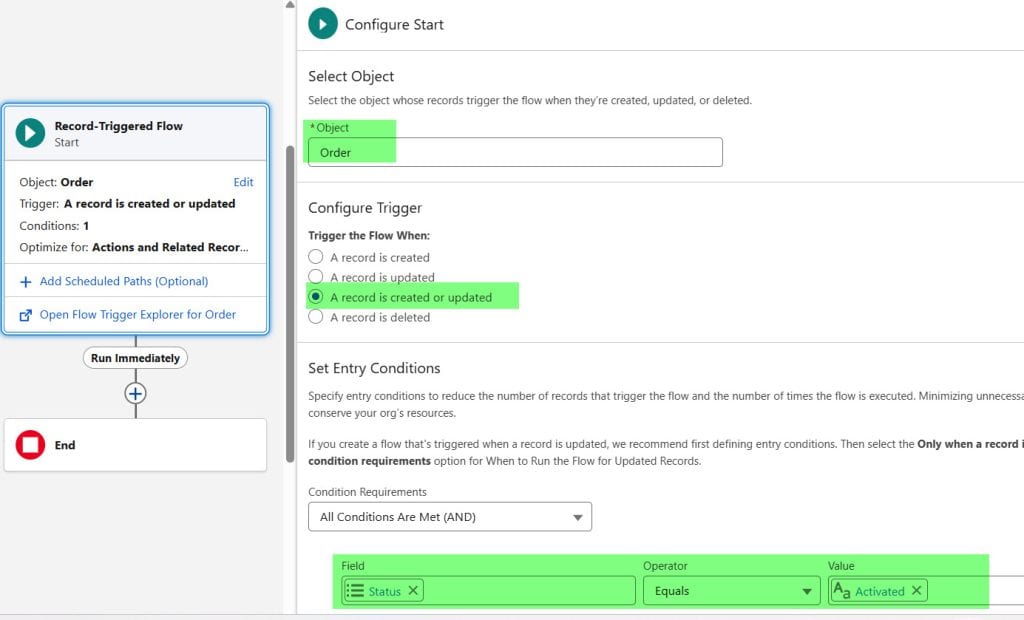
- Select Record‑Triggered Flow.
- Choose Object = Order.
- Choose Trigger = A record is created or updated.
- Under Entry Conditions, set:
- Status equals Activated (or whatever status represents a confirmed order)
- Description contains Headless 360 (optional, to filter only headless orders)
- Optimize for Actions and Related Records.
Step 3: Add Get Records and Update Records Elements
In the Flow canvas:
- Add a Get Records element:
- Label: Get Account
- Object: Account
- Condition: Id Equals {!$Record.AccountId}
- Store all fields (for simplicity)
- Add another Get Records for existing Orders:
- Label: Get Headless Orders
- Object: Order
- Condition:
- AccountId Equals {!$Record.AccountId}
- Status Equals Activated
- Add a Loop element over the Get Headless Orders collection.
- Inside the loop, add an Assignment element to sum TotalAmount into a variable, for example varTotalHeadlessRevenue.
- After the loop, add an Update Records element:
- Label: Update Account Headless Revenue
- Set Account.Id = {!Get_Account.Id}
- Set Account.Total_Headless_Revenue__c = {!varTotalHeadlessRevenue}
Sample Result:
When a new headless order is activated, Salesforce Flow automatically recalculates Total Headless Revenue and updates the related Account record. Sales reps see the updated value immediately on the Account page.How does this work?
The record‑triggered Flow fires whenever an Order record is created or updated. The Flow fetches the related Account, pulls all activated Orders for that Account, loops through them to calculate total revenue, and writes the summed value to Total Headless Revenue. Your 360‑degree view stays current without code.Pro Tip:
Keep Flow logic simple and avoid deeply nested loops for high‑volume orgs. If you process thousands of orders per hour, consider offloading heavy calculations to Apex or an external service to stay under Flow interview limits.
Method 3 – Use Apex Services for Headless 360 (Advanced Logic)
Use this method when you need complex validation, custom pricing, or specific business rules that go beyond what Flow can comfortably handle.
Apex gives you full control and is ideal when your headless front‑end calls a single Apex REST endpoint rather than multiple standard APIs.
We’ll build a simple Apex REST service that accepts an order JSON payload from the headless store, validates it, creates an Order and OrderItem records, and returns a normalized response.
Step 1: Create an Apex REST Class
- Go to Setup → Apex Classes.
- Click New.
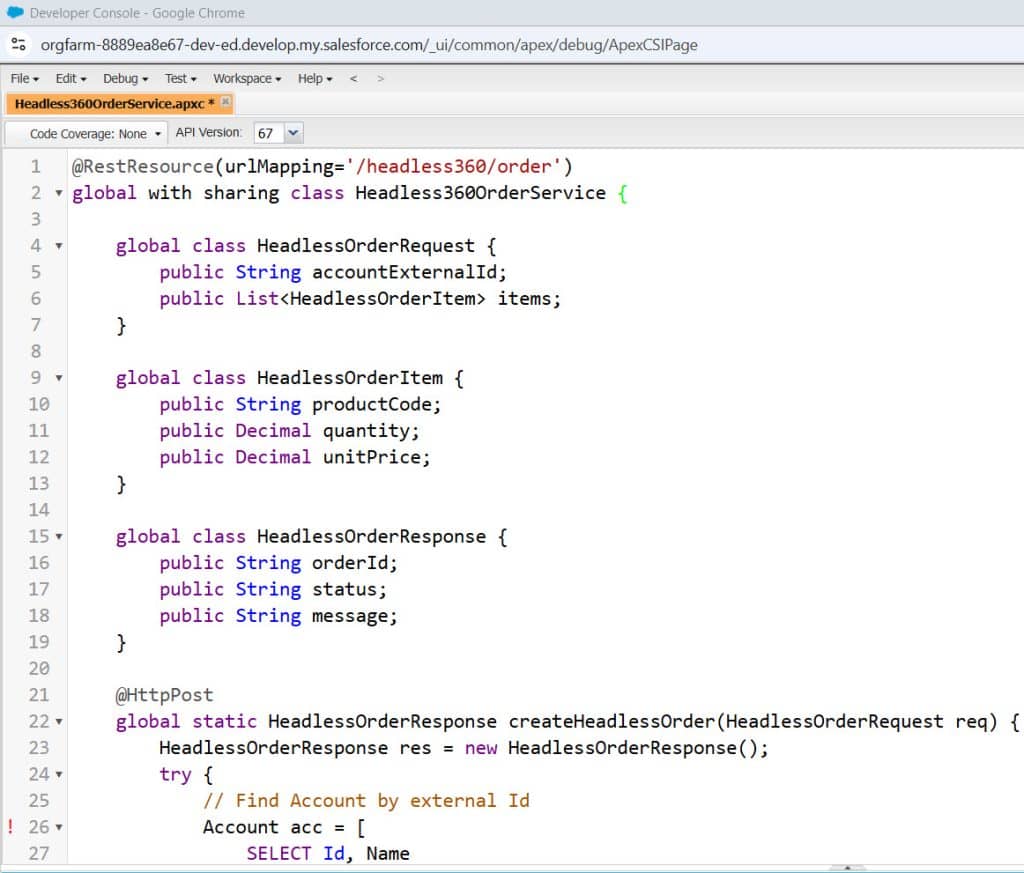
- Paste the following code and adjust object and field API names as needed:
@RestResource(urlMapping='/headless360/order')
global with sharing class Headless360OrderService {

    global class HeadlessOrderRequest {
        public String accountExternalId;
        public List<HeadlessOrderItem> items;
    }

    global class HeadlessOrderItem {
        public String productCode;
        public Decimal quantity;
        public Decimal unitPrice;
    }

    global class HeadlessOrderResponse {
        public String orderId;
        public String status;
        public String message;
    }

    @HttpPost
    global static HeadlessOrderResponse createHeadlessOrder(HeadlessOrderRequest req) {
        HeadlessOrderResponse res = new HeadlessOrderResponse();
        try {
            // Find Account by external Id
            Account acc = [
                SELECT Id, Name
                FROM Account
                WHERE External_Id__c = :req.accountExternalId
                LIMIT 1
            ];

            // Create Order
            Order ord = new Order(
                AccountId = acc.Id,
                EffectiveDate = Date.today(),
                Status = 'Draft',
                Description = 'Headless 360 order'
            );
            insert ord;

            // Prepare OrderItems
            List<OrderItem> orderItems = new List<OrderItem>();
            for (HeadlessOrderItem hi : req.items) {
                Product2 prod = [
                    SELECT Id, ProductCode
                    FROM Product2
                    WHERE ProductCode = :hi.productCode
                    LIMIT 1
                ];

                orderItems.add(new OrderItem(
                    OrderId = ord.Id,
                    PricebookEntryId = getPricebookEntry(prod.Id),
                    Quantity = hi.quantity,
                    UnitPrice = hi.unitPrice
                ));
            }
            insert orderItems;

            res.orderId = ord.Id;
            res.status = 'SUCCESS';
            res.message = 'Order created for Account ' + acc.Name;
        } catch (Exception e) {
            res.status = 'ERROR';
            res.message = e.getMessage();
        }
        return res;
    }

    // Helper to get a PricebookEntry
    private static Id getPricebookEntry(Id productId) {
        PricebookEntry pbe = [
            SELECT Id
            FROM PricebookEntry
            WHERE Product2Id = :productId
            AND IsActive = true
            LIMIT 1
        ];
        return pbe.Id;
    }
}
Sample Input (JSON from Headless Store)
{
  "accountExternalId": "EXT-ACC-1001",
  "items": [
    {
      "productCode": "PROD-API-001",
      "quantity": 5,
      "unitPrice": 99.00
    }
  ]
}
Sample Output (Response JSON)
{
  "orderId": "800xx000000J8xZAAS",
  "status": "SUCCESS",
  "message": "Order created for Account Acme Corp"
}
How does this work?
The Apex REST class exposes a custom endpoint under /services/apexrest/headless360/order. Your headless front‑end posts an order payload, the class looks up the Account and Product2 records, creates an Order and related OrderItem records, and sends back a structured response. You can plug in complex rules (discounts, validation, territory assignment) directly in Apex.Pro Tip:
Use with sharing on integration classes to respect org security and avoid unwanted access. For large item lists, reduce SOQL queries by bulk fetching Product2 and PricebookEntry records instead of querying inside the loop.
Method 4 – Sync Headless Data via Platform Events and External Middleware
Use this method if you already use an integration platform such as MuleSoft, Azure Functions, or AWS Lambda and want near-real-time, event‑driven sync between Salesforce and your headless 360 architecture.
This works best for high‑scale B2B or B2C setups with multiple channels (web, mobile, marketplace).
Step 1: Define a Platform Event for Headless 360
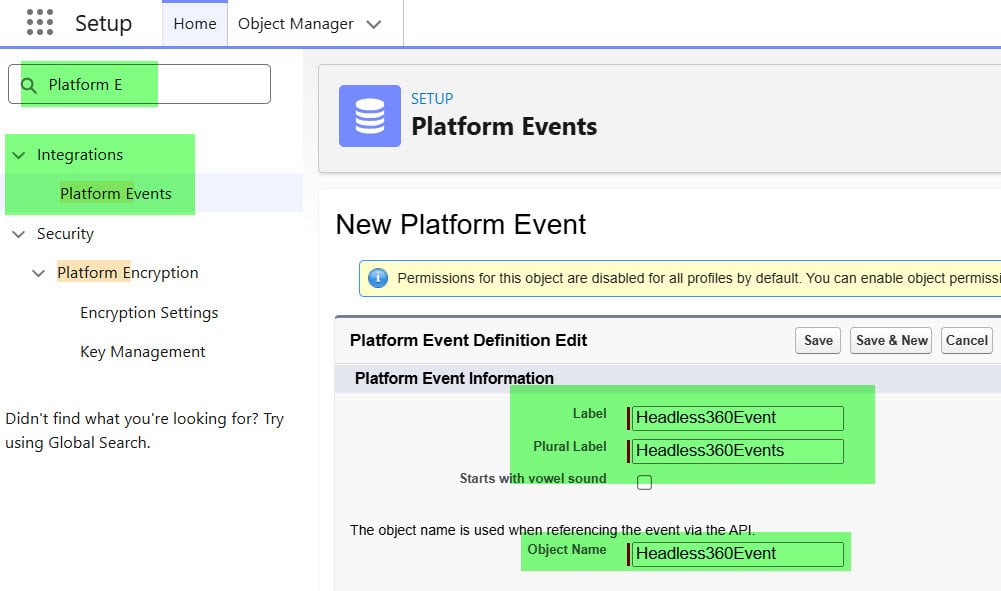
- Go to Setup → Integrations → Platform Events.
- Click New Platform Event.
- Set Label to Headless360Event and Plural Label to Headless360Events.
- Set API Name to Headless360Event__e.
- Add fields such as:
- AccountId__c (Text)
- EventType__c (Text: e.g., ORDER_CREATED, ORDER_UPDATED)
- Payload__c (Long Text Area for JSON)
- Save the event.
Step 2: Publish Platform Events from Salesforce
You can publish a Headless360Event from Apex whenever an Order is activated. For example:
trigger HeadlessOrderTrigger on Order (after insert, after update) {
    List<Headless360Event__e> eventsToPublish = new List<Headless360Event__e>();

    for (Order ord : Trigger.new) {
        if (ord.Status == 'Activated') {
            Headless360Event__e evt = new Headless360Event__e(
                AccountId__c = ord.AccountId,
                EventType__c = 'ORDER_ACTIVATED',
                Payload__c = JSON.serialize(ord)
            );
            eventsToPublish.add(evt);
        }
    }

    if (!eventsToPublish.isEmpty()) {
        Database.SaveResult[] results = EventBus.publish(eventsToPublish);
    }
}
Sample Result:
When an Order becomes Activated, Salesforce publishes a Headless360Event that contains basic order details. Your middleware subscribes to the event, transforms data if needed, and updates your headless store or other systems to keep the 360‑degree view consistent.How does this work?
The Apex trigger listens for Order changes. When an order reaches the desired status, it constructs a Headless360Event__e and publishes it to the EventBus. External systems subscribe via CometD or the EMP API, process events, and maintain synchronized data across channels.Pro Tip:
Monitor event delivery and replay IDs to avoid data loss. Use durable subscriptions in middleware and track last processed events, especially in high‑volume environments with frequent deployments.
Things to Keep in Mind
- API limits and scaling – Plan around Daily API limits if your headless store sends a lot of traffic. Use caching, bulk operations, and integration users with separate limits to avoid throttling.
- Profiles vs permission sets – Give your integration user only the necessary object and field access via permission sets, not broad profiles, to reduce security risk and accidental data exposure.
- Sandbox vs production – Always test headless integrations in sandboxes first. Use Change Sets or the Salesforce DevOps Center to deploy Flows, Apex, and Platform Events safely.
- Edition and feature limits – Some features, such as advanced API, Platform Events, and high API limits, are available in the Enterprise and Unlimited editions. Essentials and Professional can be more restricted, so check your org’s edition before designing.
- Governor limits for Apex – When building Apex REST services, keep SOQL queries and DML operations within limits. Use bulk patterns and avoid queries inside loops on high‑volume routes.
- API version compatibility – Set your Apex class and Connected App to a stable API version and review updates regularly to avoid breaking changes in response formats or authentication.
Frequently Asked Questions
Q1: What is Salesforce Headless 360 in simple terms?
It’s an architecture in which Salesforce maintains the full 360‑degree view of customers and orders, while your front‑end (website, app, portal) communicates with Salesforce only via APIs and events. You decouple the UI from Salesforce but keep data centralized.
Q2: Do I need coding skills to use Headless 360 with Salesforce?
Not always. You can use Salesforce Flow in a low‑code way to react to incoming data, update records, and keep 360 views in sync. For fully custom APIs and complex logic, Apex coding is helpful.
Q3: Which method should I start with?
If your dev team is comfortable with APIs, start with the REST API or Apex REST approach. If business admins drive the process, begin with Flow and add Platform Events or Apex later as complexity grows.
Q4: How does this work with Salesforce Experience Cloud sites?
You can run a headless front‑end on a separate domain while using Experience Cloud only as an auth provider and API gateway. Use Connected Apps, OAuth, and REST API to keep data flowing while UI stays fully custom.
Q5: How can I monitor errors in Headless 360 integrations?
Log request and response data in custom Log__c objects, use Salesforce Transaction Logs when available, and integrate with tools such as Splunk or CloudWatch. Also add alert Flows or Apex to notify admins when critical records fail to create.
Conclusion
You learned four practical ways to implement Salesforce Headless 360 using REST APIs, Flows, Apex REST services, and Platform Events. Use Flow for no‑code automation, REST API when the front‑end owns the logic, Apex REST when rules are complex, and Platform Events for high‑scale, event‑driven sync. I hope you found this article helpful.
What specific part of Headless 360 do you want to cover next on SalesforceAQs.com—API auth, error handling, or performance tuning?
You may like to read:
- Set up Einstein Bots in Salesforce
- Where is the Recycle Bin in Salesforce
- Create and Export Unmanaged Package For Flows as Zip File in Salesforce
- Create Downloadable Salesforce Packages with VS Code & CLI
- Free Salesforce CRM Suite for Small Businesses

Shubham is a Certified Salesforce Developer with technical skills for Building applications using custom objects, approval processes, validation rules, Salesforce flows, and UI customization. He is proficient in writing Apex classes, triggers, controllers, Apex Batches, and bulk load APIs. I am also familiar with Visualforce Pages and Lightning Web Components. Read more about me.