If you’ve worked in Salesforce Lightning Experience, you’ve probably seen the navigation bar at the top of the page.
These tabs help users quickly open objects such as Accounts, Contacts, Opportunities, and other custom objects.
Many Salesforce Admins and Developers don’t know that this navigation menu can be fully customized based on business needs.
You can:
- Add custom object tabs
- Remove tabs that users do not need
- Change the order of tabs
- Create different navigation menus for different Salesforce Apps
In this tutorial, you will learn how to customize the navigation menu in Salesforce Lightning Experience step by step — without writing any code.
What Is a Custom Navigation Menu in Salesforce Lightning?
A Custom Navigation Menu in Salesforce Lightning Experience allows you to control which tabs and items users see in the navigation bar at the top of the screen.
Using the navigation menu, users can quickly access Salesforce objects, apps, dashboards, reports, and other features. Salesforce allows Admins to customize this menu to make navigation easier and improve the user experience.
For example, you can:
- Add standard or custom object tabs
- Remove unnecessary tabs
- Reorder menu items
- Add items like Dashboards, Reports, or Lightning Pages
- Create different navigation menus for different Lightning Apps
This helps users access the tools and records they use most frequently without wasting time searching through multiple tabs.
Who Can Add or Edit Navigation Menus in Salesforce?
To create or customize a navigation menu in Salesforce Lightning Experience, you must have Salesforce Administrator access or the Customize Application permission.
With these permissions, you can:
- Create and edit Lightning Apps
- Add or remove navigation tabs
- Change the tab order
- Customize the navigation menu for different Lightning Apps
Regular users with limited permissions may be able to personalize their own navigation bar if Salesforce allows it. However, they cannot change the default navigation menu for the entire Salesforce org or for other users.
Add a Custom Navigation Menu in Salesforce Lightning Experience
Before jumping into steps, it helps to know there are two distinct approaches:
| Approach | What It Does | Best For |
|---|---|---|
| Edit a Lightning App’s navigation items | Adds/removes/reorders tabs inside an existing app | Admins managing existing apps |
| Create a brand new Lightning App | Builds a custom app with its own navigation from scratch | New teams, role-specific apps |
In most cases, you’ll mainly work with the first option — editing the navigation menu of an existing Lightning App.
However, in this tutorial, I’ll explain both methods step by step.
1. Edit the Navigation Menu of an Existing Lightning App
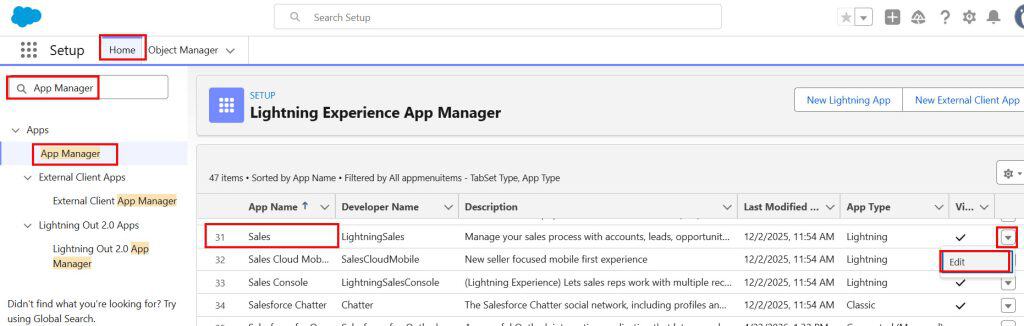
- Open Setup
- Click the gear icon (⚙️) in the top-right corner of Salesforce Lightning and select Setup.
- Go to App Manager
- In the Quick Find box, type App Manager and click App Manager from the results.
- You’ll see a list of all apps in your org, including both Lightning and Classic apps. Lightning apps show a Lightning label in the App Type column.
- Find Your App and Click Edit
- Find the Lightning app whose navigation menu you want to update. Click the dropdown arrow on the right side of that row and select Edit.
- This opens the Lightning App Builder / App Settings page with a step-by-step wizard.
- Navigate to the “Navigation Items” Step. The app editor has several steps at the top:
- App Details & Branding
- App Options
- Utility Items (Desktop Only)
- Navigation Items ← : This is where you need to be
- User Profiles
- Click Navigation Items to go to that step.
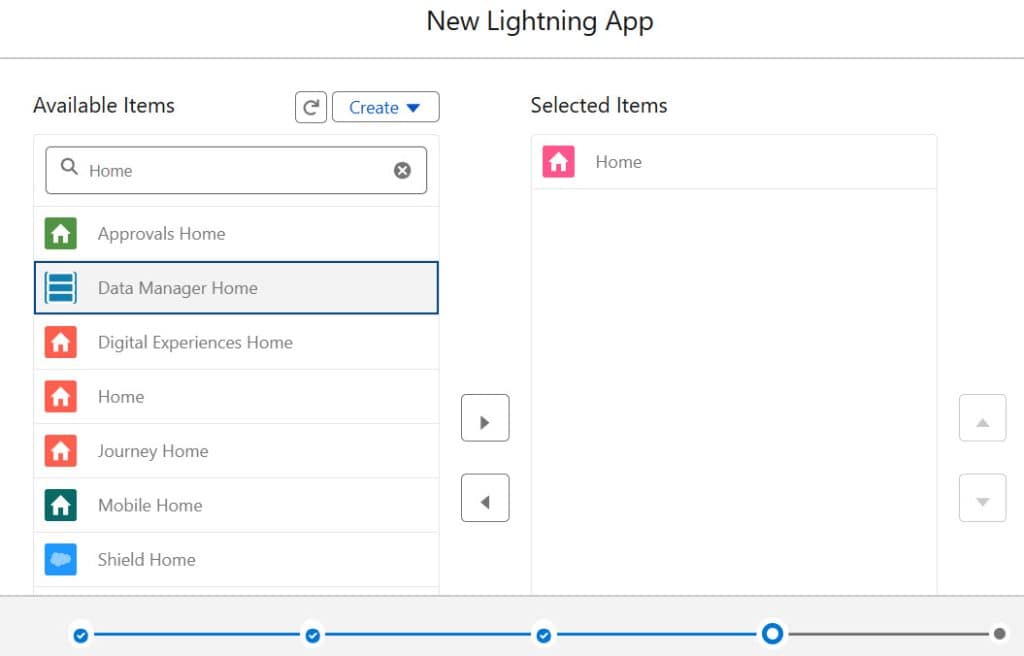
- Add Items to Your Navigation Menu – You’ll see two columns:
- Available Items (left) — everything you can add
- Selected Items (right) — what currently appears in the navigation bar
To add something to your navigation menu:
- Find the item in the left column (you can search for it)
- Click it to select it, then click the right arrow to move it to Selected Items
- Or simply drag and drop it across
Things you can add to the navigation menu include:
- Standard objects (Accounts, Contacts, Leads, etc.)
- Custom objects
- Lightning component tabs
- Visualforce tabs
- Web tabs (external URLs)
- Utility pages and canvas apps
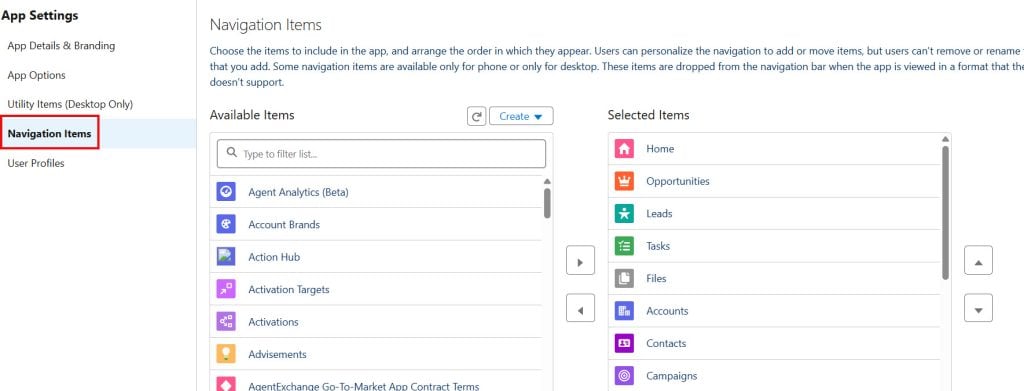
Reorder the Navigation Items
In the Selected Items column, drag items up or down to set their order in the navigation bar. The item at the top of the list becomes the first tab on the left side of the nav bar.
Put the most-used items at the top. For most sales teams, that’s usually Leads, Accounts, Contacts, and Opportunities.
Remove Items You Don’t Need
To remove an item from the navigation bar, select it in the Selected Items column and click the left arrow to send it back to Available Items.
Removing clutter from the navigation bar makes it easier for users to find what they actually use day to day.
Save and Finish
Once you’re happy with the navigation items and their order, click Next to go through the remaining steps (or Save & Finish if you’re done). The changes go live immediately — no deployment or activation needed.
2. Create a Brand New Lightning App with a Custom Navigation Menu
Sometimes you don’t want to modify an existing app. You want to build a completely new one — for a specific team, use case, or set of users. Here’s how.
- Open App Manager
- Go to Setup → App Manager and click the New Lightning App button in the top-right corner.
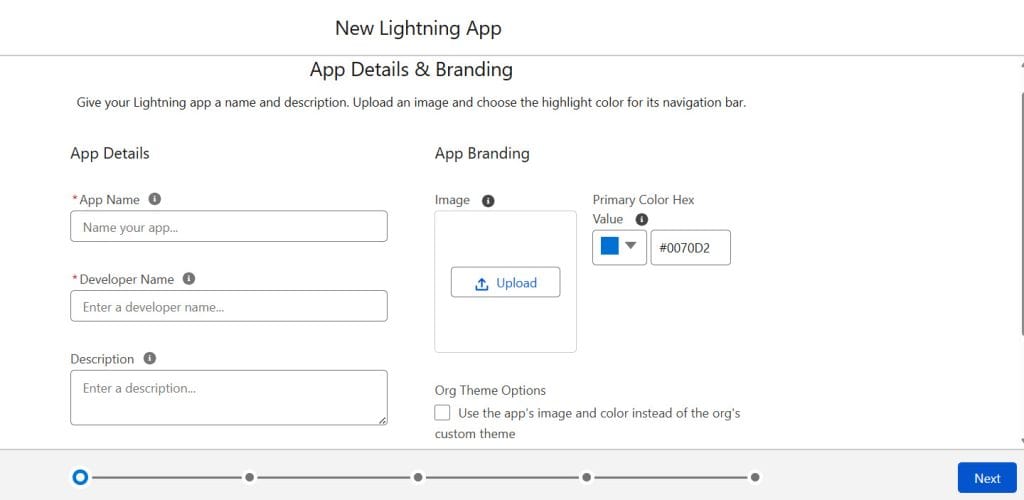
- Fill in App Details
- Give your app a name, a developer name (auto-filled), and optionally a description. You can also upload a custom icon and choose a brand color.
- Click Next.
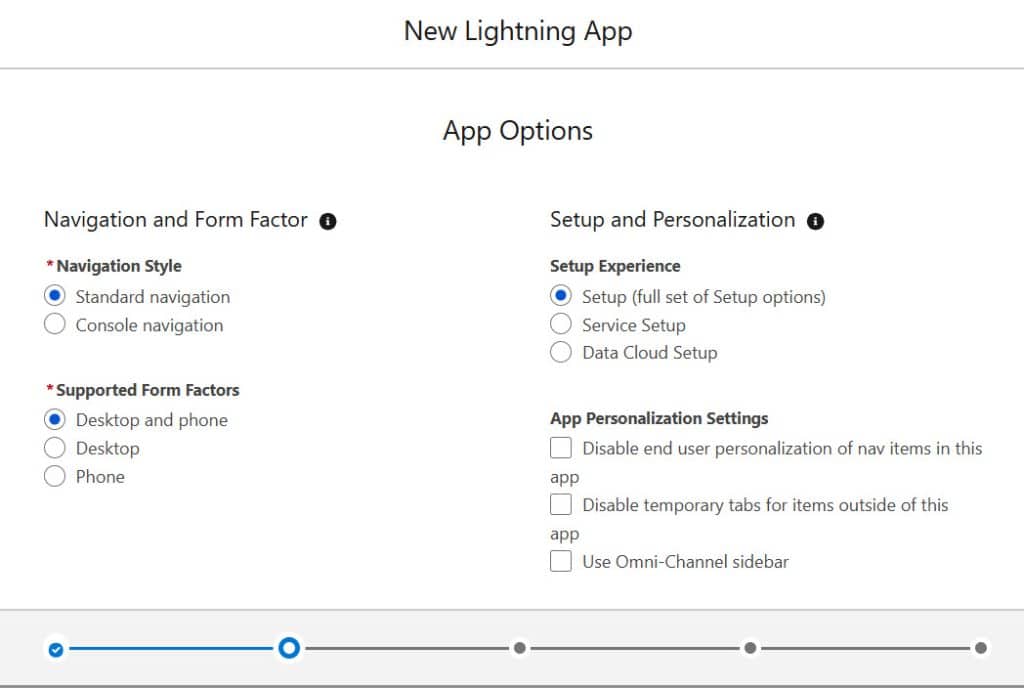
- Configure App Options
- Here you choose whether this app is for Desktop only, Mobile only, or both. You can also decide whether users can personalize their navigation tab order.
- If you want your users to be able to move tabs themselves (within the options you’ve given them), check “Allow users to customize the navigation bar.”
- Click Next.
- Add Utility Items (Optional)
- Utility items appear in the utility bar at the bottom of the screen — things like Notes, History, or Open CTI. This is optional. You can skip this step if you don’t need a utility bar.
- Click Next.
- Add Navigation Items
- This is the same step as in the previous guide. Add the items you want from the left column to the right column, then drag them into the order you want.
- Think about who will use this app and what objects or tools they use most. Build the navigation around their workflow, not around what’s easiest for admins to set up.
- Click Next.
- Assign the App to User Profiles
- This is an important step that’s easy to overlook. If you don’t assign the app to any profiles, nobody will see it in the App Launcher.
- Select the profiles that should have access to this app. You can assign it to specific profiles (e.g., Sales User, Service User) or all internal users.
- Click Save & Finish.
Common Issues and How to Fix Them
❌ A tab I created isn’t showing up in Available Items in App Manager
This usually means the tab isn’t visible in your profile. Go to Setup → Tabs and check the tab’s visibility settings.
Make sure it’s set to Default On for the System Administrator profile (or your own profile). Tabs with visibility set to Hidden for your profile won’t appear in App Manager.
❌ Users can’t see the custom navigation app in their App Launcher
The app isn’t assigned to their profile. Go to App Manager → Edit App → User Profiles step and add the relevant profiles.
❌ App shows in App Launcher, but navigation bar looks different from what was expected
The user may have already personalized their navigation. Ask them to click the pencil icon in the nav bar and reset it, or go to Setup → App Manager to check whether personalization is enabled for that app.
❌ I can see the app, but some tabs are missing
The user’s profile might not have read access to those objects. Even if a tab is in the navigation menu, users won’t see it if their profile doesn’t have object-level access. Check their profile’s Object Permissions.
Navigation Menu Tips You’ll Actually Use
- Lead with your most-used object. Whatever your team opens first every morning should be the first tab. For most sales teams, that’s Leads or Opportunities.
- Keep it under 8 tabs. More than that, and the nav bar starts getting cluttered. Overflow tabs are hidden in a “More” dropdown that users often miss.
- Create one app per team role, not one app for everyone. A sales rep and a service agent have completely different workflows — give them menus that match.
- Name your app clearly. Users see the app name in the App Launcher. “Sales – North America” is more useful than “Custom App 1”.
- Test with a non-admin user before rolling out. Log in as a test user (or use the “Login As” feature) and verify the navigation looks right from their perspective.
Key Takeaways
- The navigation bar in Salesforce Lightning is controlled by the Lightning App’s navigation items, not a global setting
- You can have multiple Lightning Apps with different navigation menus, each assigned to different user profiles
- To edit a navigation menu, go to Setup → App Manager, find your app, and click Edit
- You can add standard objects, custom objects, Visualforce tabs, Web tabs, and Lightning component tabs to any navigation menu
- Enable Allow users to customize the navigation bar if you want users to personalize their own tab order without affecting others
- If a tab isn’t showing up in Available Items, check its visibility settings in Setup → Tabs
- Keep navigation menus short and role-specific — less clutter means faster workflows
You may like to read:
- Customize the Salesforce Lightning Header Bar
- Difference Between Salesforce and Salesforce Lightning
- Delete the Custom Home page in Salesforce Lightning
- Activate a Record Page in Salesforce Lightning
- Edit Page Option Missing in Salesforce Lightning
I am Bijay Kumar, the founder of SalesforceFAQs.com. Having over 10 years of experience working in salesforce technologies for clients across the world (Canada, Australia, United States, United Kingdom, New Zealand, etc.). I am a certified salesforce administrator and expert with experience in developing salesforce applications and projects. My goal is to make it easy for people to learn and use salesforce technologies by providing simple and easy-to-understand solutions. Check out the complete profile on About us.
