When users interact with an AI agent, they expect smart and human-like communication. One of the simplest but most powerful ways to achieve this is to greet users by name.
In Salesforce, Agentforce agents can be configured to dynamically greet users based on their logged-in details.
This creates a more engaging, professional, and personalized experience for both customers and employees.
In this article, you will learn how to greet the Agentforce Service agent by user name in Salesforce. We will cover everything step by step.
What is the Greeting with the User Name in Agentforce?
Greeting with a user name means displaying a welcome message that dynamically includes the logged-in user’s name.
Instead of showing: “Hello User.”
You show: “Hello Alex, how can I help you today?”
This is done by fetching user details from Salesforce and passing them into the Agentforce prompt or response.
Why is a Personalized Greeting Important?
Personalized greetings provide multiple benefits:
- It makes the interaction feel human and friendly
- Improves user engagement and trust
- Enhances user experience in apps and portals
- Gives a professional touch to your AI agent
- Helps businesses build better relationships with users
Even a small change like using the user’s name can make a big difference.
How AI Agents Greet Users by Name in Salesforce Agentforce
Below, I will explain how to customize the greeting or welcome message for the agent by the logged-in user name in Salesforce Agentforce.
1. Prerequisites
Before customizing the greeting by user name and assigning it to the Agentforce agents, make sure you have set up the following settings.
- Enable Einstein Setup.
- Create an Agentforce Service agent and assign a Subagent, Instructions, and Actions.
- Create an inbound omnichannel flow to route the request to the service agent.
- Deploy the Service agent on the Community Site in Salesforce.
- Give login access to experience site/community site to the person account.
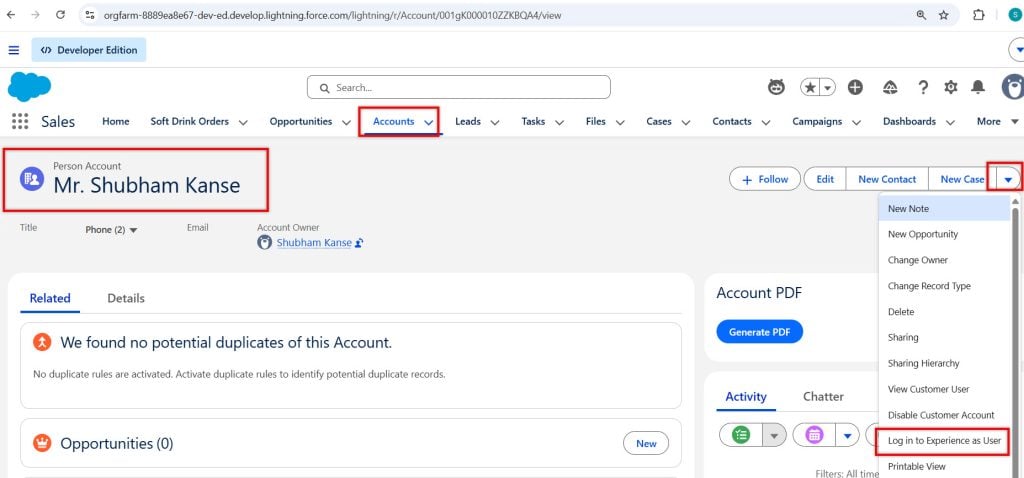
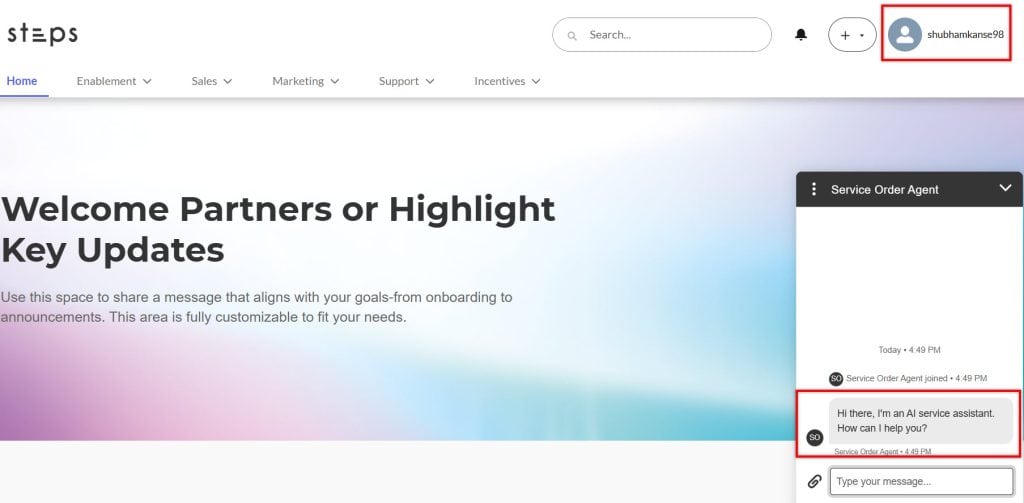
In the image below, you can see we have logged in to the community site from a person account, but the agent is not greeted by the user by their name.
We want to customize the greeting message with the logged-in user’s name.
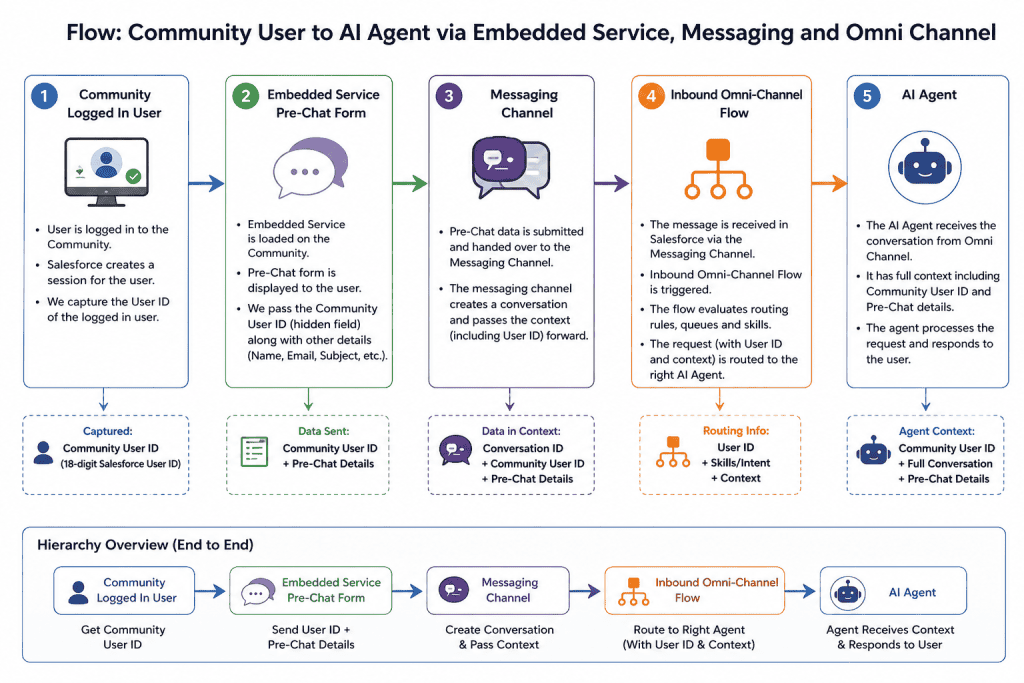
2. Flow – How the User Name will be Sent to the AI Agent
First, we need to understand the complete flow of how the logged-in community user’s ID is passed through the system.
- The process starts by capturing the logged-in user ID from the Experience Cloud (Community).
This user ID is then passed to the Embedded Service Pre-Chat form. - From the Pre-Chat form, the data is forwarded to the Messaging Channel.
- After that, it moves to the Inbound Omni-Channel Flow, which processes the request.
- Finally sends it to the AI Agent for handling.
3. LWC Component to Get the Community Logged-In User ID
First, we need to create an LWC component that fetches the logged-in user’s details from the Experience Cloud (Community).
Using this component, we can capture the Community User ID and, if needed, retrieve additional user information.
This LWC component sends the logged-in Community User ID to the Embedded Service Pre-Chat form.
The component does not require an HTML file because its purpose is only to run in the background when the community page loads, fetch the logged-in user ID, and store or pass it further in the flow.
JS File – communityHome.js
import { LightningElement, api } from 'lwc';
import Id from '@salesforce/user/Id';
export default class CommunityHome extends LightningElement {

    connectedCallback() {
        console.log('CommunityHome connectedCallback');
        console.log('current logged in user id',Id);
        const selectedEvent = new CustomEvent('Current_User_Id', {
            detail: {
                id: Id
            },
            bubbles: true,
            composed: true
        });
        window.dispatchEvent(selectedEvent);
    }

}
Xml File – communityHome.js-meta.xml
Since we need to use this component on the Community Home Page, we must expose it in the meta.xml file.
This allows the component to be added and configured directly within the community site Experience Builder.
<?xml version="1.0" encoding="UTF-8"?>
<LightningComponentBundle xmlns="http://soap.sforce.com/2006/04/metadata">
<apiVersion>62.0</apiVersion>
<isExposed>true</isExposed>
<masterLabel>Community Home</masterLabel>
<targets>
<target>lightningCommunity__Page</target>
<target>lightningCommunity__Default</target>
</targets>
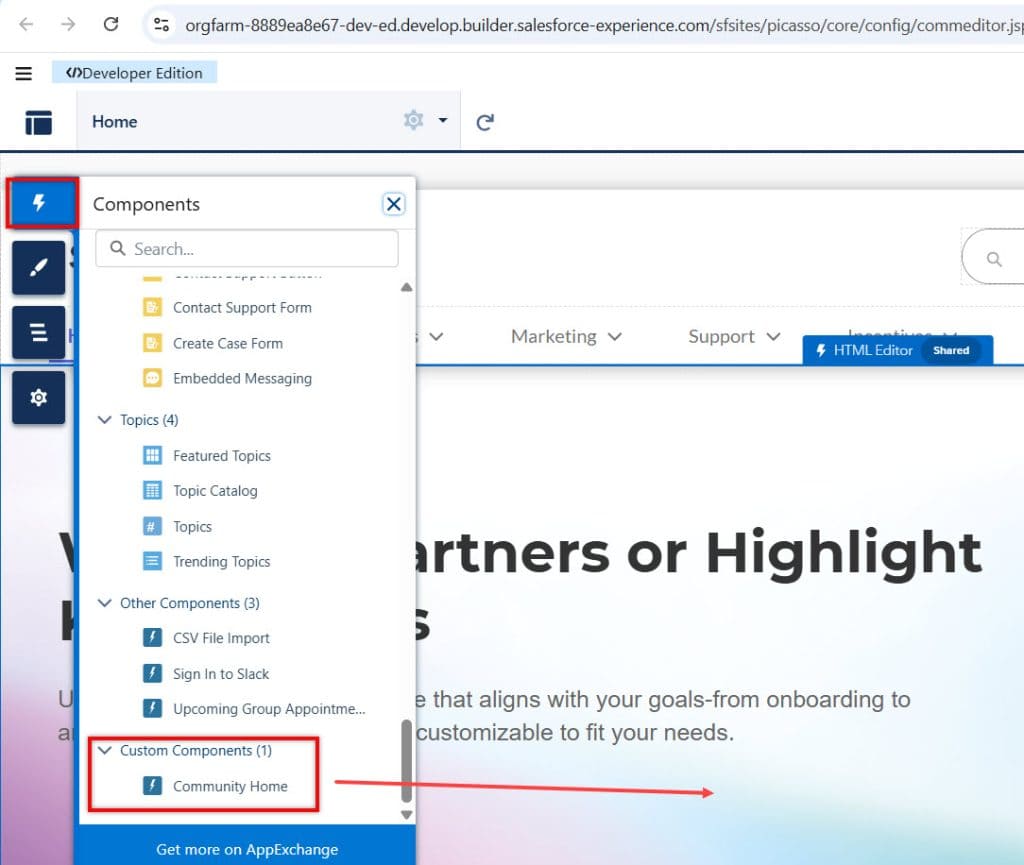
</LightningComponentBundle>4. Place LWC Component on Community Home Page
Now, place the LWC component on the Community Home Page so it loads automatically when the page opens.
This ensures the component runs in the background, fetches the logged-in user’s details, and captures the User ID without any manual action.
Once the User ID is captured, it can be stored or passed to the Embedded Service Pre-Chat form.
This helps maintain the user context throughout the flow and allows the AI Agent to properly identify and greet the user.
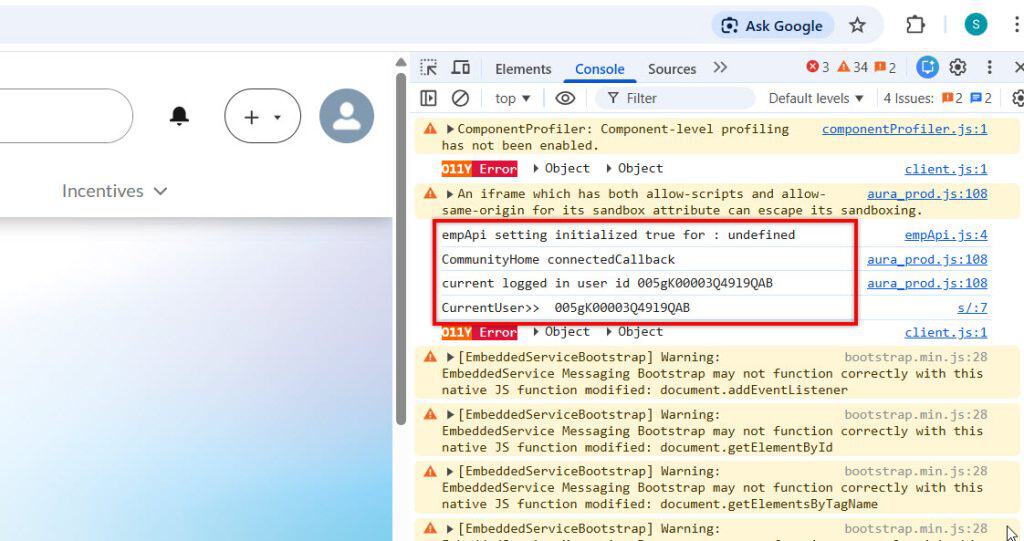
In the LWC JavaScript file, we have added the line:
console.log('Current logged-in user ID:', Id);This will display the currently logged-in Community user’s ID in the browser’s Inspect → Console tab.
It helps us verify that the component is correctly fetching the user ID when the Community page loads.
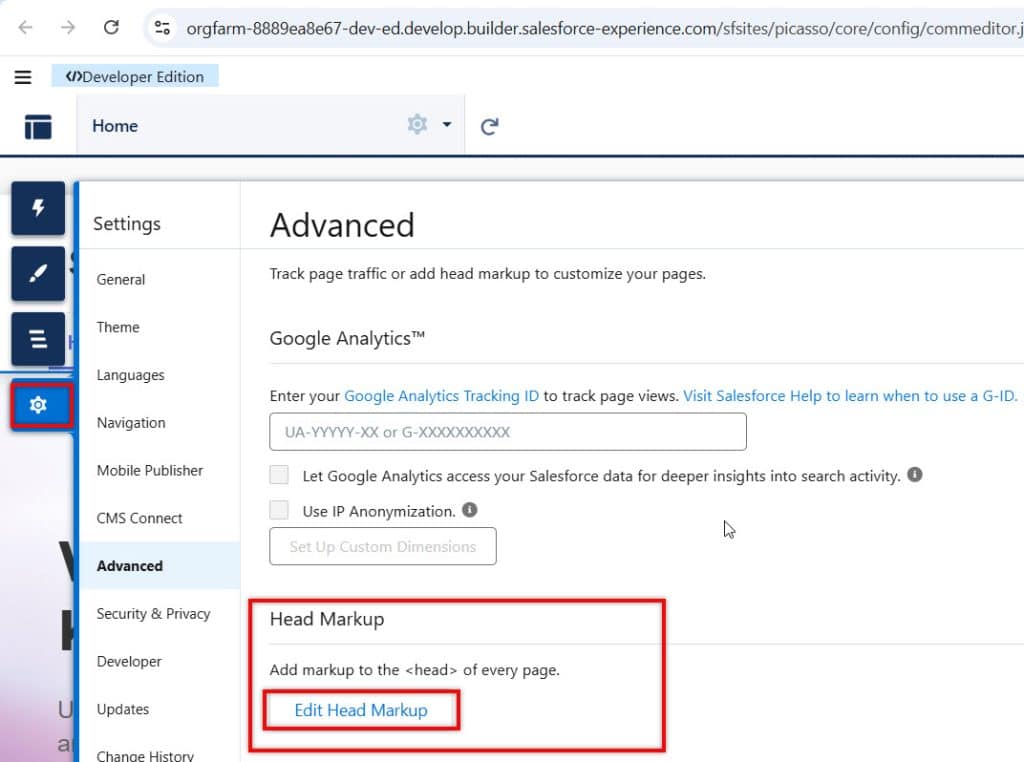
5. Add Head Markup in Experience Builder
After that, in Experience Builder, we need to add the Head Markup with the provided code.
<title>Welcome to Communities!</title>
<script type='text/javascript'>
    var currentUserId;
    window.addEventListener('Current_User_Id', function(e){
        currentUserId = e.detail.id;
        console.log('CurrentUser>> ',currentUserId);
    });
    window.addEventListener("onEmbeddedMessagingReady", () => {

        embeddedservice_bootstrap.prechatAPI.setHiddenPrechatFields({"Current_User_Id" : currentUserId});
        console.log('setting hidden prechat2  ',currentUserId);

    });

</script>
This code captures the logged-in Community User ID from the LWC component and stores it in a JavaScript variable (currentUserId).
It listens for a custom event (Current_User_Id) that is fired by the LWC, and once the event is received, it extracts and stores the user ID.
Next, when the Embedded Messaging is ready (onEmbeddedMessagingReady event), the script sets this user ID as a hidden field in the Pre-Chat form using setHiddenPrechatFields.
This ensures the logged-in user’s ID is automatically passed to the messaging flow without requiring the user to enter it manually.
Additionally, the console.log statements help in debugging by showing the captured and passed user ID in the browser’s console.
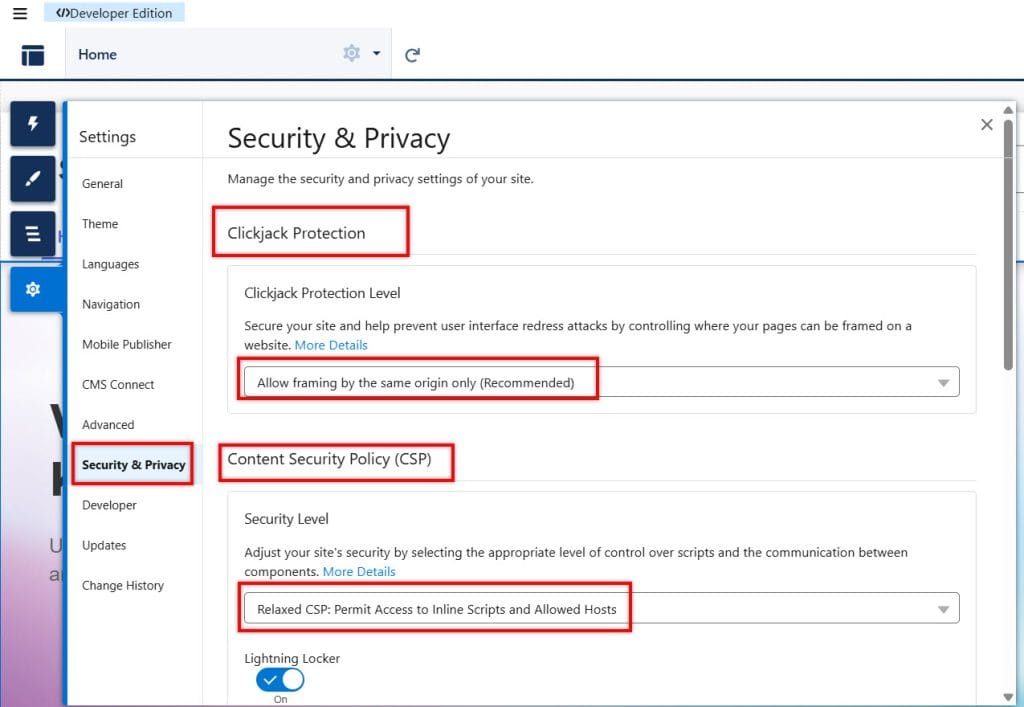
Then, in Security & Privacy settings inside Experience Builder, we need to configure a few important options to ensure the script and messaging work properly.
First, go to Clickjack Protection and set the level to “Allow framing by the same origin only (Recommended)”. This allows your site to operate securely while still supporting embedded components such as messaging.
Next, in the Content Security Policy (CSP) section, set the security level to “Relaxed CSP: Permit Access to Inline Scripts and Allowed Hosts”. Then, publish the site once.
This is required because we are using custom JavaScript in the Head Markup, and strict CSP settings may block it.
These settings ensure that:
- Your custom script in the Head Markup runs without issues
- Embedded Messaging works correctly
- The user ID is passed smoothly through the flow
Without these configurations, your script or messaging setup may not function as expected.
6. Create a Custom Parameter in the Messaging Channel
Next, open Messaging Settings from Setup.
Go to Setup → Search for “Messaging Settings” → Open it. This is where you configure all the settings related to Embedded Messaging, channels, and pre-chat configurations.
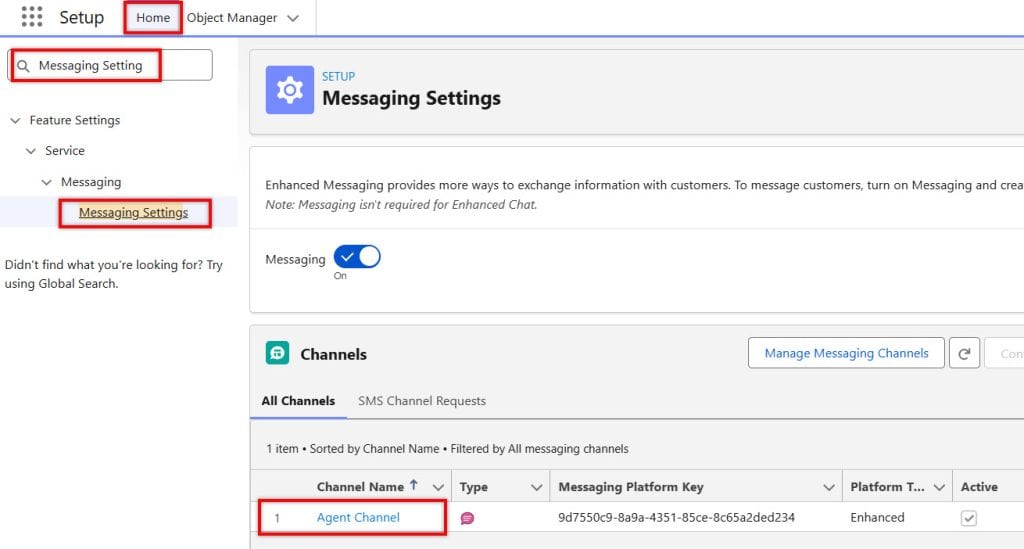
Here, we need to create a new Custom Parameter to store and pass the logged-in user ID from the Pre-Chat form into the messaging flow.
This custom parameter will act as a bridge between the Embedded Messaging Pre-Chat and the Omni-Channel Flow.
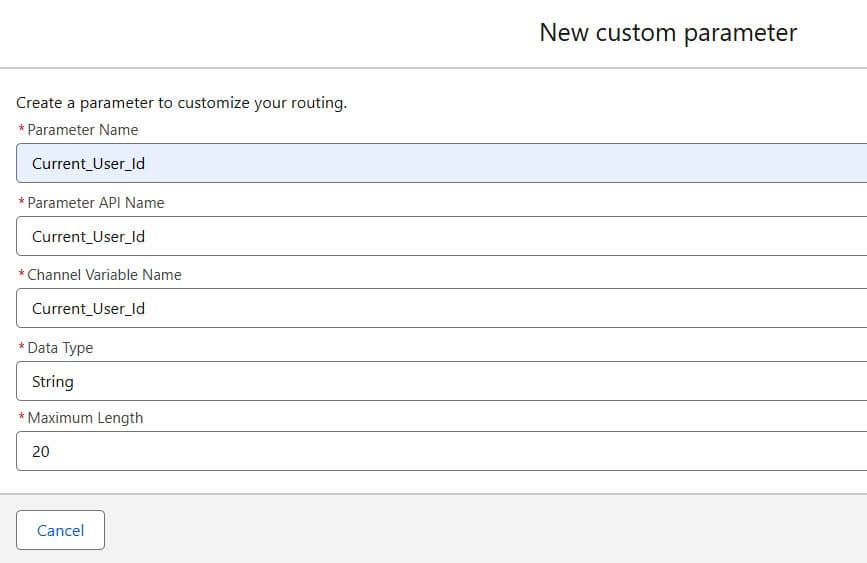
While creating the custom parameter in Messaging Settings, use the following configuration:
- Parameter Name – Current_User_Id
- Parameter API Name – Current_User_Id
- Channel Variable Name – Current_User_Id
- Data Type – String
- Maximum Length – 20
This configuration ensures that the logged-in Community User ID is correctly captured from the Pre-Chat hidden field and passed into the Messaging Channel.
Using the same variable name across all fields helps maintain consistency and makes it easier to use this value later in the Inbound Omni-Channel Flow and the AI Agent.
7. Activate Pre-Chat Form in Embedded Service Deployments
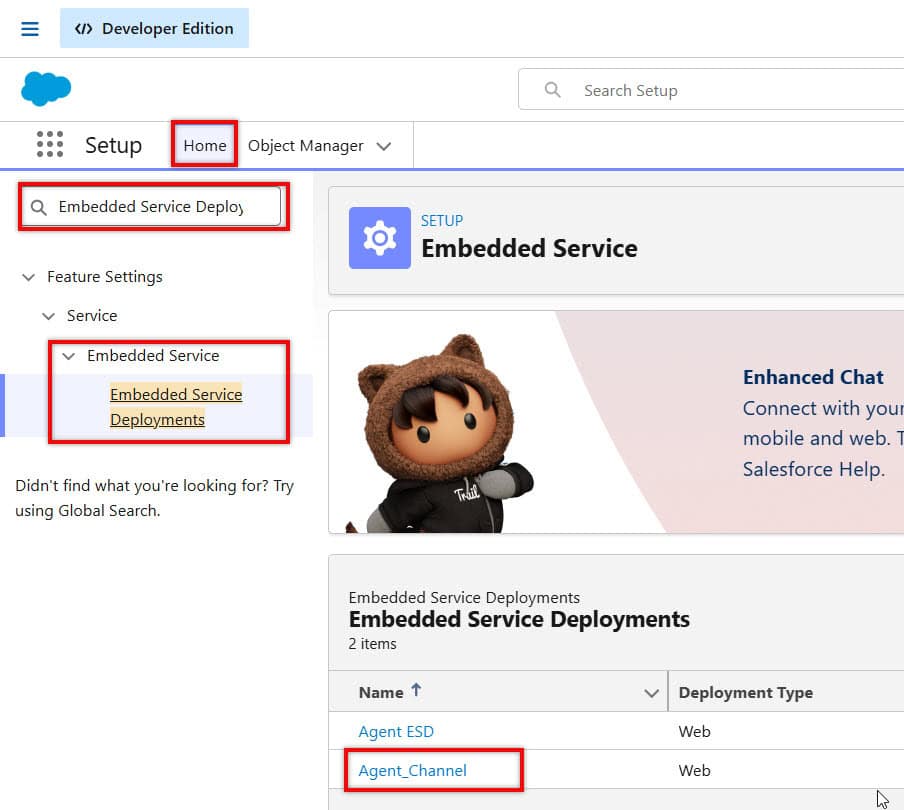
Now, open Embedded Service Deployments from Setup.
Go to Setup → Search for “Embedded Service Deployments” → Open it, and then select the deployment that you created in Experience Builder for adding the Service Agent to your website.
Once you open the deployment, navigate to the Pre-Chat Settings section. Click the Edit Pre-Chat option.
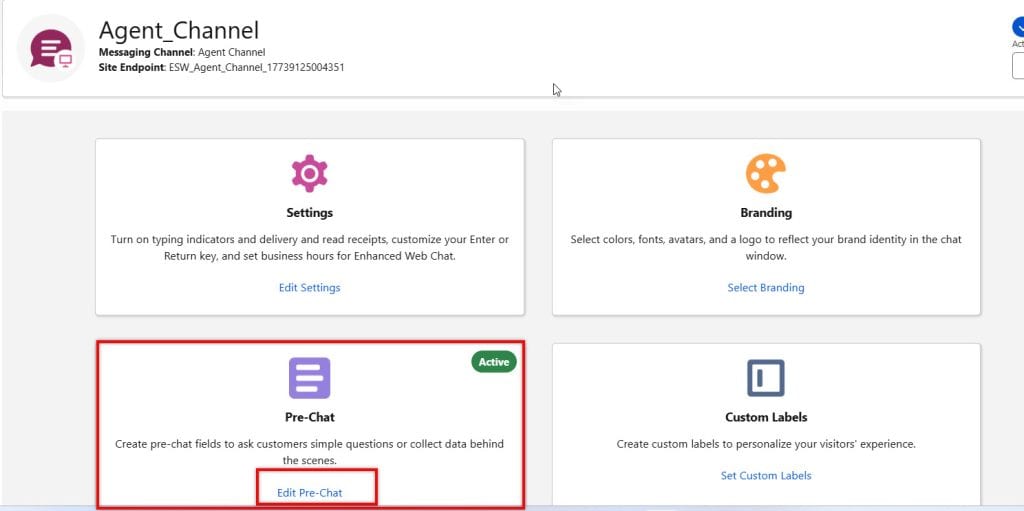
Here, map (from Available to Selected) the Hidden Pre-Chat Field (Current_User_Id) we passed from the Head Markup to the custom parameter you created in Messaging Settings.
This step ensures that the logged-in user ID is correctly captured at the start of the conversation and passed into the Messaging Channel, which will later be used in the Inbound Omni-Channel Flow and by the AI Agent for personalized interactions.
Activate and Publish the Embedded Service Deployment.
8. Parameter Mapping – Custom Parameter & Flow Variable
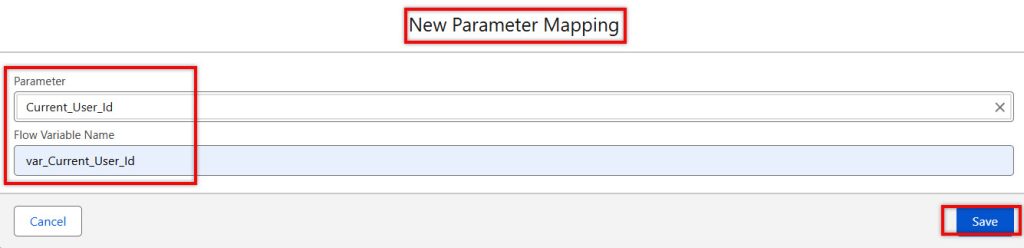
Now, again open Messaging Settings → Messaging Channel, and create a new Parameter Mapping.
Here, select the parameter Current_User_Id and provide a Flow Variable Name. This Flow variable name is very important because it will be used later inside the Inbound Omni-Channel Flow.
At this stage, we have not yet created the variable in the Flow. However, whatever name you define here must be used exactly the same when creating the variable in the Flow.
The variable in the Flow should be marked as Available for Input, so it can receive the value passed from the Messaging Channel.
This step ensures that the Current_User_Id captured in the Pre-Chat is successfully passed to the Flow, where the AI Agent can use it to identify and greet the user.
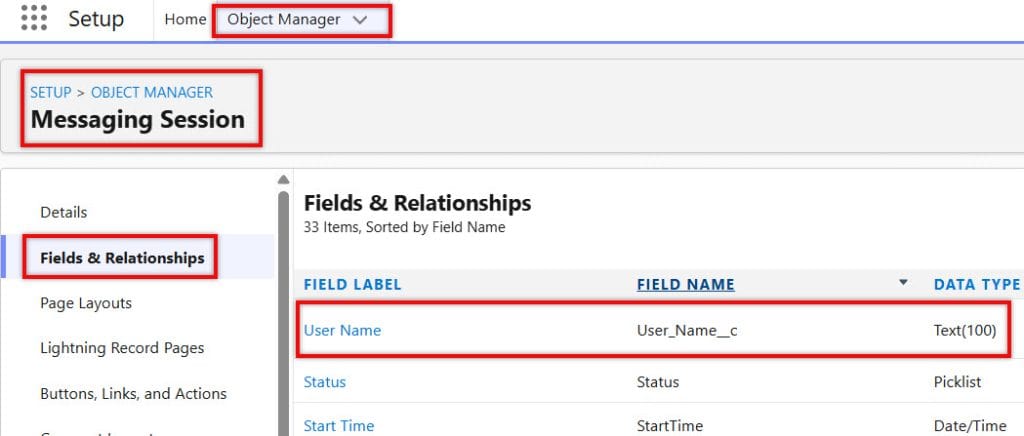
9. Create Custom Field in Messaging Session Object
Now, create a custom Text field on the Messaging Session object to store the user name.
Go to Setup → Object Manager → Messaging Session → Fields & Relationships → New. Select Text as the data type, then define the field.
For example:
- Field Label – User Name
- Field API Name – User_Name
- Length – 255 (recommended)
This field will store the user’s name after we fetch it in the Flow using the Current_User_Id. Later, the AI Agent can use this field to greet the user by name.
10. Edit Inbound Omni Channel Flow
Open the Inbound Omni-Channel Flow that is used to route requests from the Community site to the AI Agent you configured while deploying the Service Agent.
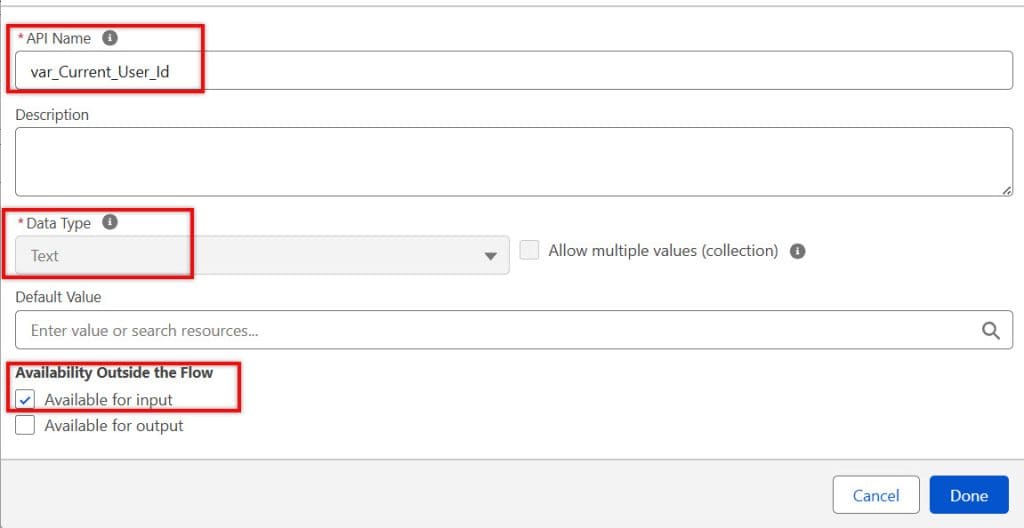
Now, create a new variable in the Flow using the same name that you provided earlier in the Messaging Channel Parameter Mapping. This is important because the value passed through the messaging channel will be assigned to this variable.
Configure the variable as follows:
- Data Type – Text (since it will store the User ID)
- Available for Input – Enabled
This variable will capture the Current_User_Id coming from the Pre-Chat and make it available inside the Flow.
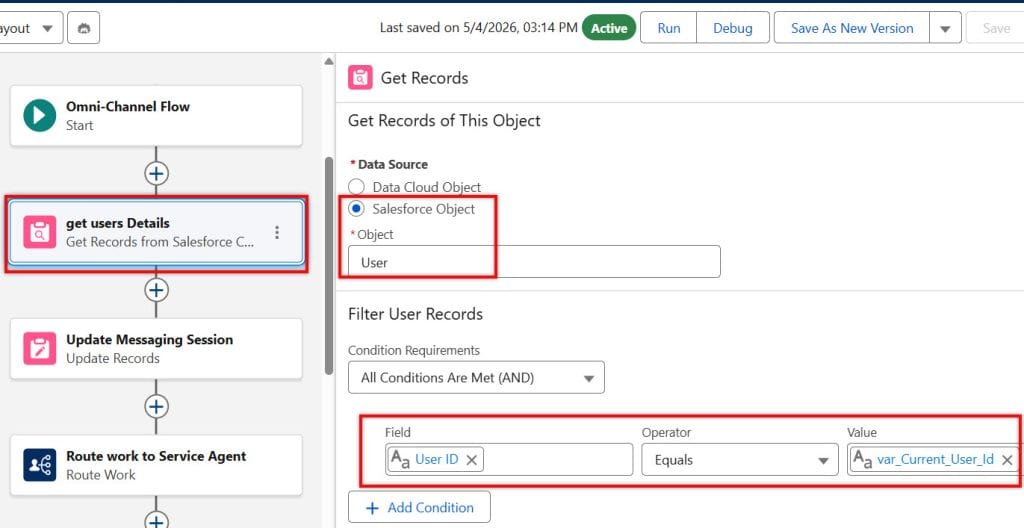
After that, add a Get Records element in the Flow to retrieve the User details.
Configure this element to query the User object by passing the variable you created earlier (which stores the logged-in Community User ID).
Use this variable in the filter condition like:
- Condition: Id = {!Your_Variable_Name}
This step allows you to fetch the actual user details using the captured User ID.
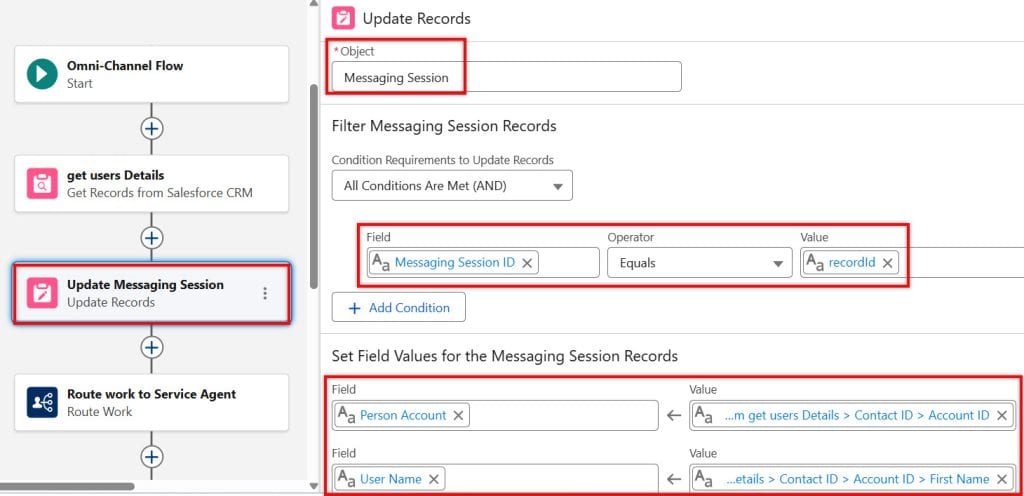
Next, add an Update Records element in the Flow. This element will update the user’s name in the Messaging Session record for the current session.
Configure it as follows:
- Object – Messaging Session
- Condition –Id = {!recordId} (this recordId is automatically available in the flow and represents the current messaging session)
- Field to Update – Set your custom field (e.g., User_Name__c) with the value from the retrieved User record.
This step ensures that the user’s name, retrieved using the User ID, is stored in the Messaging Session record.
Later, the AI Agent can use this field to greet the user by name, enabling a more personalized experience.
After this, keep all the other flow elements as they are; do not update or modify anything else. Simply save the flow, then activate it to apply the changes.
11. Add Context Variabel in Service Agent
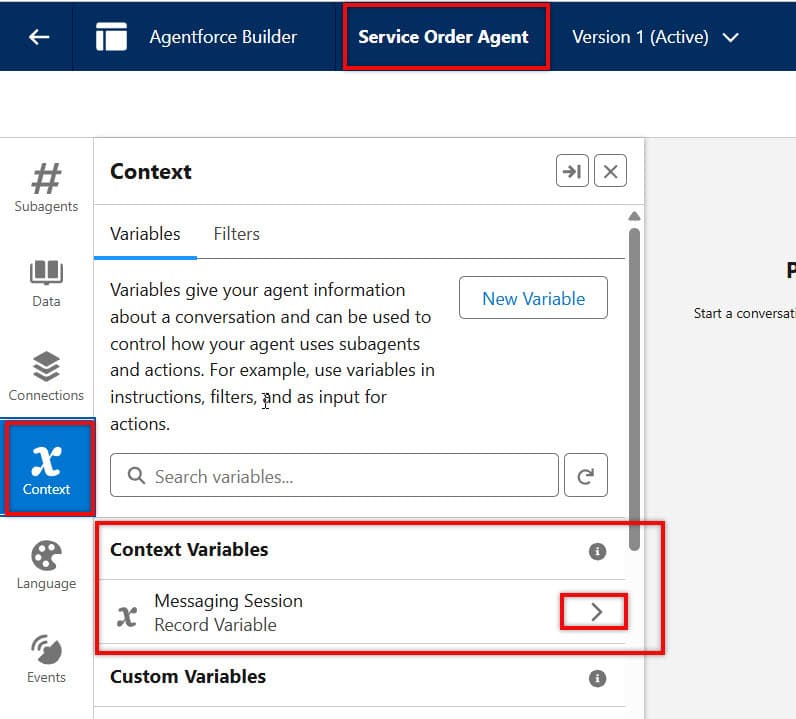
Now navigate to Agentforce Agents and open your Service Agent in the Agent Builder, where we will add a Context Variable.
In the Agent Builder, go to the Context Variables section and open the Messaging Session context variable.
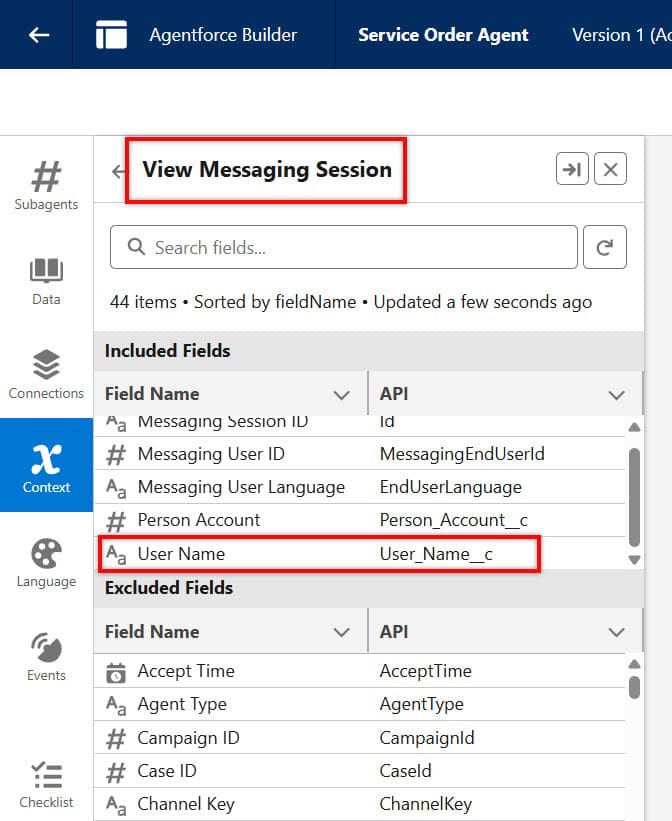
After opening the Messaging Session in the Context Variables section, go to the Excluded Fields list and search for the field you created to store the user name (e.g., User_Name__c).
Once you find it, move this field from Excluded Fields to Included Fields. This step is important because only the included fields are accessible to the Agent.
After adding it to the Included Fields, the AI Agent will be able to use this value during the conversation and dynamically greet the user by name.
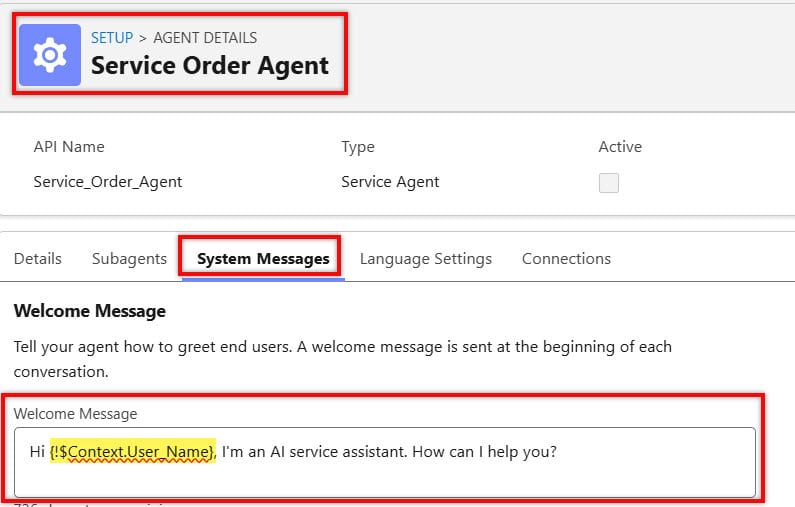
Now navigate back and edit your Agent’s System Message.
Add the context variable like this:
{!$Context.User_Name} // (Note: Do not include __c here.)This variable contains the user’s name that we stored earlier in the Messaging Session record through the Flow. When the conversation starts, the Agent will use this value to dynamically greet the logged-in user.
For example:
Hello {!$Context.User_Name}, how can I assist you today?This ensures that every user receives a personalized greeting with their actual name.
Now, activate the Agent and log in to your Community site using your Community user credentials.
Once you log in and open the messaging widget, the entire flow will trigger automatically, from capturing the user ID to passing it through the Pre-Chat, Flow, and Messaging Session.
Finally, the AI Agent will use the stored user name to greet you with a personalized message.
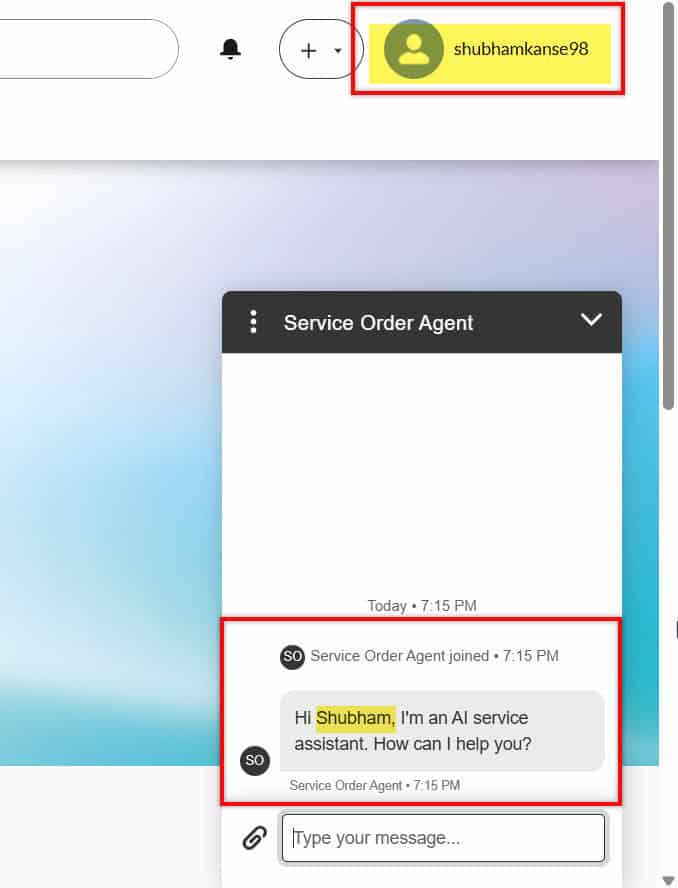
Proof of Concept:
Now, once you log in to the Community site and click on the Agent bot, you will see that the Agent greets you using your logged-in user name.
This confirms that the entire flow from capturing the user ID, passing it through Pre-Chat, processing it in the Flow, storing it in the Messaging Session, and finally using it in the Agent is working correctly.
Frequently Asked Questions
1. Can Agentforce automatically get the user name?
2. Which field should I use for greeting?
3. What if the user name is not available?
4. Can I use the full name instead of the first name?
5. Do I need coding for this?
6. Can I use this in Experience Cloud?
7. Is this available in all Agentforce agents?
Conclusion
Greeting users by name in Agentforce is a simple yet powerful feature that improves the user experience and makes your AI agent feel more human.
You can implement this using Prompt Templates, Instructions, Flow, or Apex, depending on your requirement. For beginners, Prompt Builder is the easiest and most recommended method.
By following this guide, you can easily configure personalized greetings in Salesforce Agentforce for your agents and create a more engaging interaction for your users.
You may like to read:
- Outbound Omni-Channel Flow in Salesforce Agentforce
- Agentforce Data Cloud & Data Library in Salesforce
- Agentforce Vibes in Salesforce Tool for Developers
- Agentforce Use Cases for Sales, Service, and Employee Support

Shubham is a Certified Salesforce Developer with technical skills for Building applications using custom objects, approval processes, validation rules, Salesforce flows, and UI customization. He is proficient in writing Apex classes, triggers, controllers, Apex Batches, and bulk load APIs. I am also familiar with Visualforce Pages and Lightning Web Components. Read more about me.
