If you’ve ever tried to connect Salesforce to an external API, whether it’s a payment gateway or your company’s internal system, you’ll need to provide an API key, a Bearer token, or a custom header such as X-Calling-User or X-Billing-Code.
That “something extra” is what we call a custom header, and in this tutorial, you will understand exactly how to set one up in Salesforce using Named Credentials and External Credentials step by step, no Apex code required.
What Are Custom Headers in Salesforce?
Custom headers are key-value pairs you attach to an outgoing HTTP request. Think of them like a sticky note you put on your API call that tells the external system: “Here’s who I am, here’s my key, and here’s what I need.”
The HTTP standard includes an Authorization header, and Salesforce automatically generates it for many authentication types.
But many real-world APIs don’t follow that standard. They define their own authentication rules. For example:
- A photo API might expect: Authorization: Client-ID abc123
- A B2B platform might expect: X-API-Key: your-key-here
- An enterprise search service might expect: X-Calling-User: john@company.com
For these cases, you need to define your own custom headers, and Salesforce provides a clean, no-code way to do so in Setup.
Named Credentials vs External Credentials in Salesforce
Before we jump into the steps, let me quickly explain where you can add custom headers, because this trips people up.
In Salesforce, you have two layers:
- External Credential — Handles how to authenticate (the auth protocol, principal, and auth credentials). Think of it as the identity layer.
- Named Credential — Defines where to call (the endpoint URL). Think of it as the destination layer.
You can add custom headers to both, and a single callout will combine them. But here’s the rule of thumb from Salesforce’s own documentation:
In most cases, it’s best to associate headers with the External Credential, rather than the Named Credential, because External Credentials are meant to encapsulate authentication details.
A simple way to decide:
| Scenario | Where to Add the Header |
|---|---|
| API key or Bearer token (authentication-related) | External Credential |
| Billing code or endpoint-specific context | Named Credential |
| Per-user identity (e.g., X-Calling-User) | External Credential |
| A header only relevant to one specific endpoint | Named Credential |
One more thing to know: If you create headers with the same name on both the Named Credential and the External Credential, the Named Credential header wins and overwrites the External Credential one.
When Would You Use Named & External Credentials?
Let me give you a few real-world scenarios to make this feel less abstract.
Scenario 1: Third-party API key
Your company uses a data enrichment service that requires an API key in every request, set to X-API-Key: abc123.
Instead of hardcoding this in Apex, you store it as a principal in an External Credential and attach it as a custom header.
Every Apex callout using that Named Credential automatically sends the correct header — and if the key changes, you update it in Setup, not in code.
Scenario 2: Per-user identity
You’re integrating with Microsoft’s enterprise search. The service returns different results based on who is making the request.
You define a custom header, X-Calling-User, with the value {!$User.email}, so each user’s callout automatically identifies them by their Salesforce email address.
Scenario 3: Basic Auth with a custom Authorization header
Some services expect Basic authentication but don’t accept Salesforce’s auto-generated header.
You can disable the auto-generated header and create your own Authorization header using a formula that Base64-encodes the username and password.
How to Create Custom Headers in Salesforce
Follow the steps to create a custom header in Salesforce.
Step 1: Open Setup
Click the gear icon (⚙️) and select Setup from the dropdown. This takes you to the Setup home page.
In the Quick Find box, type Named Credentials and click Named Credentials from the search results.
You’ll land on a page with two tabs:
- Named Credentials → A secure way in Salesforce to store the endpoint URL and authentication details for external API callouts.
- External Credentials → A configuration that defines how Salesforce authenticates (like OAuth, API key) with external systems.
- External Auth Identity Providers → The trusted external service (like Google or Microsoft) that issues authentication tokens for secure API access.
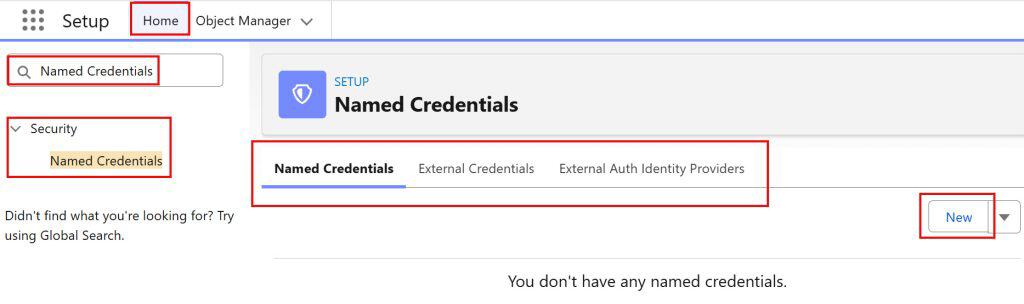
Based on your requirements, decide whether to add the custom header to the External Credential, the Named Credential, or External Auth Identity Providers.
For most API key and authentication scenarios, you’ll work under the External Credentials tab.
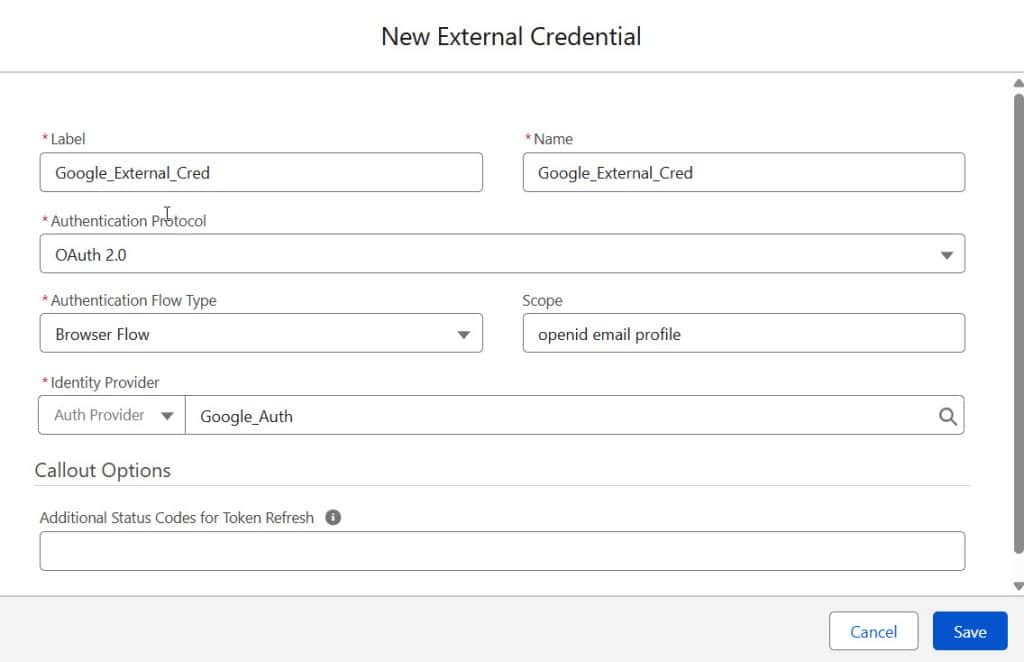
Step 2: Open the Relevant Credential
I have selected External Credentials. You can select the credential you want to add the header to. Then click New to create it first.
Provide the details and click the save button.
Step 3: Add a New Custom Header
Scroll down to the Custom Headers section on the credential’s detail page. Click New.
You’ll see three fields:
| Field | What to Enter |
|---|---|
| Name | The header name exactly as the external service expects it (e.g., Authorization, X-API-Key, X-Calling-User) |
| Value | The header value — either a static string or a formula using {!$Credential.*} or {!$User.*} syntax |
| Sequence Number | A number that controls the order in which headers are sent. Lower numbers go first. Leave as the default if you only have one header. |

The Name field is straightforward; just type the exact header name the API expects. The Value field is where it gets interesting. You have two options:
Option A — Static value:
Just type the value directly. For example: application/json
Option B — Formula-based value (more secure and flexible):
Use Salesforce’s formula functions to reference stored credentials or user details.
Here are some common examples:
// Reference a stored API key from the principal
{!$Credential.ExternalCredentialName.PrincipalParameterName}

// Combine text with a credential value
{!'Client-ID ' & $Credential.UnsplashScheme.MyClientId}

// Per-user callout using the logged-in user's email
{!$User.email}

// Basic Auth — encode username and password in Base64
{!'Basic ' & BASE64ENCODE(BLOB($Credential.MyScheme.Username & ':' & $Credential.MyScheme.Password))}
Note: If you’re using
$Userin a formula on an External Credential with Named Principal as the identity type, Salesforce won’t allow it. Switch to Per User identity type, or move the header to the Named Credential instead.
If you have multiple headers on the same credential, use the Sequence Number to control the order in which they’re applied. Headers with a lower number are sent first.
For a single header, the default value is fine.
Click Save. The custom header now appears in the Custom Headers section of your credential.
Step 4: Allow Formulas in Your Named Credential (if using formula values)
If your custom header value uses a formula, you need to enable formula support on the Named Credential itself.
- Go to the Named Credentials tab
- Open the Named Credential linked to your External Credential
- Make sure Allow Formulas in HTTP Header is enabled
- If you created a custom
Authorizationheader manually, also disable Generate Authorization Header to prevent Salesforce from sending a duplicate
Click Save.
Common Custom Header Examples
Here’s a cheat sheet for the header configurations you’ll most commonly need:
| Header Name | Example Value | Use Case |
|---|---|---|
| Authorization | Bearer {!$Credential.MyScheme.Token} | OAuth token-based APIs |
| Authorization | Client-ID {!$Credential.MyScheme.ClientId} | Photo/media APIs (e.g., Unsplash) |
| Authorization | {!’Basic ‘ & BASE64ENCODE(BLOB(…))} | Basic Auth with encoded credentials |
| X-API-Key | {!$Credential.MyScheme.ApiKey} | API key-based services |
| X-Calling-User | {!$User.email} | Per-user identity callouts |
| X-Billing-Code | costCenter123 | Static billing/tracking identifier |
| Content-Type | application/json | Ensure JSON payload format |
Common Errors and How to Fix Them
Below are some common errors that users face in the custom header. I will explain how to fix them.
1. “Header value formula is invalid.”
This usually means you’ve used an unsupported function or made a syntax error in the formula.
Double-check that you’re using supported formula functions (like BASE64ENCODE, BLOB, TRIM, or the & concatenation operator).
Not every Salesforce formula function works in custom header values.
2. The custom header is not being sent in the callout
Two common causes:
- The Named Credential’s Allow Formulas in HTTP Header option is not enabled
- The External Credential’s principal is not correctly mapped to the Named Credential. Open the Named Credential and confirm the External Credential field is populated
3. Duplicate header issue (Named Credential header overwriting External Credential header)
This happens when you’ve created the same header name on both the Named Credential and the External Credential.
Remember — headers from the Named Credential always take priority. If you want the External Credential’s header to apply, remove the duplicate from the Named Credential.
4. $User The formula is not working on the External Credential
If you’re using {!$User.email} or any $User merge field in a custom header on an External Credential, your identity type must be set to Per User, not Named Principal.
The Named Principal type uses a shared identity and doesn’t have a user context to resolve.
5. “Generate Authorization Header” conflict
If your custom header is an Authorization header and callouts are failing with a 401 Unauthorized error, it might be because Salesforce is also auto-generating its own Authorization header on top of yours.
Go to your Named Credential and uncheck the “Generate Authorization Header” option.
Named Credentials Formula Functions You Can Use in Custom Headers
Salesforce supports a set of formula functions specifically designed for custom header values. Here are the ones worth knowing:
- {!$Credential.SchemeName.ParameterName} — References a stored principal parameter (like an API key or password)
- {!$User.FieldName} — References a field from the currently logged-in user’s record
- BASE64ENCODE(BLOB(value)) — Encodes a value in Base64 (essential for Basic Auth)
&— Concatenates strings (e.g., {!’Bearer ‘ & $Credential.MyScheme.Token})- TRIM() — Removes whitespace from a string value
Key Takeaways
- Custom headers in Salesforce are used to pass authentication data, API keys, or context information in outgoing API callouts — not for UI styling or navigation
- You can add them to both Named Credentials and External Credentials — a single callout automatically combines both
- For authentication-related headers (API keys, tokens), attach them to the External Credential
- For endpoint-specific or non-auth headers (billing codes, etc.), attach them to the Named Credential
- When the same header name exists on both, the Named Credential header wins
- Use formula-based values with {!$Credential.*} syntax to reference stored credentials securely — no hardcoding needed
- If your header value uses a formula, enable Allow Formulas in HTTP Header on the Named Credential
- If you’re creating a custom
Authorizationheader, disable Generate Authorization Header on the Named Credential to avoid conflicts
I am Bijay Kumar, the founder of SalesforceFAQs.com. Having over 10 years of experience working in salesforce technologies for clients across the world (Canada, Australia, United States, United Kingdom, New Zealand, etc.). I am a certified salesforce administrator and expert with experience in developing salesforce applications and projects. My goal is to make it easy for people to learn and use salesforce technologies by providing simple and easy-to-understand solutions. Check out the complete profile on About us.
