
A customer visits your support community at 10 PM, asks why an order has not arrived yet, and needs immediate help.
Your human support team may be offline, but the customer still expects a useful answer or a clear path to a live agent.
I have seen this situation in many Service Cloud implementations. The best setup does not try to make AI replace every support representative.
Instead, it lets an Agentforce Service Agent answer trusted questions first, collect context, and transfer complex conversations to the right support queue.
In this guide, I will show you how to create an AI Service Agent in Salesforce and deploy it to an Experience Cloud community site using Agentforce, Omni-Channel, Messaging, and an inbound flow.
Before You Create an AI Service Agent
For this example, let us use a B2B software company that handles around 500 customer support cases each month.
Customers use an Experience Cloud site to check product documentation, ask billing questions, and report technical issues.
The company wants the AI agent to:
- Answer common questions from approved knowledge content
- Help visitors raise a support request
- Run inside the customer community site
If you are still learning how Agentforce fits into the wider Salesforce platform, read this guide on Salesforce Agentforce. For a broader customer support foundation, review Salesforce Service Cloud.
Pro Tip: In my experience, teams get better results when they prepare a small, accurate knowledge base first. Do not give a new AI agent every document in your org. Start with customer-safe articles, test its answers, and expand carefully.
Create an AI Service Agent with Agentforce Script in Salesforce
Below are the steps we will follow to create and deploy an AI service agent with the Agentforce script.
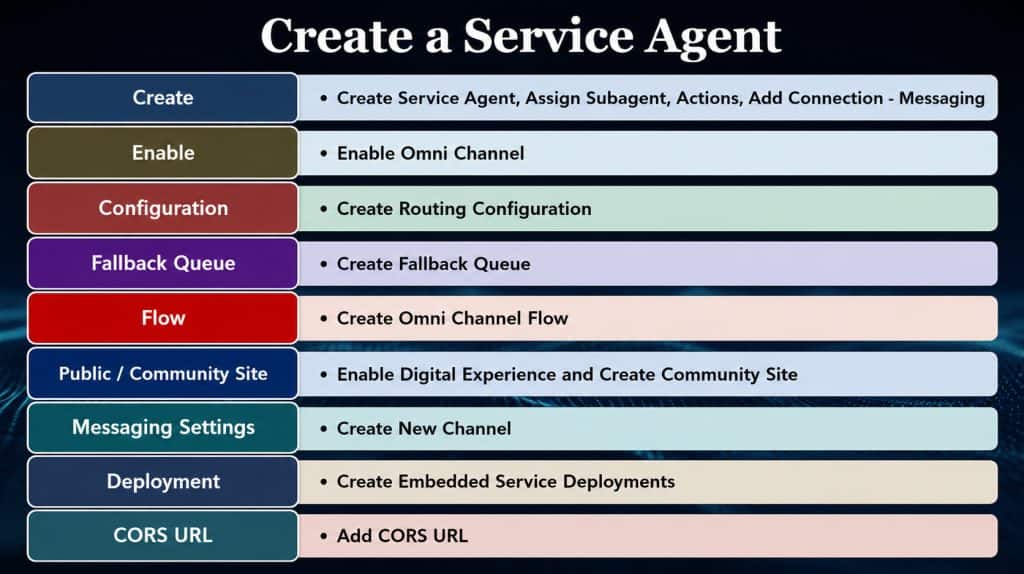
Create an AI Service Agent with Agentforce Script in Salesforce
An AI Service Agent is an Agentforce agent designed to help customers with service-related tasks. It uses instructions, subagents, actions, and connected knowledge to understand questions and take approved actions.
- Go to App Launcher and search for Agentforce Studio.
- Click New Agent.
- Select the Agentforce Service Agent template or option.
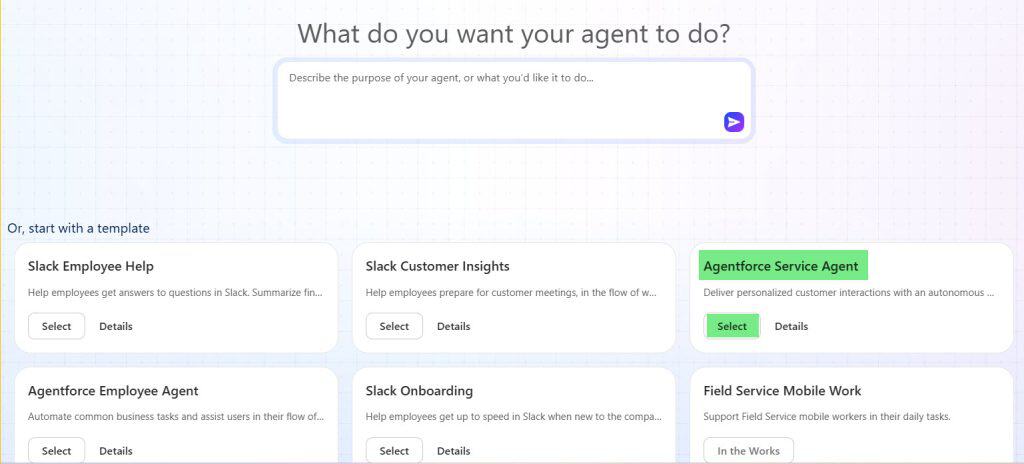
- Enter an agent name, such as Customer Support AI Agent.
- If you are creating the service for the first time, Salesforce will automatically create a new user; you just have to click the Let’s Go button.
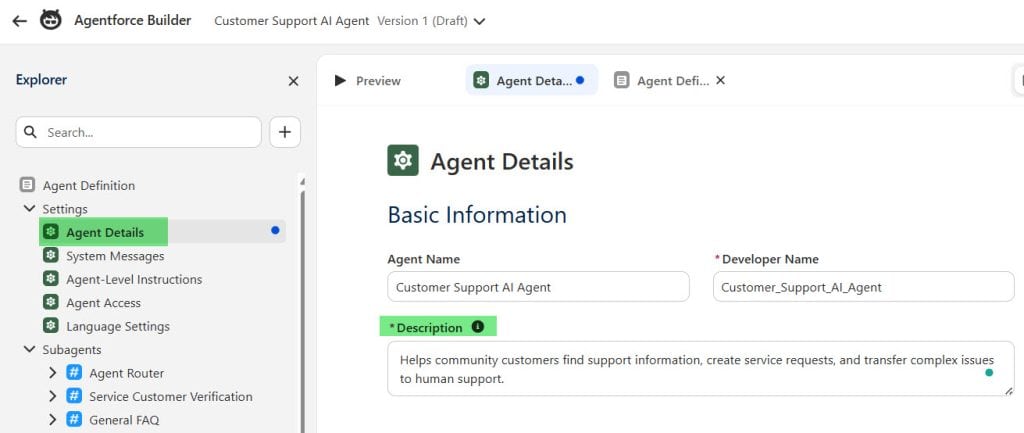
- Add a clear Description:
- In the System Messages, you can customize the Welcome and Error messages.
- Choose the agent language and click Create.
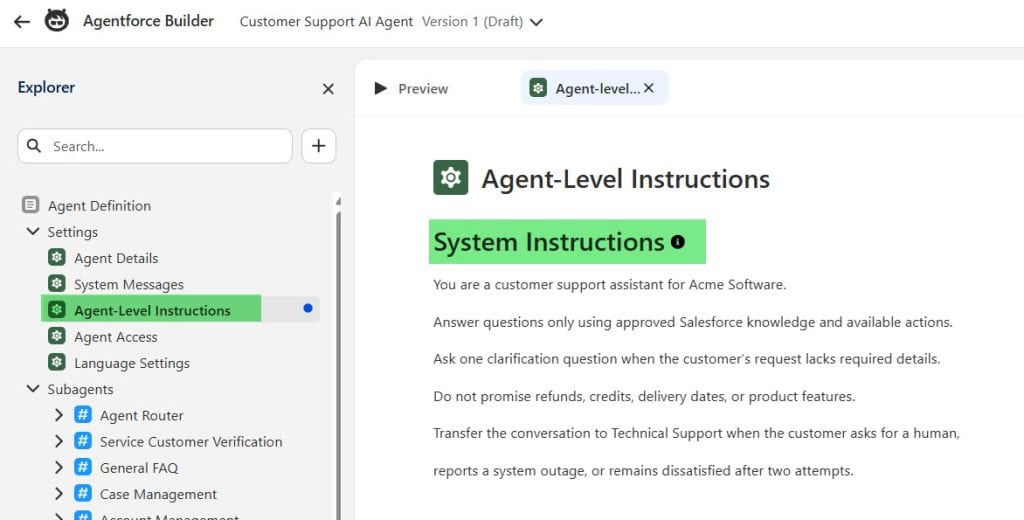
- Next, configure the agent’s behavior. Your instructions should define what the agent should do and what it must avoid.
- These instructions matter because they give the agent boundaries. Without them, the agent may produce helpful-sounding but unsupported answers.
Assign a Subagent, Instructions, and Actions to Agent
In Agentforce Builder, add the subagents that match your support process. A topic tells the agent what type of customer request it can handle. For this use case, create topics such as:
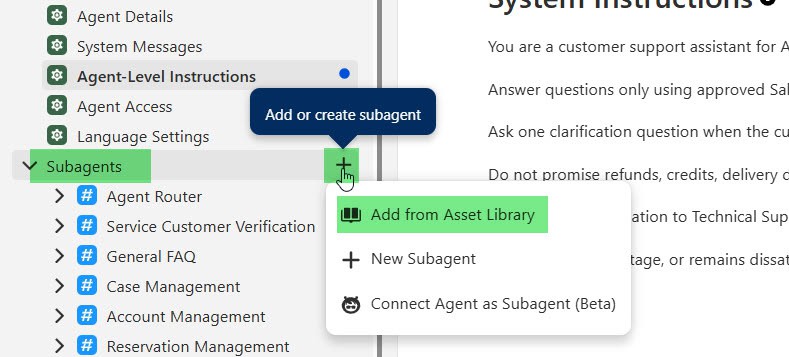
Then add actions for the tasks your agent must complete. An action lets the agent retrieve Salesforce data, launch a Flow, call approved Apex, or transfer a conversation.
For example, create a Flow action named Create Support Request. A Flow is Salesforce’s low-code automation tool. This action can collect the customer’s subject, description, product area, and priority before creating a Case record.
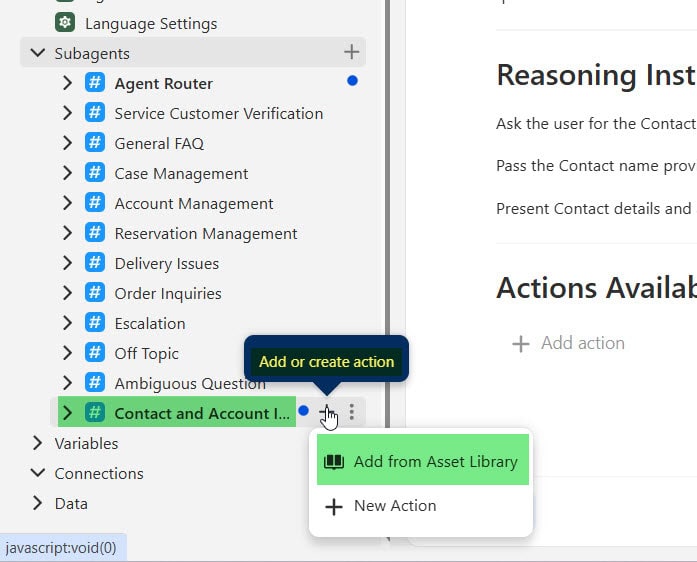
You can use a screen flow or an autolaunched flow depending on how you want the conversation to work. If you need help building an action with automation, see how to create a custom Flow action for Agentforce.
For more advanced use cases, such as securely calling another business system, you can also explore Agentforce actions that call external APIs.
Add Messaging Connection to AI Agent in Salesforce
The Service Agent needs a Messaging connection because customers will start conversations from the Experience Cloud site.
- Go to Connections.
- Click Add Connection.
- Select Messaging.
- Save the connection.
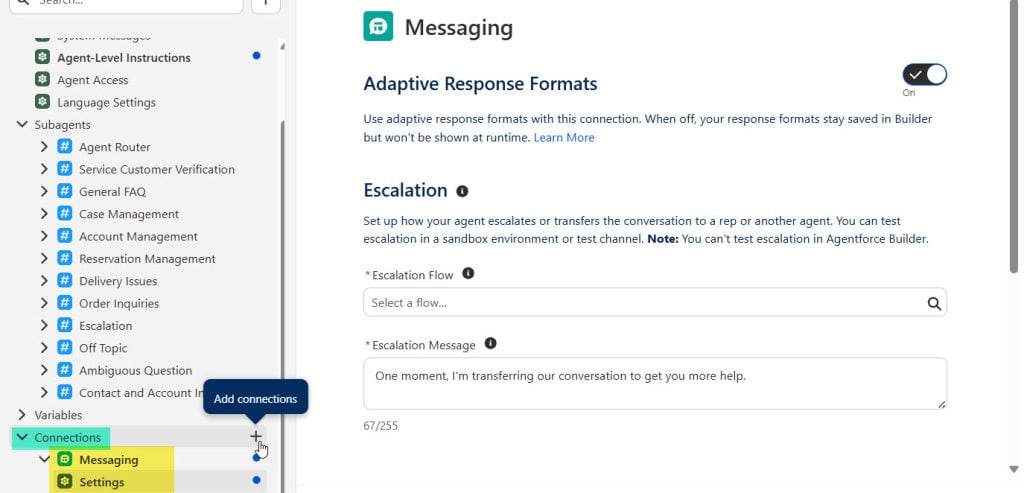
This connection prepares the Service Agent to receive Messaging sessions from your website or community site.
After that, save the changes, commit the version, and activate the agent.
You will connect the actual messaging channel after you create the Omni-Channel routing flow.
Enable Omni-Channel for Agentforce Routing
Omni-Channel routes service work, such as chats and cases, to the right people based on queues, skills, capacity, and availability.
In this setup, Omni-Channel handles the handoff when the AI agent needs human help.
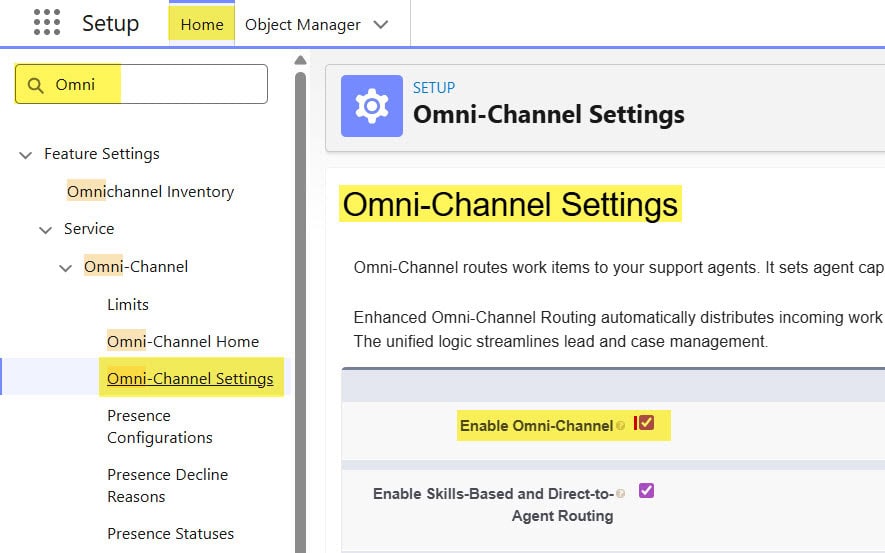
- Go to Setup.
- Search for Omni-Channel Settings.
- Enable Omni-Channel.
- Enable enhanced routing features if your org requires them.
- Click Save.
Create Routing Configuration and Fallback Queue
A Routing Configuration controls how Salesforce sends incoming work to agents. It defines settings such as routing priority, work capacity, and the model Salesforce uses to assign work.
- Go to Setup and search for Routing Configurations.
- Click New.
- Enter AI Service Agent Routing as the routing configuration name.
- Set a routing priority that matches your support model.
- Set the unit of capacity for each messaging conversation.
- Save the routing configuration.
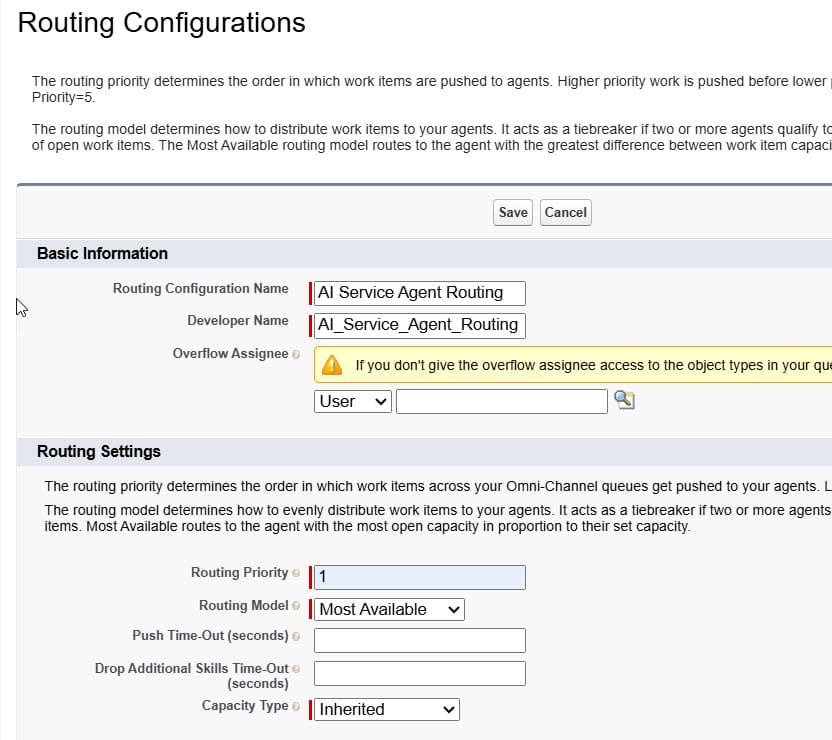
For a team of five support representatives, I normally start with conservative capacity. For example, let an agent handle two active messaging conversations instead of five. You can increase capacity after reviewing response times and customer satisfaction.
For a full setup explanation, see how to create a routing configuration in Salesforce.
Next, create the fallback queue.
- Go to Setup and search for Queues.
- Click New.
- Name the queue Technical Support – AI Escalations.
- Add the users, roles, or public groups that should receive escalated conversations.
- Associate the queue with the required messaging or service channel.
- Save the queue.
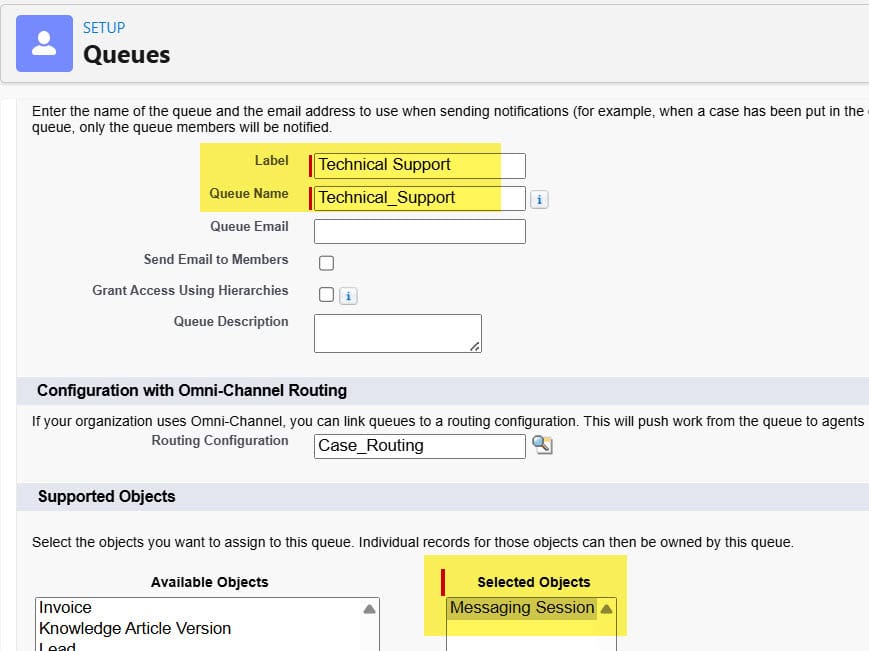
The fallback queue protects the customer experience. When no specifically skilled agent is available, Salesforce can still route the conversation to a monitored group instead of leaving the customer without help.
Create an Inbound Omni-Channel Flow
An Inbound Omni-Channel Flow controls what happens when a new Messaging conversation enters Salesforce.
You use it to connect the customer’s message to the AI service agent and define what happens when the conversation needs a human.
- Go to Setup and search for Flows.
- Click New Flow.
- Select Omni-Channel Flow.
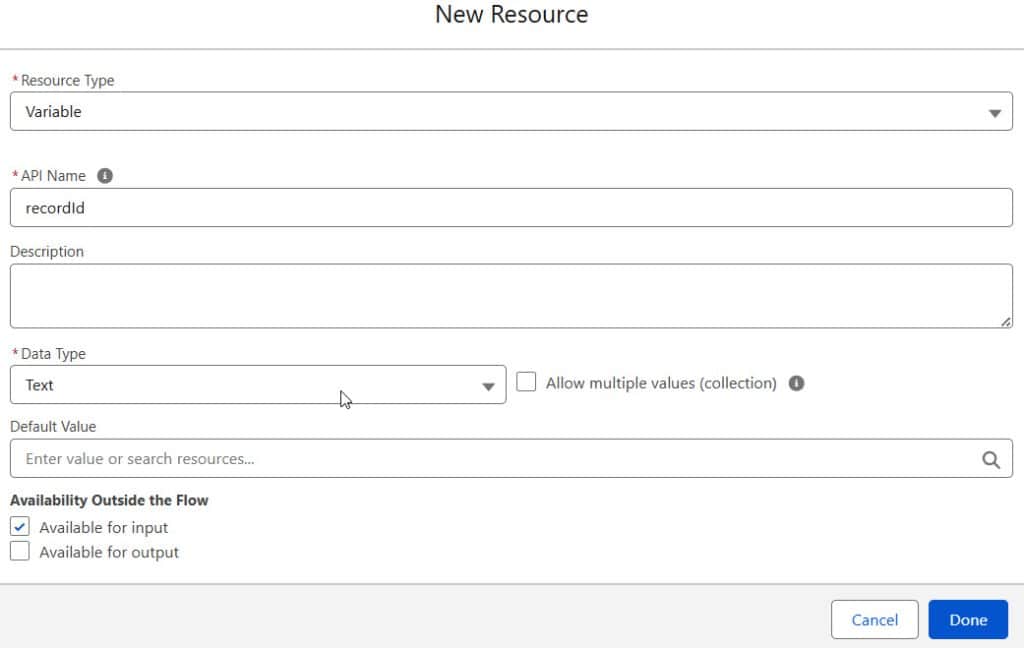
- Create an input variable for the Messaging Session record ID:
- Click New Resource.
- Select Variable.
- Enter recordId as the API name.
- Select Text as the data type.
- Select Available for input.
- Click Done.
- Add the Route Work element onto the canvas.
- Select the Messaging Session recordID variable.
- Choose your Agentforce Service Agent as the routing destination.
- Select Service Agent Messaging Routing as the routing configuration.
- Select Service Agent Fallback Queue as the fallback queue.
- Save the flow with a name such as Route Messaging to Service Agent.
- Click Activate.
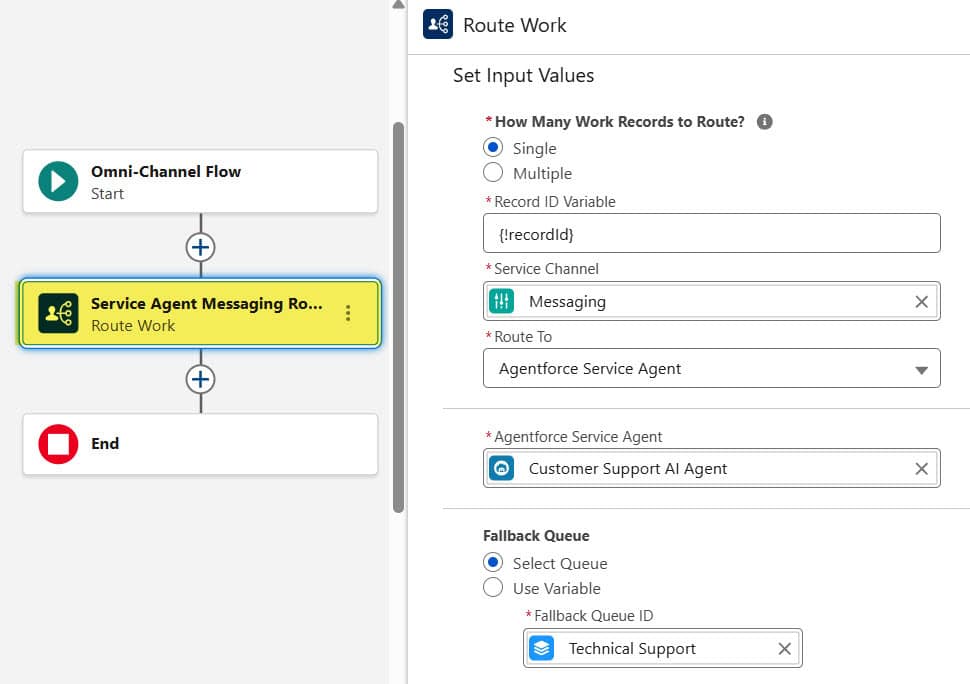
The flow is the bridge between incoming website messages and your AI agent. It also gives you a controlled escalation path when the AI agent cannot resolve the issue.
You can learn more about this design in the guide on Salesforce Agentforce inbound Omni-Channel flows.
Enable Digital Experiences and Create a Community Site
Your AI Service Agent needs a public or authenticated digital location where customers can start a conversation. In this example, we will use an Experience Cloud community site.
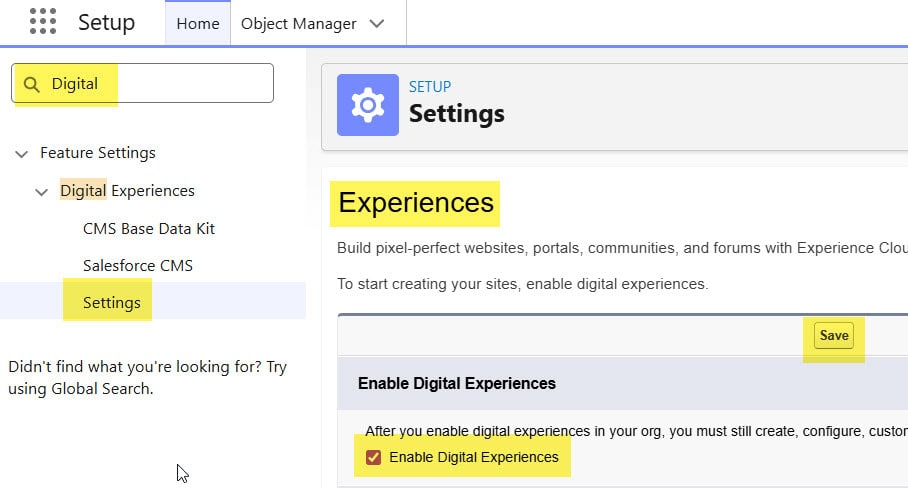
- Go to Setup.
- Search for Digital Experiences.
- Enable Digital Experiences if Salesforce has not enabled it already.
- Enter a domain name for your Experience Cloud sites.
- Click Save.
- Go to All Sites.
- Click New.
- Select a site template that fits your support portal.
- Enter the site name and URL.
- Click Create.
If you need to create a customer site from scratch, use this guide on creating a community in Salesforce Lightning.
Create a Messaging Channel in Salesforce
Now create the messaging channel:
- Go to Setup and search for Messaging Settings.
- Click New Channel.
- Select the supported web or embedded messaging option.
- Name it Customer Community Messaging.
- Connect the channel to your inbound Omni-Channel flow.
- Save and activate the channel.
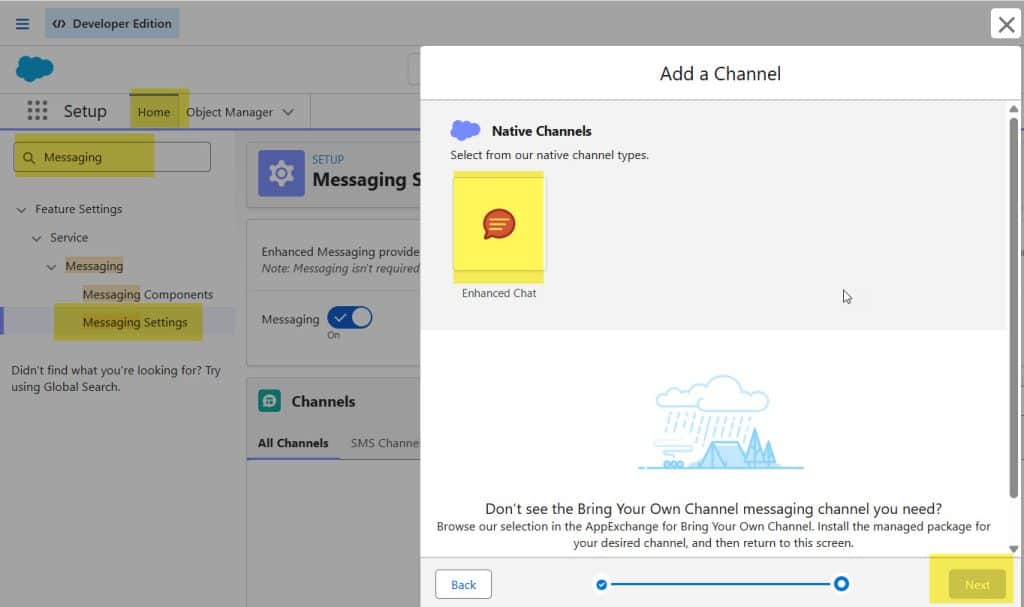
This channel lets Salesforce recognize messages that come from your community site. Without it, the agent and routing flow cannot receive visitor messages from the embedded deployment.
Create an Embedded Service Deployment
An Embedded Service Deployment places the messaging experience on your Experience Cloud site. This is the customer-facing widget that opens the conversation with your AI Service Agent.
- Go to Setup and search for Embedded Service Deployments.
- Click New Deployment.
- Enter a deployment name, such as Customer Community AI Support.
- Select the messaging channel you created.
- Select the Experience Cloud site where you want to show the agent.
- Configure the welcome message and conversation options.
- Save and activate the deployment.
- Open Experience Builder for the community site.
- Add the Messaging or Embedded Service component to the page.
- Select your new deployment.
- Publish the Experience Cloud site.
The message works because it tells visitors what the agent can do while making human support easy to access.

Add the Community Site CORS URL in Salesforce
CORS stands for Cross-Origin Resource Sharing. It is a browser security setting that controls which websites can send requests to Salesforce services.
If your messaging deployment runs on your Experience Cloud domain, add that site address to the CORS allowlist.
- Go to Setup and search for CORS.
- Open CORS Allowed Origins.
- Click New.
- Add your Experience Cloud site origin, such as https://*.my.site.com.
- Save the record.
Add only the exact trusted domain. Do not use broad or unnecessary origins in production.
Things to Keep in Mind
- Use customer-safe knowledge: Only connect articles and files that customers can safely receive through the AI agent.
- Set clear transfer rules: Define when the AI agent should hand off to people, especially for outages, billing disputes, and sensitive account requests.
- Control agent permissions: Use permission sets and sharing rules to limit what the agent and its supporting actions can access.
- Test guest-user behavior: Test the community as a real unauthenticated or external user, not only as a Salesforce administrator.
- Start with low capacity: Give human agents a manageable number of messaging conversations, then increase capacity based on real service metrics.
- Review conversation transcripts: Check failed answers, transfer reasons, and common questions every week to improve instructions, actions, and knowledge.
Frequently Asked Questions
How do I create an AI Service Agent in Salesforce?
Go to Setup, open Agentforce Agents, and create a new Service Agent. Then configure its instructions, topics, knowledge sources, and actions before activating it.
Can I deploy an Agentforce Service Agent on Experience Cloud?
Yes. You can connect the AI Service Agent to a Messaging channel, build an inbound Omni-Channel flow, and add an Embedded Service Deployment to your Experience Cloud site.
Does Agentforce transfer chats to human agents?
Yes. You can configure a transfer action that sends conversations to a queue through Omni-Channel. The routing configuration then assigns the conversation to an available human agent.
Why is my Agentforce messaging widget not showing on my community site?
First, confirm that you activated the embedded deployment and published the Experience Cloud site. Then check the Messaging component configuration, site access, browser console errors, and CORS allowed origins.
Do I need Omni-Channel for an AI Service Agent?
You need Omni-Channel when the AI agent must route or transfer conversations to human agents. If your agent only answers self-service questions, you may not need a human-routing configuration.
Can an Agentforce Service Agent create a Case?
Yes. Create an approved Flow or other action that collects the required details and creates a Case. Keep the action focused, validate required information, and return the Case number to the customer.
Conclusion
You have now created an AI Service Agent in Salesforce, connected it to Omni-Channel routing, and deployed it to an Experience Cloud community site through Messaging.
Start with a narrow support use case, test every customer journey, and improve the agent from real conversation data. I hope you found this article helpful.
You May Also Like
- Configure Agentforce for customer service in Salesforce
- Set up Omni-Channel web chat in Salesforce
- Create a service channel in Salesforce
- Create a Case in Salesforce
- Agentforce best practices for Salesforce agents

Shubham is a Certified Salesforce Developer with technical skills for Building applications using custom objects, approval processes, validation rules, Salesforce flows, and UI customization. He is proficient in writing Apex classes, triggers, controllers, Apex Batches, and bulk load APIs. I am also familiar with Visualforce Pages and Lightning Web Components. Read more about me.