
If your Salesforce org is still using Process Builder automations, it’s important to migrate them to Flow Builder as soon as possible.
Salesforce recommends using Flow Builder because it is more powerful, flexible, and the future of Salesforce automation.
Salesforce ended support for Process Builder on December 31, 2025. This means Salesforce no longer provides new updates, bug fixes, or official support for Process Builder.
As a result, existing Process Builder automations may encounter issues in future Salesforce releases.
To help users migrate from Process Builder to Flow, Salesforce provides a tool called Migrate to Flow.
This tool can automatically convert many Process Builder automations into Salesforce Flows, reducing manual work and saving time.
In this guide, we will cover the following topics:
- What the Migrate to Flow tool is and how it works
- Which automations it supports (and which it doesn’t)
- A complete step-by-step walkthrough — migrating both a Process Builder process and a Workflow Rule
- What to do after the migration (this part is just as important)
- Common mistakes and how to avoid them
- What to do when the tool can’t migrate something automatically
Let’s get started.
What Is the Migrate to Flow Tool?
The Migrate to Flow tool is a built-in Salesforce Setup tool that helps you convert existing Process Builder processes and Workflow Rules into Flow Builder automations.
Instead of rebuilding the automation manually, Salesforce automatically creates an equivalent Flow for you.
The tool is available in Salesforce Setup, and users with System Administrator access can use it.
Using this tool, you can:
- Migrate a Process Builder process into a Record-Triggered Flow
- Migrate a Workflow Rule into a Record-Triggered Flow or a Fast Field Update Flow, depending on the automation logic
The migration tool can handle many standard automation use cases automatically, saving development time and effort.
However, some complex logic or unsupported features may still require manual changes after the migration.
Before You Start: Do This Audit First
Before using the Migrate to Flow tool, don’t start migrating all Process Builders and Workflow Rules at once.
Migrating everything without proper planning can create issues in your Salesforce org and may break existing automations.
Instead, spend some time reviewing your current automation setup before starting the migration. Even 30 minutes of preparation can help you avoid problems later.
1. Check All Active Process Builder Processes
Go to: Setup → Quick Find → Process Builder
In the Process Builder page, check the Status column and identify all processes marked as Active. These are the automations currently running in your Salesforce org and should be reviewed before migration.
2. Check All Active Workflow Rules
Go to: Setup → Quick Find → Workflow Rules
Filter the Workflow Rules by Status = Active to see all active Workflow Rules currently being used in the org.
Review these rules carefully before starting the migration process.
3. Document the Details of Each Automation
For every active Process Builder process or Workflow Rule, document the following details:
- Which Salesforce object does the automation run on?
- What are the entry criteria or conditions?
- What actions does the automation perform?
- Does it contain any scheduled or time-based actions?
- Does it call another Flow, Apex class, or any external automation?
You can use a simple spreadsheet to track this information. Having a clear understanding of your existing automation setup will make the migration process easier and help you avoid missing important logic.
4. Start with Simple Automations First
Do not begin with complex automations. Start by migrating simple Process Builders or Workflow Rules that have:
- Only one criteria condition
- One or two actions
- No scheduled actions or complex logic
This helps you understand how the Migrate to Flow tool works before moving to more advanced automations.
What the Migrate to Flow Tool Supports in Salesforce
Here’s what the Migrate to Flow tool can and cannot handle based on Salesforce’s official documentation.
For Salesforce Process Builder Processes:
The tool fully supports these action types (they migrate cleanly with no extra work):
- Record Update
- Record Create
- Invoke Flow
- Invoke Apex
- Email Alert
These action types are partially supported; they migrate, but you’ll need to do some manual configuration inside Flow Builder afterward:
- Post to Chatter
- Quick Action
- Submit for Approval
- Send Custom Notification
- Send Surveys
The tool does not support these Process Builder scenarios at all:
- Custom event-triggered processes
- Custom invocable type processes
- Processes that contain custom metadata types in criteria
- Criteria that use field traversals (referencing a field from a related object, like Opportunity.Account.Industry)
- Processes with recursion (processes that trigger themselves — they partially migrate but need manual testing)
- Cross-object formula references
If your process falls into any of these unsupported categories, you’ll need to rebuild it manually in Flow Builder. I’ll cover how to approach that at the end of this guide.
For Salesforce Workflow Rules:
The tool supports:
- Field-based criteria
- Field updates
- Email alerts
- Outbound messages
- Time-dependent workflow actions
- Rule criteria formulas set to “true”
The tool does not support Workflow Rules that use:
- Tasks (you’ll need to manually create these using a Create Records element in Flow)
- Fields on related records in the criteria
- Record types
- The does not contain, includes, or excludes operators on text/picklist fields
- Relative date values like TODAY or NEXT WEEK
- Global variables
- Multiple currencies
Steps: Migrating a Process Builder Process to Flows
Let’s understand the migration process with a real Salesforce example.
In this example, we will migrate a Process Builder process that runs on the Opportunity object. The process triggers when:
- The Opportunity Stage is set to Closed Won
- The Amount is greater than 500
When these conditions are met, the automation posts a Chatter message on the Opportunity record.
We will use the Migrate to Flow tool to convert this Process Builder automation into a Record-Triggered Flow.
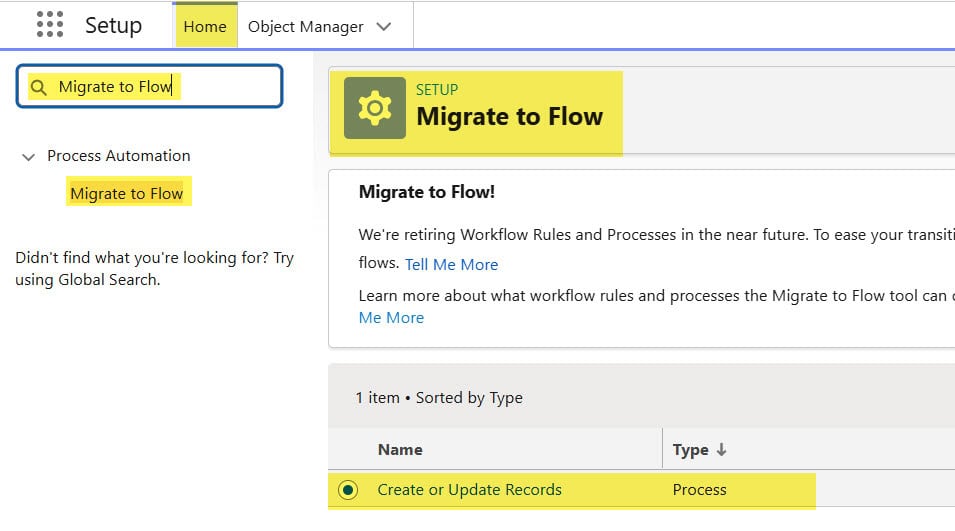
Step 1 — Open the Migrate to Flow Tool
Go to: Setup → Quick Find → Migrate to Flow
When the Migrate to Flow option appears under the Process Automation section, click on it.
The migration page contains two tabs:
- Processes
- Workflow Rules
To migrate a Process Builder automation, open the Processes tab.
Here, Salesforce displays a list of all Process Builder processes available in your org, including both active and inactive processes.
Step 2 — Select the Process You Want to Migrate
Find the Process Builder process you want to migrate, then select it with the radio button next to the process name.
In this example, we are selecting the Opportunity Win Notification process.
After selecting the process, the Migrate to Flow button becomes active in the top-right corner of the page. Click the button to start the migration process.
Step 3 — Choose Which Criteria to Migrate
Now, it will show the pop-up window where it will show follows options:
- Criteria Name: This means your conditional statement, which is present in your process builder. If you want all criteria to be left out of the migration, don’t select them. We can select the criteria that we want in the flow builder.
- Migratable: Let’s say you have complex business logic in your process builder that is currently not converted to Lightning Flow. It will show the ‘No‘ option in the migratable column; otherwise, display the ‘Yes‘ option.
- Schedule Action: If you added any schedule action in the process builder, it will show up here; we haven’t added any.
- Evaluation Next: We don’t have an evaluation, so it will display the ‘No’ option.
Then click on the Migrate to Flow button.

Step 4 — Review the Result Screen
After the migration process is completed, Salesforce displays a confirmation screen showing:
- The name of the newly generated Flow (usually something like “[Process Name] – Migrated Flow”)
- Two action buttons:
- Test in Flow Builder
- Switch Activations
At this stage, do not click Switch Activations immediately.
First, click Test in Flow Builder to review and test the migrated Flow before activating it in your Salesforce org.

Step 5 — Review the Generated Flow in Flow Builder
When you click Test in Flow Builder, Salesforce opens the migrated Flow in a new tab. Before activating the Flow, review it carefully to make sure everything was migrated correctly.
Check the following parts of the Flow:
1. Review the Start Element
Open the Start element and verify these settings:
- The correct Salesforce object is selected (Opportunity in this example)
- The trigger condition is correct, such as:
- A record is created
- A record is updated
- or both
- The entry conditions match the original Process Builder criteria
2. Review the Decision Element
The Decision element in Flow usually represents the criteria logic from your Process Builder.
Check that:
- All conditions are migrated correctly
- The logic matches the original Process Builder process exactly
3. Review the Action Elements
Open each Action element and verify:
- All actions are present
- Field updates, email alerts, Chatter posts, or other actions are configured correctly
- No action is missing after migration
4. Optimization Tip
In the Start element, scroll to the Optimize the Flow for section.
If the Flow only updates fields on the same triggering record and does not create or update other records, choose: Fast Field Updates
This creates a before-save Flow, which is faster and more efficient than an after-save Flow.
This is an important improvement because Process Builder always runs after the record is saved, whereas Flow lets you use better-performing before-save automation.
5. Verify Chatter Actions Carefully
If the migrated Flow contains a Post to Chatter action, open that element and manually verify:
- The Chatter message text
- The recipient or target record configuration
Some Chatter actions may require manual review after migration to ensure they work correctly.
Step 6 — Save, Debug, and Activate the Flow
If you make any changes to the migrated Flow, such as changing the optimization type to Fast Field Updates, save the updated version of the Flow.
To do this:
- Click Save As New Version
- Enter a version name or description
- Click Save
Click the Debug button in the top toolbar. A panel opens on the right side where you can:
- Choose to run the flow as if a record was created or updated
- Enter the record ID of a test record in your sandbox
- Set field values to simulate specific conditions
Once your testing passes, click Activate in the top toolbar of Flow Builder. Click Activate again in the confirmation modal.
Your new flow is now live in the sandbox.

Steps: Migrate a Workflow Rule to Salesforce Flows
Migrating a Workflow Rule is similar to migrating a Process Builder process, but you may notice a few differences in the options and Flow configuration.
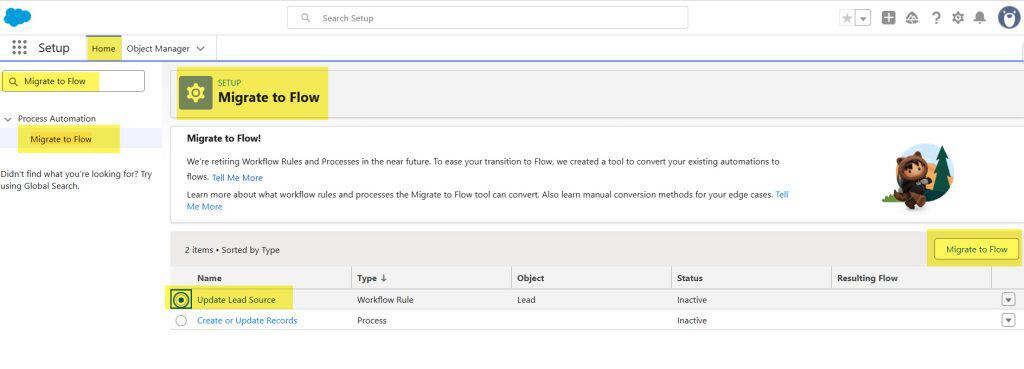
Step 1 — Open Migrate to Flow and Click the Workflow Rules Tab
Go to: Setup → Quick Find → Migrate to Flow. Then open the Workflow Rules tab. Here, Salesforce displays all active Workflow Rules available in your org.
Select the Workflow Rule you want to migrate by clicking the radio button next to it, and then click Migrate to Flow.
Unlike Process Builder migration, Workflow Rule migration does not include a separate criteria selection step because Workflow Rules have a simpler automation structure. Salesforce migrates the entire Workflow Rule directly into a Flow.
Step 3 — Review the Result
After the Workflow Rule migration is completed, Salesforce displays a confirmation screen similar to the Process Builder migration screen.
You will see two options:
- Test in Flow Builder
- Switch Activations
Before activating the migrated Flow, open it using Test in Flow Builder and review the configuration carefully.
One important difference with Workflow Rule migration is that if the original Workflow Rule only performed field updates (without email alerts, tasks, or outbound messages), Salesforce automatically creates a Fast Field Updates Flow, also known as a before-save Flow.
This is actually a performance improvement compared to the original Workflow Rule because before-save Flows run faster and use fewer system resources.

Step 4 — Test and Activate
After migrating the Workflow Rule, follow these important steps before using the new Flow in production:
- Click Test in Flow Builder and carefully review the migrated Flow
- Use the Debug option and test different scenarios in your Salesforce sandbox
- Test the Flow using real records to confirm the automation works correctly
- Activate the migrated Flow after successful testing
- Deactivate the original Workflow Rule to avoid duplicate automation execution

After Migration: 4 Things You Should Always Do
Many users complete the migration, activate the Flow, and think the work is finished. However, there are a few important steps you should always follow after every migration.
1. Check for Duplicate Automation
Review your Salesforce org for other automations running on the same object.
For example, if multiple Flows, Process Builders, or Workflow Rules are running on the Opportunity object, check whether they can be combined into a single Flow. This helps reduce automation conflicts, duplicate actions, and performance issues.
2. Monitor the Flow for Errors
After activating the migrated Flow in production, monitor it closely for the next few days.
Go to: Setup → Flows
Also review:
- Flow Error Emails
- Paused and Failed Flow Interviews under Setup
These areas help you identify any Flow execution errors or failed automation scenarios after migration.
3. Inform Your Team
If the automation affects records used by other users in your Salesforce org, inform your team about the migration.
Even small changes in automation behavior can impact users, so it is a good practice to communicate the update before or after deployment.
4. Update Your Documentation
Update your Salesforce admin or technical documentation to reflect the new automation setup.
Include details such as:
- Flow name
- Salesforce object name
- Trigger conditions
- Actions performed by the Flow
Also, mention that the automation has been migrated from Process Builder or Workflow Rule to Flow Builder.
Common Mistakes to Avoid During Migration
1. Migrating Directly in Production Without Testing
Although the Migrate to Flow tool is available in production orgs, avoid using it directly in production for the first migration.
Always perform the migration and testing in a Sandbox org first. This helps you identify automation issues before they affect live business data and users.
2. Leaving Both Automations Active
After activating the migrated Flow, make sure to deactivate the original Process Builder process or Workflow Rule.
If both automations remain active, duplicate actions may run, such as:
- Duplicate emails
- Duplicate field updates
- Multiple Chatter posts
- Repeated record updates
Always confirm the migrated Flow works correctly before disabling the old automation.
3. Not Reviewing Post to Chatter and Quick Action Elements
Some actions, such as:
- Post to Chatter
- Quick Actions
may require manual verification after migration.
Always open the migrated Flow in Flow Builder and review these elements carefully. Verify:
- Message text
- Recipient configuration
- Action settings
Do not assume everything is automatically configured correctly.
4. Ignoring the “Optimize for Fast Field Updates” Option
If your Flow only updates fields on the triggering record, use:
Optimize the Flow for → Fast Field Updates
This creates a before-save Flow, which:
- Runs faster
- Uses fewer Salesforce resources
- Avoids extra database updates
Do not keep the default after-save configuration unless your Flow actually requires after-save actions.
5. Migrating Time-Based Automations Without Proper Planning
If your Process Builder or Workflow Rule contains scheduled actions (time-dependent actions), review the migration notes carefully.
Important points:
- Each criteria group with scheduled actions should usually be migrated into its own separate Flow
- Always migrate and test within the same Salesforce org
Avoid migrating to another intermediate org and then deploying later because pending scheduled actions may not transfer correctly during deployment.
Frequently Asked Questions
Is the Migrate to Flow tool free to use?
Yes. It’s built into Salesforce Setup and available to all orgs at no extra cost.
Does the tool work for both Process Builder and Workflow Rules?
Yes. The tool has two tabs — one for Process Builder processes and one for Workflow Rules.
What if my process has criteria that use fields from related objects (field traversals)?
The tool doesn’t support this. You’ll need to rebuild the automation manually in Flow Builder using Get Records to retrieve the related record and then a Decision element to evaluate the field value.
Can I undo a migration if something goes wrong?
The tool doesn’t delete your original process or workflow rule — it just creates a new flow. So if the migrated flow doesn’t work correctly, you can deactivate it and reactivate the original process. Nothing is irreversible as long as you haven’t deleted the source automation.
You may like to read:
- Before Insert Validation in Salesforce Trigger
- Before vs After Triggers in Salesforce: When to Use & Why
- Display Toast Messages Using Salesforce Flow (Native Show Toast Action)
- Change Display Format of Auto-Number Field on Existing Records in Salesforce

I am Bijay Kumar, the founder of SalesforceFAQs.com. Having over 10 years of experience working in salesforce technologies for clients across the world (Canada, Australia, United States, United Kingdom, New Zealand, etc.). I am a certified salesforce administrator and expert with experience in developing salesforce applications and projects. My goal is to make it easy for people to learn and use salesforce technologies by providing simple and easy-to-understand solutions. Check out the complete profile on About us.