
When I work with service teams that want faster automation, the first problem is rarely data. It is usually structure.
The team wants one AI agent to handle common requests, but the real work needs different skills, different instructions, and different actions behind the scenes.
That is exactly where Agentforce Script Builder becomes useful. Instead of stuffing every rule into one agent, you can create a main agent, assign focused subagents, and give each one clear instructions and actions for a specific job.
In this guide, I will show you how to create an AI Agent with Agentforce Script Builder in Salesforce, assign subagent instructions and actions, and set it up in a way that stays clean, scalable, and easy to maintain.
Prerequisites
Before you build the agent, make sure your org is ready. In most projects, I check this first because the agent setup can look correct while the real blocker is access, data, or missing actions.
You should have:
- Agentforce enabled in the org.
- Access to create and manage agents.
- The right profile or permission set access for the setup work.
If your org still needs the base setup, read Create and deploy Agentforce for Service in Salesforce and Agentforce for Sales, Service, and Employee Support.
For access planning, these articles on roles and profiles in Salesforce and Salesforce profiles and permission sets help avoid permission issues later.
Real Business Scenario:
Let’s use a real Service Cloud scenario. A support team handles around 500 cases every month. Customers chat with an AI agent to ask for updates, request help, or confirm their issue is resolved.
When the customer says something like “please close my case,” the agent should update the case status from Working or Escalated to Closed.
Create an AI Agent With Agentforce Script Builder in Salesforce
First, we will create the Agentforce Employee Agent in Salesforce using Agentforce Script Builder.
Step 1: Open Agentforce Builder
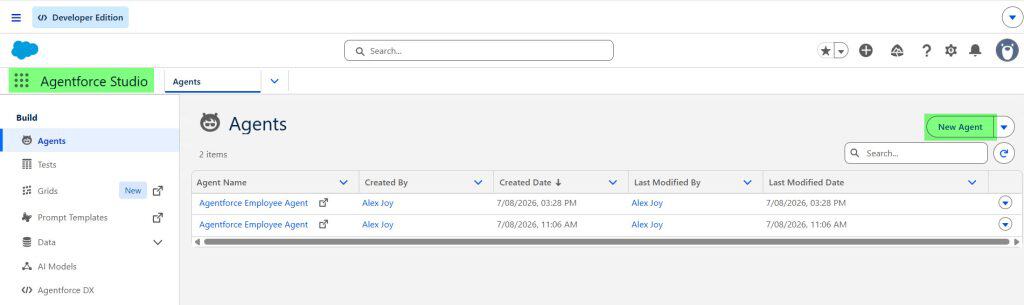
- Navigate to: App Launcher → Agentforce Studio → Agents
- Click New Agent.
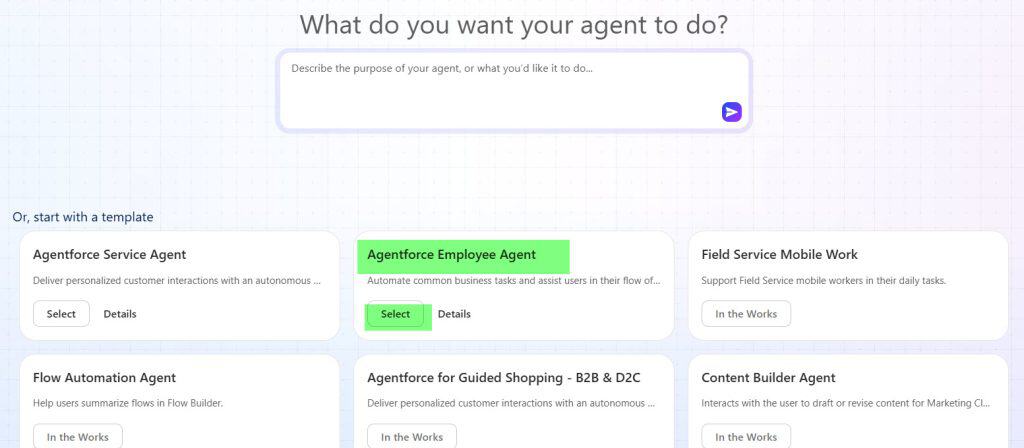
- Select the template that best fits your use case. For this example, we’ll create an Agentforce Employee Agent.
Step 2: Enter Agent Information
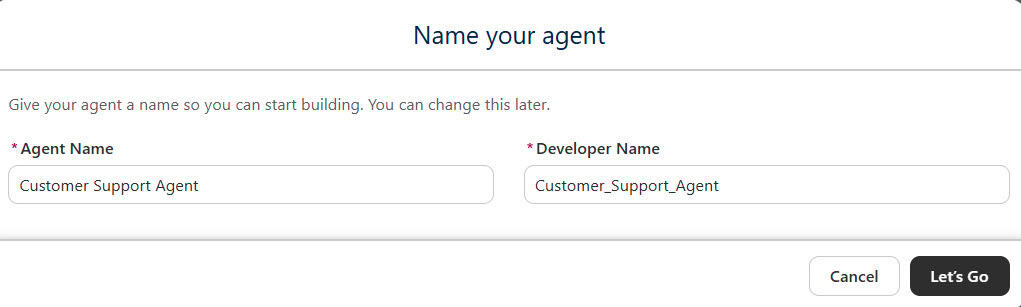
Provide the following information:
| Field | Example |
|---|---|
| Agent Name | Customer Support Agent |
| Developer Name | Customer_Support_Agent |
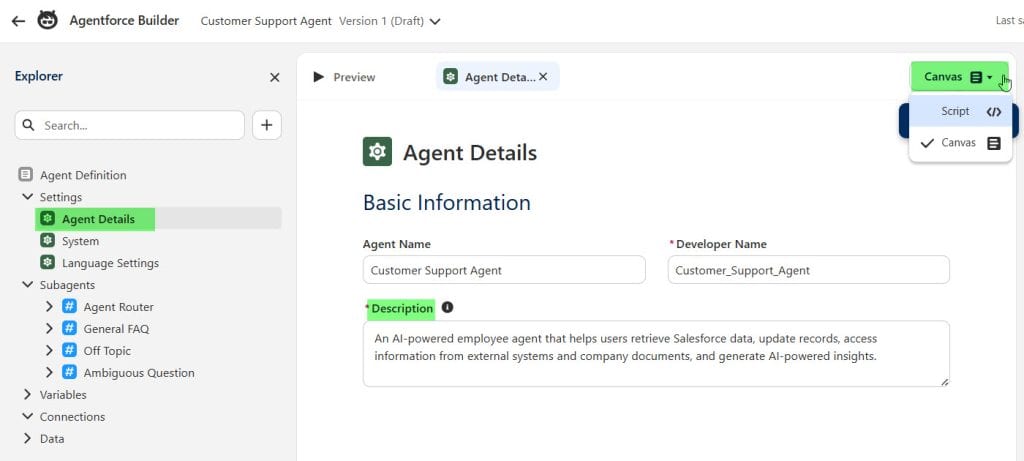
After that, provide the description for the agent. Keep the description clear because Salesforce uses it to understand the agent’s purpose.
Step 3: Configure the System Messages
Now define what the AI agent should do.
- Open the Agentforce Builder.
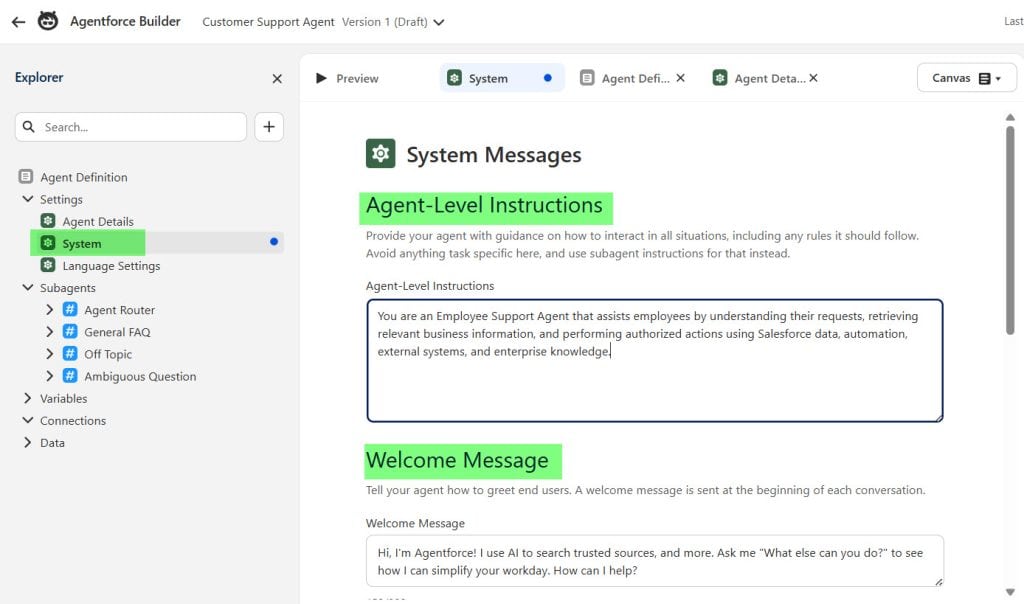
- In the Explorer panel, navigate to Agent Definition → Settings → System.
- In the Agent-Level Instructions section, enter the instructions that define your Employee Support Agent’s role and behavior.
- Scroll down to the Welcome Message section.
- Enter a welcome message that users will see when they start a conversation with the agent.
- Click Save to save the system message configuration.
Save the Employee Support Agent to apply all the changes made so far. Next, we’ll create the required subagents, define their instructions, and configure the necessary actions for each subagent.
Pro Tip: In my experience, the biggest mistake is giving the main agent too many detailed instructions. I keep the parent agent focused on routing and orchestration, and I move task-specific logic into subagents.
Create Subagents for Agentforce AI Agents in Salesforce
This topic fits best as a step-by-step guide because the user is trying to build and configure a working solution, not just understand a feature.
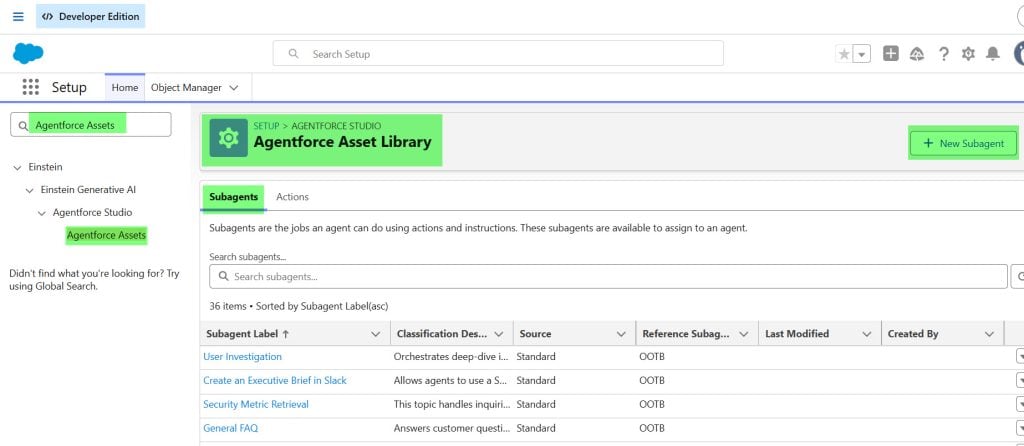
- From Setup, search for and select Agentforce Assets.
- Select the Subagents option.
- Click the + New Subagent button.
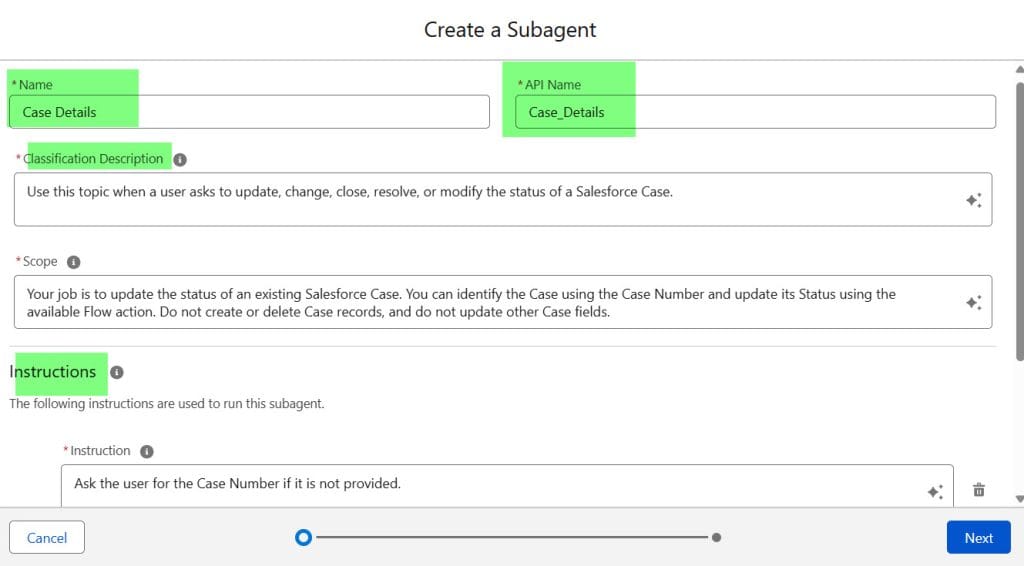
- Enter a Name for the subagent.
- Specify a unique API Name (it is automatically populated based on the name, but you can modify it if needed).
- In the Classification Description field, describe the type of user requests this subagent should handle.
- In the Scope field, define the responsibilities and limitations of the subagent, including what actions it can and cannot perform.
- Under Instructions, add the guidelines that the subagent should follow while interacting with users.
- Click Next and Finish to continue configuring the subagent.
If you want more ideas on agent structure, these posts are relevant: building blocks of agents in Salesforce and best practices for implementing agents in Salesforce Agentforce.
Create Action for Agentforce AI Agents in Salesforce
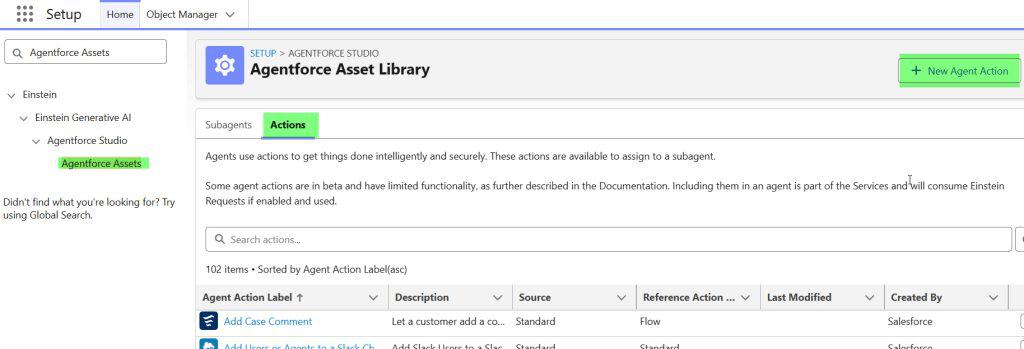
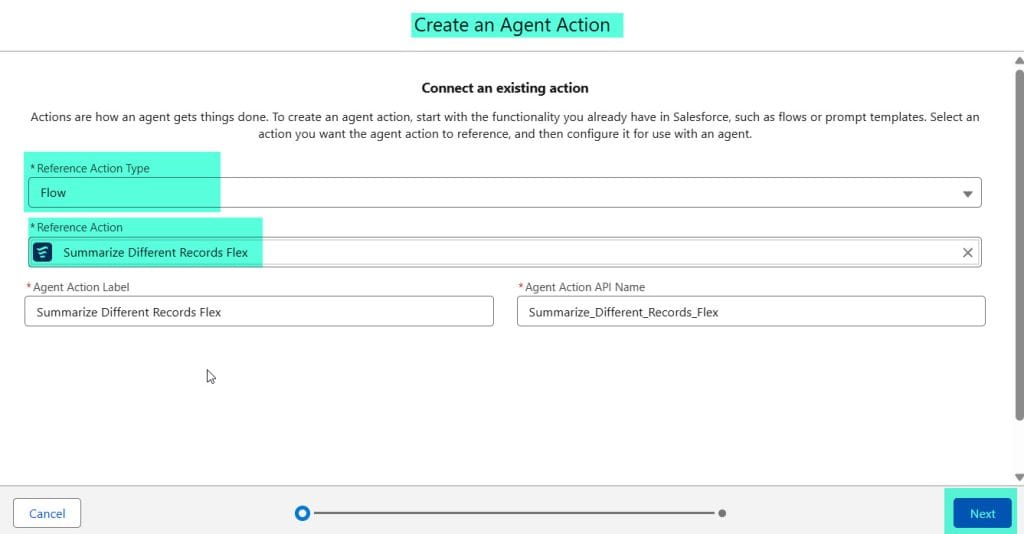
- Open the Actions tab in the Agentforce Asset Library.
- Click New Agent Action.
- Select the Reference Action Type (for example, Flow).
- Choose the existing Reference Action that you want the agent to use.
- Enter an Agent Action Label to specify the display name of the action.
- Verify or update the Agent Action API Name if required.
- Click Next to continue configuring the Agent Action.
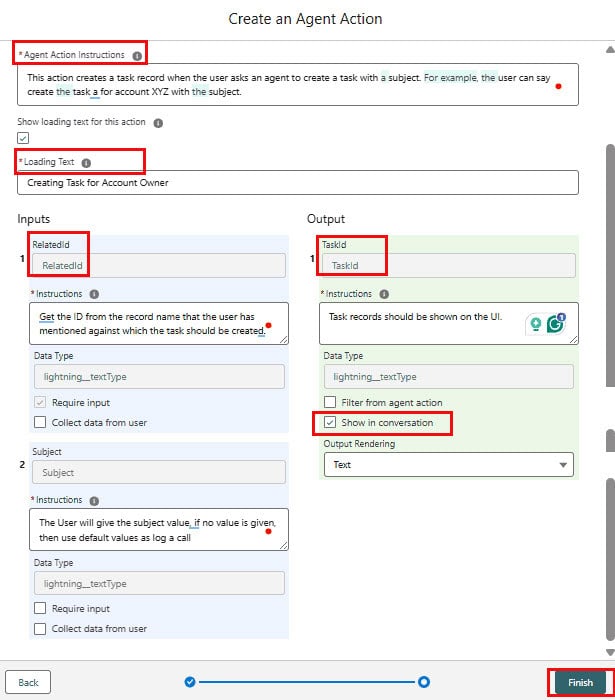
- Enter Agent Action Instructions to describe when the agent should use this action and what it is expected to do.
- (Optional) Enable Show loading text for this action and provide a custom Loading Text to display while the action is running.
- Configure the Input parameters by adding instructions for each input and marking any required fields.
- Configure the Output parameters and enable Show in conversation for the outputs that should be displayed to the user.
- Click Finish to create the Agent Action.
Add Subagents and Actions to Agentforce AI Agents in Salesforce
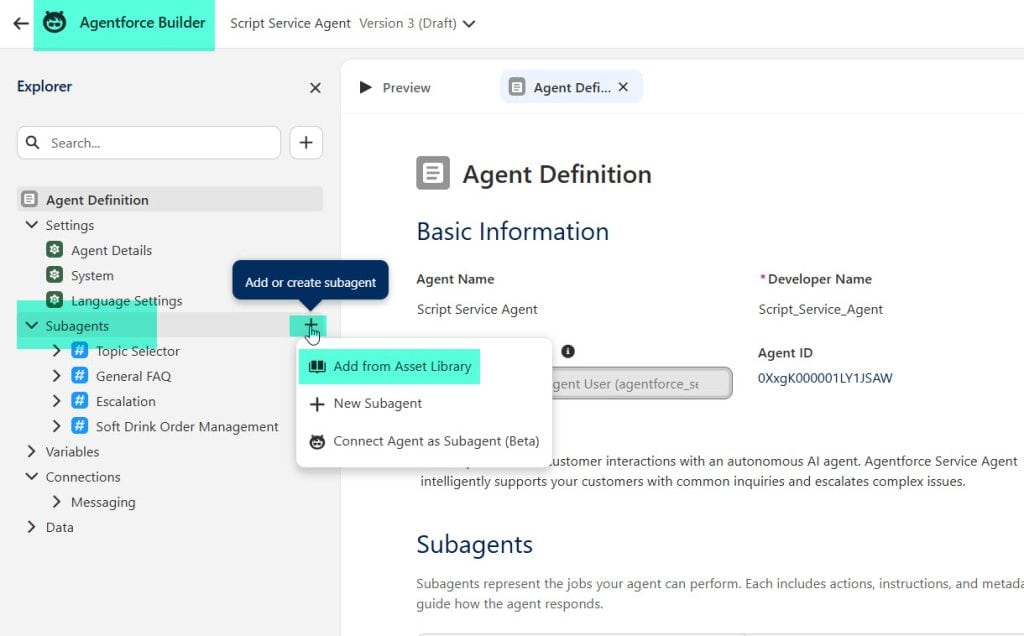
- Open the Agentforce Builder and navigate to the Subagents section.
- Click the + (Add or create subagent) icon.
- Select Add from Asset Library.
- Choose the subagent you created from the Asset Library.
- Click Add to assign the subagent to your agent.
- Repeat the same steps to add additional subagents if required.
- Click Save to apply the changes to the agent.
If your org is already using prompt-based logic, you may also want to review prompts and Prompt Builder in Salesforce Agentforce and assign a prompt template to an agent in Salesforce.
- Click Save to apply the changes.
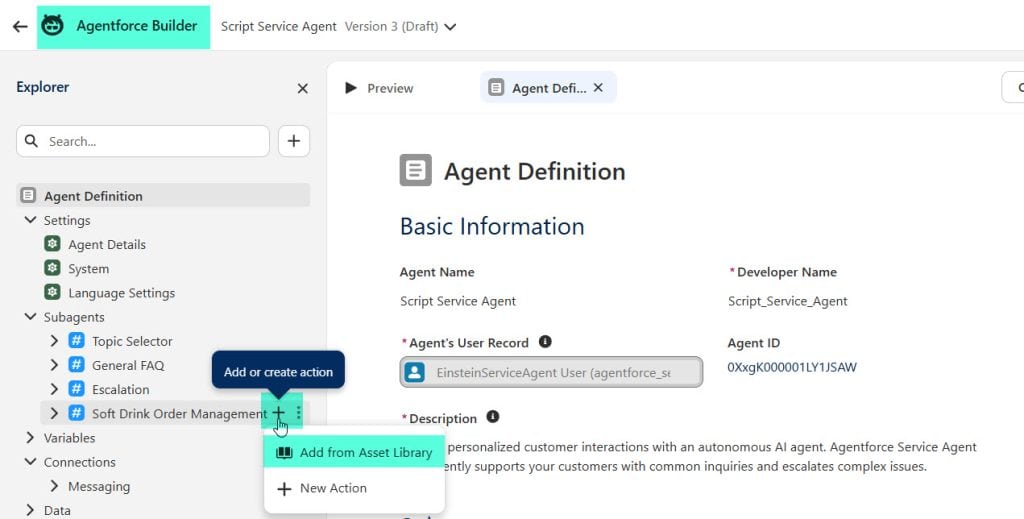
- In Agentforce Builder, expand the required Subagent.
- Click the + (Add or create action) icon next to the subagent.
- Select Add from Asset Library.
- Choose the Agent Action you created from the Asset Library.
- Click Add to assign the action to the selected subagent.
This is the part that usually decides whether the implementation feels smart or confusing. Good instructions are short, specific, and tied to a real job.
Common Action Examples for Agentforce Agents
In this same support org example, I would assign actions like these:
- Order Tracking Subagent → action to fetch order status.
- Refund Policy Subagent → action to check refund eligibility.
- Case Escalation Subagent → action to create or update a case.
- Product FAQ Subagent → action to search approved internal knowledge or data sources.
Pro Tip: In my experience, the best test prompts come from real support tickets. I copy the wording customers actually use because that exposes weak routing faster than polished demo prompts.
Things to Keep in Mind
- Keep subagents narrow: One subagent should solve one business problem well, not three unrelated ones.
- Use actions for live data: Do not rely on instructions alone when the answer depends on current Salesforce records.
- Watch permissions closely: The agent may be configured correctly, but missing object, field, or action access will still break the experience.
- Avoid duplicate logic: Do not repeat the same business rule in the main agent, subagent instructions, and Flow unless there is a real reason.
- Test escalation paths: Human handoff, fallback messaging, and exception handling matter as much as the core happy path.
- Document ownership: Decide who owns prompts, actions, and automation updates before the solution goes live.
Frequently Asked Questions
How do I create an AI agent using Agentforce Script Builder in Salesforce?
Start by creating the main Agentforce agent in Setup, then open Script Builder to define the conversation flow. Add intent-based paths, create subagents for each major task, and connect those subagents to the right actions.
What are subagents in Agentforce?
Subagents are specialized agent components that handle a narrower task inside a larger AI conversation. They help keep instructions focused, improve accuracy, and make the solution easier to maintain.
How do I assign actions to an Agentforce subagent?
You assign actions from the agent configuration or script path where that subagent operates. In most orgs, the action comes from Flow, Apex, or an external integration, depending on the business need.
Should I use Flow or Apex for Agentforce actions?
I usually start with Flow when the logic is straightforward and admin-managed. I use Apex when I need more complex processing, tighter control, or advanced integrations.
Why is my Agentforce subagent giving inconsistent answers?
This usually happens when the instructions are too broad, the subagent owns too many tasks, or live data should have come from an action. Tighten the instruction scope and move business logic into actions where possible.
Can one main agent use multiple subagents in Salesforce?
Yes, and that is often the best design for real projects. One parent agent can route requests to different subagents based on the user’s intent, which keeps the experience more accurate and scalable.
Conclusion
Creating an AI agent with Agentforce Script Builder works best when you start with one main agent, break responsibilities into focused subagents, and connect each subagent to the right actions. Keep the setup simple, test every path with real business scenarios, and add complexity only when the basic routing and action logic are working well. I hope you found this article helpful.
You May Also Like
- Assign data library to Agentforce agent
- Greet Agentforce agent by name
- Salesforce Agentforce flow custom action agent
- Agentforce Script AI Agent Custom Action to Close Cases
- Introduction to model builder in Salesforce Agentforce
- Create an AI Service Agent with Agentforce Script in Salesforce

Shubham is a Certified Salesforce Developer with technical skills for Building applications using custom objects, approval processes, validation rules, Salesforce flows, and UI customization. He is proficient in writing Apex classes, triggers, controllers, Apex Batches, and bulk load APIs. I am also familiar with Visualforce Pages and Lightning Web Components. Read more about me.
